Swiss Madison SM-WC424 - Wall-Hung Concealed Tank System Manual
- Installation instructions manual (20 pages) ,
- Installation instructions manual (12 pages)
Advertisement
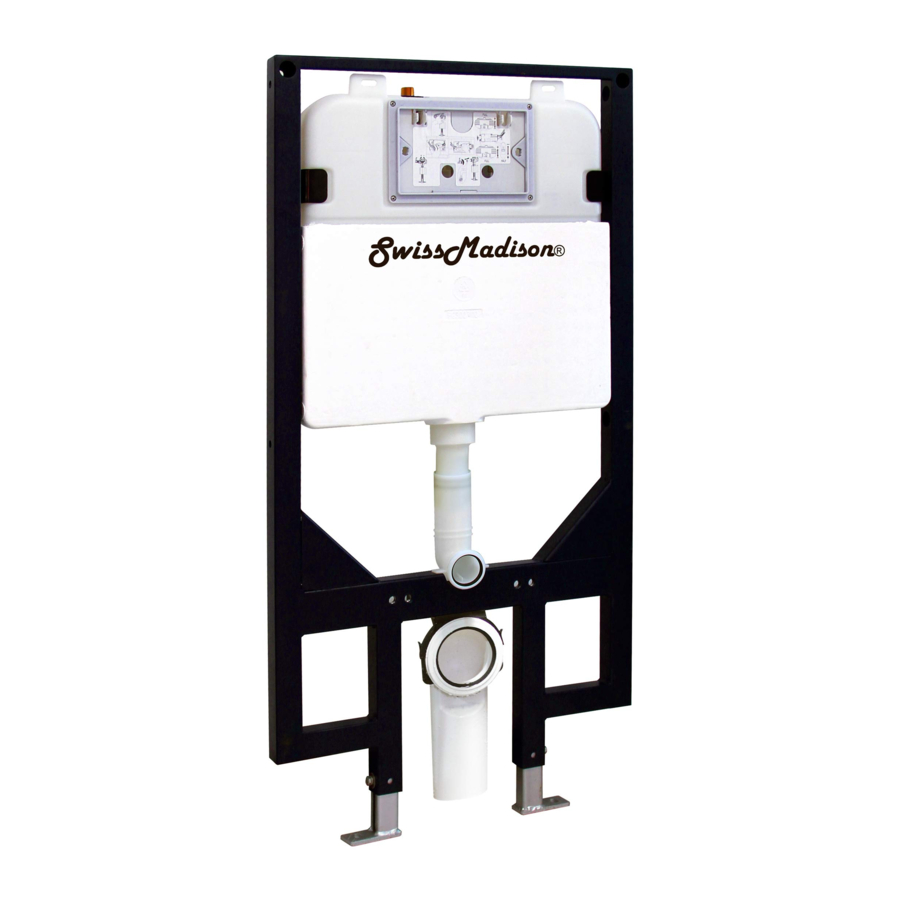
ROUGH DIMENSIONS
The step-by-step guidelines in the installation instructions are a general reference for installing a Swiss Madison Concealed Tank System. Should there be any discrepancies, Swiss Madison cannot be held liable.
It is recommended to install all Swiss Madison products by hiring a licensed professional

- Read the complete instruction manual before beginning installation.
- Confirm that your model will fit in intended location and plumbing fixtures are located where legally required before beginning installation.
- Not all drawings on this manual are drawn to scale. Please refer to the model chart.
- Two people are recommended to install and move this product.
- Steps depicted in this manual are based on having a cement board or tile backer board.
SUGGESTED TOOLS AND MATERIALS

NOTE: Specialized tools may be necessary to install a Swiss Madison Concealed Tank.
INSTALLATION INSTRUCTIONS


- Before fastening sides, you must first attach legs to framing. At this point it is possible to readjust your bowl rim to your desired height.
- L-shaped mounting brackets are for masonry applications.
- Fasten your frame into studs/framing using four mounting holes in the carrier frame (two on each side). It is recommended for framing installations to use 2 ¹⁄2" screws and 1 ¹⁄4" fender washers (needing four of each total).
- Be sure to screw carrier to wood framing flush across the front.


- When connecting to a 3" sewer line it is advised to drill a 3 5⁄8" hole before connecting the discharge pipe to the frame.
![]()
For a vertical discharge, leave bracket as shown below.
![]()
It is possible to offset the discharge pipe left or right. If offsetting is required, you must move the top bracket holding the discharge pipe to the back holes in the frame. This allows you to miss the carrier frame when connecting the necessary plumbing.
![]()
Use this mounting position for an offset installation.
![]()
- Depending on your installation it will either be a 4" x 3" or a 3" x 3" mechanical coupling.
![]()
*coupler not included, please consult your local plumber. ![]()
- Leave slotted end of threaded bolt outward for later adjustment.
![]()
Cover installation bolts with protective slip, do not remove slip until after toilet is in place. It is important to keep threads clean for later adjustment. - Install dry wall over carrier system in intended location.
![]()
![]()
- Find cutout template that was included with your carrier.
- Cut out the small marked holes (1) to align cutout with the threaded bolts.
- Ensure template is plumb.
![]()
- Align template up on your wall so the threaded bolts fit through the precut holes.
- Cut around the marked lines (2) to reveal pipe/actuator locations behind the drywall.
- Cut drywall to reveal where to install flush plate and attach plumbing.
![]()
NOTE: Swiss Madison is not responsible for any damage done to wall or carrier system. - Install mud guards into proper holes to ensure no debris enters pipes after sheet-rock has been cut.


- Hold the shutoff valve stationary while tightening your water connection.

- Install the locknut as shown.


- Once the water connection is made to the water shutoff valve, undo the other side of the hose. Next, turn valve on to flush out any debris before reinstalling to the actuator.


- Ensure roughing box is secure to keep debris from entering the tank.


![]()


Installing the Toilet
- Install pipes. Be sure to seal them thoroughly.
![]()
- With a ruler, against finished wall, on top of pipe, mark as shown.
![]()
- Remove pipes from wall and install into back of bowl. Make sure pipes are sealed thoroughly.
![]()
- With a ruler, against the back of the bowl, on top of pipe, mark as shown.
![]()
- Measure distance between both lines on pipes. Take measured distance, deduct from bald end of pipe and cut.
![]()
![]()
- After cutting, take file and remove all burrs. Try and bevel edge.
![]()
![]()
- With grease, sponge thoroughly to lubricate all ends.
![]()
- Before mounting bowl, measure thickness of china and mounting hardware to get approximate depth of threaded rods.
![]()
- Use slotted end of thread bolt to adjust in or out. Do not damage the thread.
![]()
- Install with mounting hardware and ensure toilet bowl is level.
![]()


Prior to Installation
- Read instructions thoroughly.
- Remove existing toilet.
- Be sure to properly bleed all air from the piping system, trapped air can cause damage to the flushing system and toilet bowl.
- Observe all local plumbing codes.
- Additional floor and wall preparations may be necessary to avoid damage to the product
- We recommend a professional contractor. Customer is responsible for any damage that may occur during installation.
- Swiss Madison recommends using a cement board or tile backer board for the wallboard backing, avoid gypsum board as it may compromise the load strength of the toilet installation.
- Avoid outside wall installations due to possible freezing.
General Recommendations: Read installation and maintenance instructions thoroughly before installation. Be sure to use proper tools and always wear proper personal safety accessories for your protection.
If you have any questions or concerns, please contact us directly at 1-434-MADISON (623-4766)
info@swissmadison.com
www.swissmadison.com
Share your pictures for a feature using #SwissMadison

Documents / Resources
References
Download manual
Here you can download full pdf version of manual, it may contain additional safety instructions, warranty information, FCC rules, etc.
Download Swiss Madison SM-WC424 - Wall-Hung Concealed Tank System Manual
Advertisement


Need help?
Do you have a question about the SM-WC424 and is the answer not in the manual?
Questions and answers