Advertisement
Quick Links
Advertisement

Related Manuals for Swiss Madison SM-WC424


Summary of Contents for Swiss Madison SM-WC424
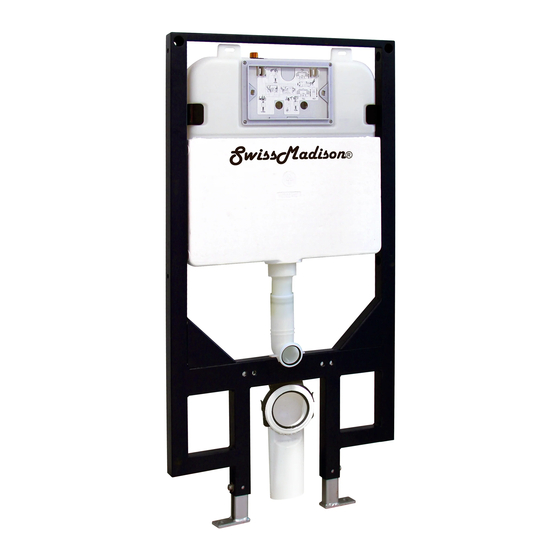
- Page 1 Wall-Hung Carrier System INSTALLATION INSTRUCTIONS ® w e l l m a d e f o r e v e r Residential Concealed In-Wall Toilet Tank Carrier System for Wall-Hung Toilet SM-WC424 @SwissMadison #WellMadeForever www.swissmadison.com | 1-434-623-4766 | info@swissmadison.com...
-
Page 2: Installation Instructions
· · The step-by-step guidelines in the installation instructions are a general reference. Should there be any discrepancies, Swiss Madison cannot be held liable. It is recommended to install all Swiss Madison products by hiring a licensed professional. · Read installation and maintenance instructions thoroughly before installing. Be sure to use proper tools and always wear proper personal safety accessories for your protection. - Page 3 WALL-HUNG CARRIER SYSTEM INSTALLATION INSTRUCTIONS Flush Actuator not included · Before fastening sides, you must first attach legs to framing. At this point it is possible to readjust your bowl rim to your desired height. · L-shaped mounting brackets are for masonry applications. A:...
- Page 4 WALL-HUNG CARRIER SYSTEM INSTALLATION INSTRUCTIONS · When connecting to a 3” sewer line it is advised · It is possible to offset the discharge pipe left to drill a 3 ” hole before connecting the or right. If offsetting is required, you must discharge pipe to the frame.
- Page 5 WALL-HUNG CARRIER SYSTEM INSTALLATION INSTRUCTIONS Depending on your installation it will either be a 4” x 3” or a 3” x 3” mechanical · Cover installation bolts with protective slip, do not coupling. remove slip until after toilet is in place. It is important to keep threads clean for later *coupler not included, please adjustment.
- Page 6 · Cut drywall to reveal where to install flush plate and attach plumbing. NOTE: Swiss Madison is not responsible for any damage done to wall or carrier system. — 5 —...
- Page 7 WALL-HUNG CARRIER SYSTEM INSTALLATION INSTRUCTIONS · Install the locknut as shown. · Hold the shutoff valve stationary while tightening your water connection. · Once the water connection is made to the water shutoff valve, undo the other side of the hose. Next, turn valve on to flush out any debris before reinstalling to the actuator.
- Page 8 WALL-HUNG CARRIER SYSTEM INSTALLATION INSTRUCTIONS · Ensure roughing box is secure to keep debris from entering the tank. — 7 —...
- Page 9 WALL-HUNG CARRIER SYSTEM INSTALLATION INSTRUCTIONS Installing the Toilet. · Remove pipes from wall and install into back · With a ruler, against finished wall, on top of · Install pipes. Be sure to seal them thoroughly. of bowl. Make sure pipes are sealed pipe, mark as shown.
- Page 10 Wall-Hung Toilet ® INSTALLATION INSTRUCTIONS w e l l m a d e f o r e v e r @SwissMadison #WellMadeForever www.swissmadison.com | 1-434-623-4766 | info@swissmadison.com...
-
Page 11: Required Parts
· · The step-by-step guidelines in the installation instructions are a general reference. Should there be any discrepancies, Swiss Madison cannot be held liable. It is recommended to install all Swiss Madison products by hiring a licensed professional. · Read installation and maintenance instructions thoroughly before installing. Be sure to use proper tools and always wear proper personal safety accessories for your protection. - Page 12 WALL-HUNG TOILET INSTALLATION INSTRUCTIONS 1. Install Tank Carrier System 2. Dry Fit Outlet Pipe and Inlet Pipe · Before toilet bowl installation, a wood frame and · Fully insert straight tube into cistern flushing outlet then connect pipe into discharge outlet. commercial or residential tank system is required.
- Page 13 WALL-HUNG TOILET INSTALLATION INSTRUCTIONS 5. Mount Toilet Bowl 6. Anchor Bowl · Apply lubricant to the joint surface on straight tube · Place part B onto the screw. and connecting pipe. · Mount the toilet bowl to the wall. C x2 D x2 B x2 B x2...
- Page 14 WALL-HUNG TOILET INSTALLATION INSTRUCTIONS TOILET SEAT INSTALLATION 2. Construct Hinges 1. Disassemble · Insert screw and nut into the hole on the hinge. · Disassemble the cover cap and the hinge. · Attach blind hole screw fixing to the bottom of screw. Pull 3.
- Page 15 WALL-HUNG TOILET INSTALLATION INSTRUCTIONS 5. Adjust and Attach Seat · Align seat to the hinges then firmly tighten the hinges. · Attach seat to the secure hinges. · Adjust seat to align to the bowl. TOILET SEAT USAGE · To remove, push middle button until you hear a “click”, then pull straight up. ·...
- Page 16 Wall-Mount Actuator Flush Plate ® INSTALLATION INSTRUCTIONS w e l l m a d e f o r e v e r @SwissMadison #WellMadeForever www.swissmadison.com | 1-434-623-4766 | info@swissmadison.com...
-
Page 17: Included Parts
· Observe all plumbing and building codes in accordance with your state and local requirements. · The step-by-step guidelines in the installation instructions are a general reference. Should there be any discrepancies, Swiss Madison cannot be held liable. It is recommended to install all Swiss Madison products by hiring a licensed professional. - Page 18 ACTUATOR FLUSH PLATE INSTALLATION INSTRUCTIONS turn on — 2 —...
- Page 19 ACTUATOR FLUSH PLATE INSTALLATION INSTRUCTIONS *click* *click* *click* Full Flush Half Flush — 3 —...
- Page 20 (including, without limitation, costs associated with ‘professionals’ or ‘experts’, investigations, audits, analyses, attorneys and any other professional/hired services). The Swiss Madison® warranty is a comprehensive and explicit limit of liability. All items not disclosed within the warranty are not addressable within the responsibility of Swiss Madison®. Certain states have variances regarding implied warranties;...
Need help?
Do you have a question about the SM-WC424 and is the answer not in the manual?
Questions and answers
What swiss madison concealed in wall tank system is compatible with SM-WT514 toilet? I installed a SM-WC424 tank system in wall but supply and drain tubes are not lining up properly thank you. Rocky
What is the height of discharge for ADA compliance?