Table of Contents
Advertisement
Quick Links
Advertisement
Table of Contents

Subscribe to Our Youtube Channel
Related Manuals for Smith & Noble Shadings


Summary of Contents for Smith & Noble Shadings
- Page 1 Shadings Collection Smart Shades Installation Instructions Rev. D 04/24...
-
Page 2: Table Of Contents
GETTING STARTED CONTENTS Smith & Noble offers only the Rechargeable Battery Wand and Satellite Rechargeable Battery Wand power options on Smart Shades. GETTING STARTED ......................... 2 Product View ..........................2 Tools and Fasteners Needed ....................... 3 INSTALLATION ........................4 Installation Overview ........................4 STEP 1 —... -
Page 3: Getting Started
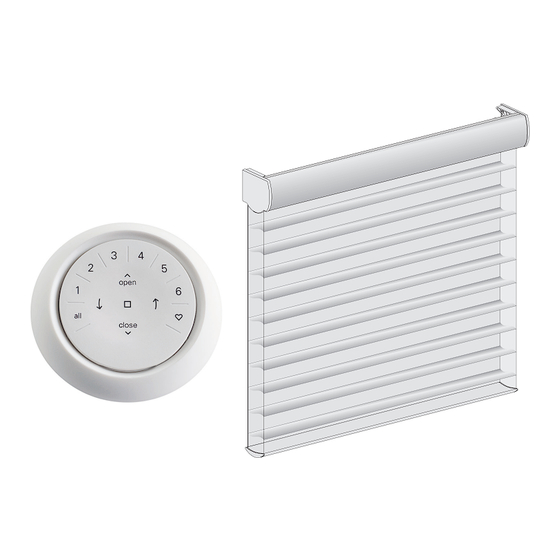
GETTING STARTED Product View Optional Dust Cover (For Outside Mount) Optional Back Cover (For Inside/End Mount only) Battery Wand Clips Battery Wand Power Cable Installation Brackets Limit Stops Programming Button Magnetic Hold-Down Brackets Weight (Optional) Clip Bottom Rail Balance Weight Weight Clip... -
Page 4: Tools And Fasteners Needed
GETTING STARTED Thank you for purchasing the Smart Shades Shadings Collection. With proper installation, operation, and care, your new shades will provide years of beauty and performance. Please thoroughly review this instruction booklet and the enclosed packing list before beginning the installation. If your shading has a protective cover on the fabric-covered headrail, keep the plastic in place until the shading is installed. -
Page 5: Installation
Your order will include the correct number of installation brackets for your shading width, as shown in the table below. ■ Shading orders may also include spacer blocks or extension brackets, if they were specified for added clearance. ■ Extension brackets are used for end mount shadings, as well. ➤ For Added Clearance Shading Width Brackets Installation Bracket 14"... -
Page 6: Mount The Installation Brackets - Inside Mount
INSTALLATION INSTALLATION Mount the Installation Brackets — Inside Mount Prepare the Installation Brackets NOTE: Back cover is not available with rechargeable battery wand. MOUNT the Installation Brackets Measure and mark end bracket locations 2" in from each jamb. ■ If more than two installation brackets are required, mark the location of additional bracket(s) spaced evenly between ➤... - Page 7 INSTALLATION INSTALLATION Jamb Center the installation brackets on your marks and mark the location of the screw holes. ■ Allow sufficient rear clearance when positioning the brackets. ➤ Nearest Obstruction Rear NOTE: Rear clearance is the distance between the back of the installation bracket an Clearance the nearest obstruction;...
-
Page 8: Mount The Installation Brackets - Outside Mount
INSTALLATION INSTALLATION Mount the Installation Brackets — Outside Mount Mount the Installation Brackets Center the headrail over the window opening at the desired height. Use ■ a pencil to lightly mark each end of the headrail. Alternatively, measure the width of the headrail and use that width to ➤... -
Page 9: Mount The Installation Brackets - End Mount
" Minimum WARNING: To end mount shadings into a surface other than a secure wall stud, use Depth medium to heavy-duty wall anchors (not provided) matched to the wall thickness. Failure to mount the brackets securely may result in injury or property damage. -
Page 10: Step 2 - Install The Rechargeable Battery Wand (If Applicable)
INSTALLATION INSTALLATION STEP 2 — Install the Rechargeable Battery Wand (If Applicable) For the headrail-mounted rechargeable battery wand, battery wand clips rechargeable battery mount are installed before the shading is installed. Any other power options, the power source will be connected after the shading is installed. -
Page 11: Step 3 - Install The Shading
Completely remove the protective covering from the fabric-covered headrail. ■ Attach the Optional Dust Cover (If Applicable) The dust cover is used to protect the top of the headrail from exposure on outside mounted shadings. Cut the dust cover to desired width. ■... - Page 12 INSTALLATION INSTALLATION Headrail-Mounted Rechargeable Battery Wand Insert the Rechargeable Battery Wand into the Battery Mount NOTE: The rechargeable battery wand ships fully charged, so it is ready to install out of the package. Match the direction of the arrow on the underside of the ■...
-
Page 13: Testing The Shading
INSTALLATION INSTALLATION Testing the Shading Use the control button to test the shading and ensure that the motor and power source are working correctly. Press the control button to lower the shading. If the shading does not operate, see ■ "Troubleshooting"... -
Page 14: Operation
INSTALLATION OPERATION Operating the Smith & Noble® App and Remote Syncing and Programming Your Remote Activate the remote by pulling both plastic tabs from the back battery compartment. ■ Download the Smith & Noble® App for your smartphone or tablet at getsmithandnobleapp.com. ■... - Page 15 INSTALLATION OPERATION Further Operation and Programming Information Smith & Noble® App The Smith & Noble® App is required to program Smart Shades window coverings, remotes, and gateways. The App is compatible with Apple® and Android™ smartphones and tablets. For more information regarding setup and operation using the Smith & Noble® App App, refer to https://www.smithandnoble.com/window-coverings-product-manuals.
-
Page 16: Troubleshooting
INSTALLATION TROUBLESHOOTING Troubleshooting If your shade is not operating correctly: Review the digital support guide for your control device. ➤ Refer to the following troubleshooting procedures for specific solutions for your shade. ➤ If questions remain, please contact Smith & Noble Consumer Support at 888-214-2134. Problem The shading will not fit into the installation brackets. - Page 17 INSTALLATION TROUBLESHOOTING Problem The battery is charged but the shades does not operate. Solution If your rechargeable battery wand is charged but not working, it may be due to its physical location in your window. The rechargeable battery wand can operate in temperatures up to 176 °F (80 °C). If the temperature in your window exceeds this, its safety feature will shut the battery off temporarily.
- Page 18 INSTALLATION TROUBLESHOOTING Problem Rechargeable battery needs recharging (continued) Solution Recharging Via the Single Charger Remove the rechargeable battery wand from the mount, or insert the single charger cable without removing from the shading. Attach the plug adapter to the charger. ■...
- Page 19 Vane alignment is only guaranteed within ⁄ " when shadings are ordered at the same time, at the same height, with the same color and fabric, and when specified on the order form. It is considered normal if the roll-up on both shadings is within ⁄...
- Page 20 INSTALLATION TROUBLESHOOTING Problem The shading is hard to raise or lower, or the bottom rail does not stop at the top limit. Headrail Limit Stop Solution Check the adjustment position of both limit stops. The top illustration shows the correct adjustment. The limit stop catches the bottom rail, and the bottom of the limit stop is slightly above or barely touching the fabric roll.
- Page 21 INSTALLATION TROUBLESHOOTING Problem The shading raises or lowers unevenly, the fabric rubs against one end of the headrail, or the bottom rail is uneven when fully raised. Solution Check that the window is square by measuring the diagonals. Check that the installation brackets are level. Shim to level, if necessary. Adjust the bottom rail weight.
-
Page 22: Care
Carefully pull the shading to remove it from the brackets. ■ Cleaning Procedures Smart Shades Shadings are made of 100% polyester, which means they are inherently durable and resilient. However, care must be taken to avoid wrinkling the fabric, particularly where the vanes meet the facings. Fabric-Covered Headrail Spot-clean the headrail using a sponge or delicate cloth, cool distilled water and a mild soap solution;... -
Page 23: Child Safety
INSTALLATION CHILD SAFETY WARNING ADVERTENCIA Window Blind Cord Strangulation Risk Window Blinds with a damaged or loose tension device or retractable cord that fails to fully retract pose a stangulation risk to children. To avoid this potential strangulation risk, consider purchasing cordless products or products with inaccessible cords. -
Page 24: Declarations
INSTALLATION SMITH & NOBLE® SMART SHADES MOTOR DECLARATIONS DECLARATIONS FCC Statement This equipment has been tested and found to comply with the limits for a Class B digital device, pursuant to Part 15 of the FCC Rules. These limits are designed to provide reasonable protection against harmful interference in a residential installation. -
Page 25: To Obtain Warranty Service
WARRANTY 10-Year Limited Warranty Smith & Noble is proud to extend a 10-year limited warranty on all Smith & Noble Custom Window Covering products. ® ® This is part of our commitment to providing the highest quality products, which has been our continued tradition since 1987. COVERED NOT COVERED by a 10-Year...
Need help?
Do you have a question about the Shadings and is the answer not in the manual?
Questions and answers