Advertisement
Technical Support and E-Warranty Certificate
www.vevor.com/support
UTILITY SINK PUMP
INSTRUCTIONS
MODEL: ZX30023 / ZX30024
We continue to be committed to provide you tools with competitive price.
"Save Half", "Half Price" or any other similar expressions used by us only represents an
estimate of savings you might benefit from buying certain tools with us compared to the major
top brands and does not necessarily mean to cover all categories of tools offered by us. You
are kindly reminded to verify carefully when you are placing an order with us if you are
actually saving half in comparison with the top major brands.
Advertisement
Table of Contents

Related Manuals for VEVOR ZX30023


Summary of Contents for VEVOR ZX30023
- Page 1 UTILITY SINK PUMP INSTRUCTIONS MODEL: ZX30023 / ZX30024 We continue to be committed to provide you tools with competitive price. "Save Half", "Half Price" or any other similar expressions used by us only represents an estimate of savings you might benefit from buying certain tools with us compared to the major top brands and does not necessarily mean to cover all categories of tools offered by us.
- Page 2 This is the original instruction, please read all manual instructions carefully before operating. VEVOR reserves a clear interpretation of our user manual. The appearance of the product shall be subject to the product you received. Please forgive us that we won't inform you again if there are any technology or software updates on our product.
- Page 3 Warning-To reduce the risk of injury, user must read instructions manual carefully. ATTENTION WARNING 1. Because there is cooling oil in the water pump,which is used to cool down the motor,the water pump must be placed upright-do not operate the device on its side. 2.
-
Page 4: Specification Parameters
SPECIFICATION PARAMETERS Bucket Model Input Max Flow Max Lift Outlet size Power capacity AC110-120V ZX30023 1/3 HP 2900 GPH 25 ft 6 Gal NPT 1-1/2" 60Hz AC110-120V ZX30024 1/2 HP 3500 GPH 28 ft 6 Gal NPT 1-1/2" 60Hz CAUTION This pump has been evaluated for use with water only. - Page 5 2.Risk of electric shock -This pump has not been investigated for use in swimming pool areas. 3.The electrical connections must be protected from moisture. 4.If there is danger of flooding,the electrical connections must betaken to higher ground. 5.Circulation of caustic fluids,as well as the circulation of abrasive materials,must be avoided at all costs.
-
Page 6: Installation
Installation The submersible motor pump must be installed in a stationary position with either: a.A fixed pipeline or b.A flexible hose pipe. Power Supply 1.The pump is equipped with a shock-proof plug according to regulations.The pump is designed to be connected to 110-120 VAC,60Hz GFCI protected socket. - Page 7 2.Verify that the discharge pipe is properly connected. 3.Verify that the electrical connection is 11 0 - 120 VAC 60 Hz. 4.Verify that the electrical socket is GFCI protected and in good condition.Test GFCI protected outlet before use. 5.Verify that water and moisture cannot get near the power supply socket. 6.Verify that the pump is installed so as to prevent running dry.
- Page 8 METHOD OF ERECTION Vertical switch installation instructions (See Figure 1 for details) Assembly steps: As shown in the figure, the upright switch 2 is fixed on the corresponding position of the water pump 1 with self-tapping screw 3. 6 gallon sewage drum installation steps (See Figure 2 for details) As shown in the picture: First, screw pump outlet pipe 3 into pump 2 (including check valve) outlet thread, put pump 2 (including screw outlet...
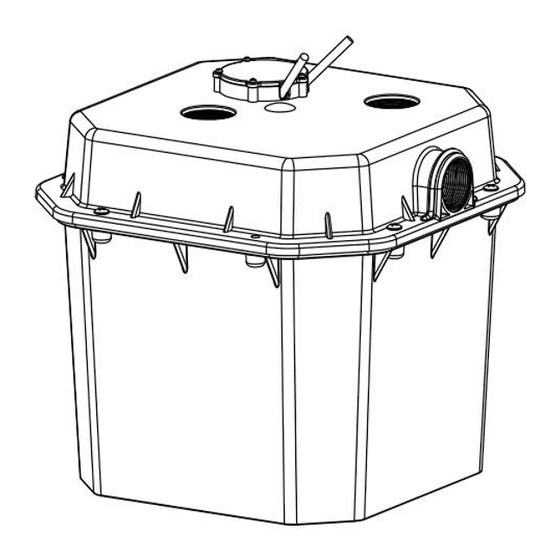
- Page 9 1/4"X20 screws with a + flat-head screwdriver, secure the drain bucket cover 6 to drain bucket 1, arrange the pump power cable 11 and the vertical switch power cable 12, and insert the two power cables 11 and 12 into the rubber sealing ring outlet hole of the drain bucket cover 6. Cover the sealing ring small cover 7 (including the rubber sealing ring), and fix the small cover 7 on the sewage bucket cover 6 with five 4x18 self-tapping screws.
- Page 10 Usage scenario description (See Figure 3,4,5,6 for details) 1. Inspect the kit for possible shipping damage prior to instalation. 2. The basin should be located at the lowest point relative to the area to be drained. See Figures 3,4 ,5 for typical installations. 3.
- Page 11 - 10 -...
-
Page 12: Part Drawing
PART DRAWING - 11 -... -
Page 13: Failure Recovery
FAILURE RECOVERY Problem Possible Causes How to Correct Pump is not plugged in,switch or Plug pump in or turn on switch/breaker breaker is turned off Check for blown fuses or tripped circuit Replace fuse,reset breaker,reset GFCI outlet If the pump breakers or tripped GFCI outlets does not start or Check and replace if necessary... - Page 14 MAINTENANCE GUIDELINES This pump is an approved and maintenance-free high quality product, which is subject to severe final controls. We recommend, regular inspection and maintenance to ensure long equipment life and uninterrupted operation. Important Note! • Remove the mains plug before all maintenance work. •...
- Page 15 Manufacturer: Xinghua Zhongxing Electric Manufacturing Co., Ltd. Address: No. 9 Shanjia Road, Xinghua Economic Development Zone, Xinghua Jiangsu CONFORMS TO UL STD. 778 CERTIFIED TO CSA STD. C22.2 NO. 108 Made In China - 14 -...
- Page 16 Technical Support and E-Warranty Certificate www.vevor.com/support...
Need help?
Do you have a question about the ZX30023 and is the answer not in the manual?
Questions and answers