Advertisement
Advertisement
Table of Contents

Related Manuals for Elite Fitness CELTIC


Summary of Contents for Elite Fitness CELTIC
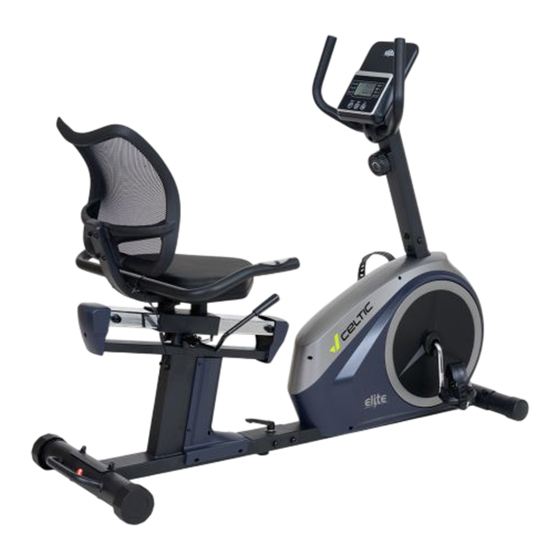
- Page 1 ASSEMBLY MANUAL Record serial number Elite Celtic Recumbent Bike...
- Page 2 Elite Cel�c Recumbent Bike. Elite Cel�c Recumbent Bike. SERVICE & WARRANTY Elite Fitness HQ CONTENTS Parts List Assembly Complete...
-
Page 3: Important Safety Instructions
IMPORTANT SAFETY INSTRUCTIONS READ ALL INSTRUCTIONS BEFORE USING THE MACHINE CONSULT A PHYSICIAN IMMEDIATELY. ELITE CELTIC RECUMBENT BIKE ASSEMBLY MANUAL... -
Page 4: Product Specifications
120 KGS. PRODUCT SPECIFICATIONS 120 KG 37.8 KG 35 KG... -
Page 5: Parts List
Crosshead screw ST4.2*19 Crank cover Φ44*10 Crosshead screw M4*10*φ7 Turntable Stopple Φ12*11*Φ3 Crosshead screw ST4.2*16 Rear stabiliser 66L/R Chain cover End cap Thin nut Hexagon bolt M8*85 Retaining washer Nut 2 Slip tube Collar housing Ф51.6 ELITE CELTIC RECUMBENT BIKE ASSEMBLY MANUAL... - Page 6 PARTS LIST Nine parts Flywheel Washer d12*Φ17*0.5 Hexagon thin nut M10*1.0*H3 Nut 1 Bearing Washer d24*Φ40*3 Hexagon flange nut M10*1.0*H9.5 Magnet Φ15*7 Screw Belt pulley Axle Belt 5PJ360 Bolt grop U bracket Hexagon nut M6*H5.5*S10 Screw M8*12*Φ10*5 Washer d5*Ф20*1.5*R25 Spring Φ2.5*Φ16*75 Tension line 2 Nylon nut M8*H7.5*S13 Rear seat trim cover...
- Page 7 Attach front bottom tube (16) to main frame bond (19) using square neck bolts (61), curved washers (09), and cover nuts (21). Use a cross wrench to fasten left and right footpegs (20L/R) onto the one-piece crank. ELITE CELTIC RECUMBENT BIKE ASSEMBLY MANUAL...
- Page 8 ASSEMBLY INSTRUCTIONS STEP 2 33# M8*85*20 2PCS 23# d8*Φ20*1.5 4PCS 124# d16*Φ32*2 1PC #08 d8 4PCS 123# M16*25 1PC #09 d8*Φ20*R30*2 2PCS 21# M8 2PCS 07# M8*16 4PCS #126 M5*10 2PCS Attach rear bottom tube (31) to rear frame bond (26) using square neck bolts (33), curved washers (09), and cover nuts (21).
- Page 9 STEP 3 07# M8*16 4PCS 23# d8*Φ20*1.5 4PCS #08 d8 4PCS Use hexagonal disc head screws (07), elastic pads (08), and washers (23) to attach seat frame elbow (42) to slip sleeve joint (125). ELITE CELTIC RECUMBENT BIKE ASSEMBLY MANUAL...
- Page 10 ASSEMBLY INSTRUCTIONS STEP 4 119# M6*12 2PCS 54# d6 2PCS 118# d6*Φ16*1.5*R16 2PCS Use hexagonal cylindrical head screws (119), an elastic pad (54), and a curved washer (118) to attach brake lever bond (121) to brake shaft bond (117).
- Page 11 Use hexagonal disc head screws (07) and washers (23) to attach seat cushion (51) to seat frame elbow joint (42). Fasten mesh backrest (52) to seat frame elbow (42) using cross groove head screws (55), elastic pads (54), and washers (53). ELITE CELTIC RECUMBENT BIKE ASSEMBLY MANUAL...
- Page 12 ASSEMBLY INSTRUCTIONS STEP 6 50# M8*50 2PCS 23# d8*Φ20*1.5 2PCS 21# M8 2PCS #08 d8 2PCS Attach handle (44) to seat frame elbow bond (42). Enclose it with curved plate (49) and secure it with square neck bolts (50), a washer (23), an elastic pad (08), and a cover nut (21).
- Page 13 Connect eight levels of fine-tuning (56) to the fine-tuning of the lower line (111). Use hexagonal disc head screws (07) and washers (23) to secure the riser bond (10) onto the main frame bond (19). ELITE CELTIC RECUMBENT BIKE ASSEMBLY MANUAL...
- Page 14 ASSEMBLY INSTRUCTIONS STEP 8 #02 M5*10 4PCS #06 1PC #08 d8 2PCS #18 M8*30*S6 2PCS Attach front armrest (04) to riser joint (10) using hexagonal cylindrical head screws (18) and bullet pad (08). Cover it with the gripper (06). Connect trunk line (12) to electronic meter extrusion line (01a), and connect induction trunk (11) to electronic meter extrusion cable (01b).
- Page 15 ASSEMBLY COMPLETE Assembly of your Elite Cel�c Recumbent Bike is now complete! Be sure to fully inspect your machine before using it for the first �me. Cel�c Recumbent Bike ELITE CELTIC RECUMBENT BIKE ASSEMBLY MANUAL...
- Page 16 INSTRUCTIONS Func�onal Bu�on: • MODE: This key allows you to select and lock onto a specific func�on. • SET: Used to proceed with data establishment for "TIME," "DISTANCE," "CALORIES," and "PULSE." • CLEAR (RESET): Press this key to reset the value to zero. •...
- Page 17 EXPLODED DIAGRAM 118 54 40 41 112R 112L 109 108 ELITE CELTIC RECUMBENT BIKE ASSEMBLY MANUAL...
- Page 18 SETTING YOUR BIKE UP Saddle Height Adjustment Seat Adjustment Place your heel on one of the bike pedals and rotate to the furthest point on the pedal stroke (as experience the feeling of reaching for the pedal or sliding down the seat, you may need to make a...
- Page 19 SETTING YOUR BIKE UP — — — — ELITE CELTIC RECUMBENT BIKE ASSEMBLY MANUAL...
-
Page 20: Care And Maintenance
CARE AND MAINTENANCE Cleaning prevent unnecessary corrosion stains and damage to the structural components from sweat and Please ensure all sweat residue is wiped from any contact points or framework with a damp cloth using a suitable PH neutral detergent in water to avoid salt and corrosion deposits on your Frame and Pedals... -
Page 21: Maintenance Log
MAINTENANCE LOG MECHANICAL FRAME MAINTENANCE SERVICE DATE HOURS DISTANCE COMMENTS Chain / Seat / Brake Cleaned Belt Pedals 01/06 16.5km none ELITE CELTIC RECUMBENT BIKE ASSEMBLY MANUAL... -
Page 22: Limited Warranty
LIMITED WARRANTY Warranty Range Warranty Time HOME USE The following conditions are not under warranty range: The Spin bike should not be: Repair and Maintenance Service... -
Page 23: Warm-Up Exercise
WARM-UP EXERCISE ELITE CELTIC RECUMBENT BIKE ASSEMBLY MANUAL... -
Page 24: Training Stages
TRAINING STAGES... - Page 25 @EliteFitnessTV @EliteFitnessNZ...
Need help?
Do you have a question about the CELTIC and is the answer not in the manual?
Questions and answers