Table of Contents
Advertisement
Quick Links
Advertisement
Table of Contents

Related Manuals for Elite Fitness Phantom


Summary of Contents for Elite Fitness Phantom
-
Page 2: Table Of Contents
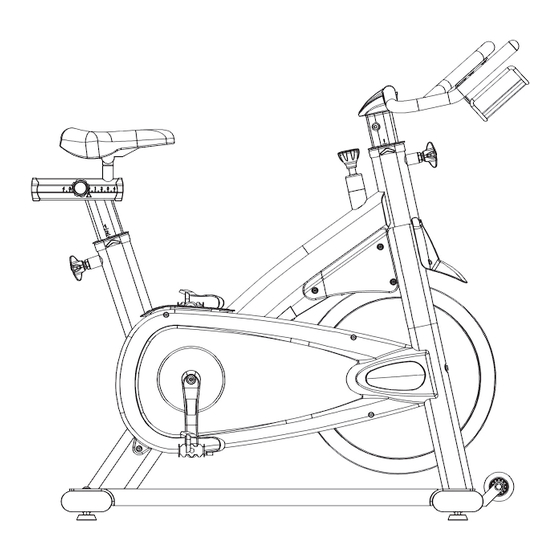
Please read through this manual to familiarise yourself with the operation of your new Elite Phantom Spin Bike. Doing so will help to insure that you get the most out of your machine, enjoying safe and effective workouts ahead. -
Page 4: Product Specifications
— Only carry out training work on the equipment when it is in perfect working order. Only use original spare parts in the event of a repair. — Do not use strong solvents for cleaning, and only use the tools supplied, or suitable ones of your own, for any repairs that may be required. -
Page 5: Assembly Instructions
(as shown). — Attach the Stabilizer with two Hex Screws (3), four Flat Washers (4) and two Nylon Nuts (5). Do not over tighten as the Stabilizer may buckle. ELITE phanTom SpIn BIkE aSSEmBLy manuaL... - Page 6 steP 2 — Position the Rear Stabilizer (2) on the Frame Bracket and fix using two Hex Screws (3), four Flat Washers (4) and two Nylon Nuts (5). Do not over tighten as the Stabilizer may buckle. NOTE: Ensure the Levelling Feet on both the Front and Rear Stabilizers are attached securely.
- Page 7 The right crank arm is on the right-hand side of the cycle as you sit on it. NOTE: The Right Pedal should be twisted on clockwise and the Left Pedal anticlockwise. If possible, apply some grease to the crank prior to attaching. ELITE phanTom SpIn BIkE aSSEmBLy manuaL...
- Page 8 steP 4 — Slide the Handlebar (8) into the Handlebar Post (9) and attach using four Socket Hex Screws (10) and four Flat Washers (4). — Insert the Handlebar Post (9) into the Main Frame Tube and use the Adjustment Handle (7) to hold in place by turning clockwise using the Wrench (A).
- Page 9 5 — Attach the Bottle Holder (12) to the Handlebar (8) using two Socket Hex Screws (11) and two Flat Washers (13). ELITE phanTom SpIn BIkE aSSEmBLy manuaL...
- Page 10 adJustinG tHe tension Increasing or decreasing the tension allows you to add variety to your workout sessions by adjusting the resistance level of the bike. — To increase tension and increase resistance (requiring more strength to pedal), turn the Emergency Brake & Tension Control Knob (37) clockwise. —...
- Page 11 ONLY when the flywheel has stopped, will it be safe to remove feet from pedals. — Do not stop pedalling: doing so could result in serious injury. — Do not attempt to stop the Fly Wheel by hands, feet or any other device not indicated in this instruction. ELITE phanTom SpIn BIkE aSSEmBLy manuaL...
-
Page 13: Setting Your Spin Bike Up
(the balls There should now be a slight bend in your of your feet should be over the pedal axles). knee when the pedal is at its lowest point. This is a good starting point. ELITE phanTom SpIn BIkE aSSEmBLy manuaL... - Page 14 Handle bar adjustment Holding this position, have your helper place the end of the plumb line (line of string with The positioning of the handlebars can be nut/washer) on the front of your leg, at a point dependent on the bike design and adjustability just below the bony protrusion that’s beneath available.
-
Page 16: Maintenance Log
maintenanCe loG Prolong the life of your spin bike by performing periodic maintenance checks. Not only does this ensure your machine is in full working order, but it will save you service costs in the long run. Every time you perform maintenance, record the date and if you can, the distance and hours operated. -
Page 17: Limited Warranty
B) The damage due to incorrect assembly or adjustment of the machine; repair and maintenance service Please contact our Elite Fitness Service Department at eliteservice@elitefitness.co.nz or visit www.elitefitness.co.nz for any service related issues or advice on preventative maintenance servicing procedures. -
Page 18: Warm-Up Exercise
Warm-uP exerCise Warm up exercise is important in preparing the muscles for activity whilst minimising the risk of injury. You may choose to warm up with a light/brisk walking pace for 5-10 minutes before stopping and performing some simple stretches. (As shown in the pictures below) —... -
Page 19: Training Stages
Note: Contact heart rate may provide inaccurate readings and is designed only as a guide Example: 220 – 39 = 181 bpm 181 x 85% (0.85) = 154 bpm (Upper Training Limit) 181 x 65% (0.65) = 118 bpm (Lower Training Limit) ELITE phanTom SpIn BIkE aSSEmBLy manuaL... -
Page 20: Parts List
Parts list We recommend 2 people assist in assembling this unit. Place all parts of the spin bike in a cleared area and remove the packing materials. Do not dispose of the packing materials until assembly is completed. Before you start installation, inspect and prepare all parts and screws featured in this manual. - Page 21 Parts list PART DESCRIPTION Q’TY Wrench (M22x3tx107L) L-Hex Wrench (6mm/35Lx95L) L-Hex Wrench (4mm/60Lx25L) L-Hex Wrench (5mm/125Lx30L) Combination Wrench (13/14/15/17mm) ELITE phanTom SpIn BIkE aSSEmBLy manuaL...
Need help?
Do you have a question about the Phantom and is the answer not in the manual?
Questions and answers