Table of Contents
Advertisement
Quick Links
Advertisement
Table of Contents

Related Manuals for Elite Fitness Pursuit Air


Summary of Contents for Elite Fitness Pursuit Air
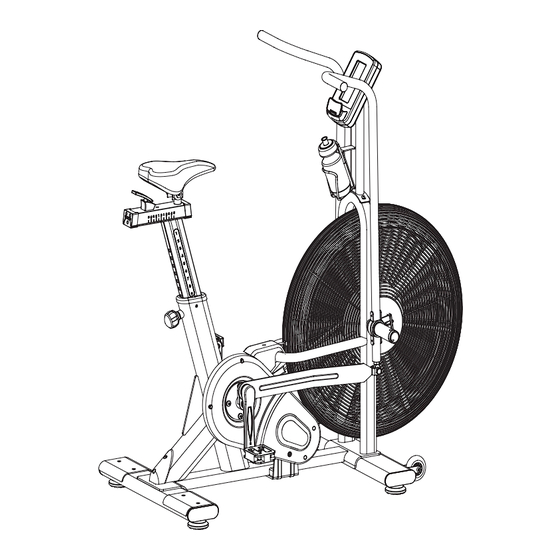
- Page 1 ASSEMBLY MANUAL Record serial number Elite Pursuit Air Bike...
-
Page 2: Table Of Contents
Please read through this manual to familiarise yourself with the operation of your new Elite Pursuit Air Bike. Doing so will help to ensure that you get the most out of your machine, enjoying safe and effective workouts ahead. -
Page 3: Important Safety Instructions
(all parts for the unit) at suitable collecting points or containers with a view to saving the environment. — DO NOT extend the seat stem past the warning line “Max” when adjusting the seat height. — Not for therapeutic use. ELITE PURSUIT AIR BIKE ASSEMBLY MANUAL... -
Page 4: Product Specifications
WARNING: Before beginning any exercise programme, consult your physician. This is especially important for persons with pre-existing health problems. The seller assumes no responsibility for personal injury or property damage sustained by or through the use of this product. SERVICE HINTS: The high quality standard of this product only will be kept if you, on a regular basis, check all screw connections and moving parts on proper fitting. - Page 5 Before assembling, make sure that you will have enough space around the item; Use the present tooling for assembling; before assembling please check whether all needed parts are available. It is strongly recommended this machine to be assembled by two or more people to avoid possible injury. ELITE PURSUIT AIR BIKE ASSEMBLY MANUAL...
-
Page 6: Assembly Instructions
ASSEMBLY INSTRUCTIONS STEP 1 Attach the Front Stabiliser (pt.15) to the Main Frame (pt.16) using two sets of Ø10 Flat Washers (pt.5) and bolt 1 (3). Attach the Rear Stabiliser (pt.4) to the Main Frame (pt.16) using two sets of Ø10 Flat Washers (pt.5) and bolt 1 (3). - Page 7 Adjustment Knob (pt.9) and pull the knob back and then select the desired height. Release the knob and retighten the knurled portion. Now fix the Seat (pt.13) to the Seat Post (pt.12) as shown, and tighten the bolts around the screws under the seat. ELITE PURSUIT AIR BIKE ASSEMBLY MANUAL...
- Page 8 STEP 3 Attach the left hand assembly (18), right wrench assembly (21) and the outer tooth type gasket (92) to the main frame assembly (16) using a hex head screw(78), flat washer (5), spring washer (95)and lock nut (79) as pictured below. Attach the console mast (17) with 2 x hex head screws (27) to the main frame assembly (16).
- Page 9 The right crank arm is on the right- hand side of the cycle as you sit on it. Note that the Right pedal should be threaded on clockwise and the Left pedal anticlockwise. ELITE PURSUIT AIR BIKE ASSEMBLY MANUAL...
- Page 10 CONGRATULATIONS Assembly of your Elite Pursuit Air Bike is now complete! Be sure to fully inspect your machine before using it for the first time. WARNING: Failure to visually check and test the assembly of your Air Bike before use can cause...
-
Page 11: Setting Up Your Air Bike
(the balls There should now be a slight bend in your of your feet should be over the pedal axles). knee when the pedal is at its lowest point. This is a good starting point. ELITE PURSUIT AIR BIKE ASSEMBLY MANUAL... -
Page 12: Console User Instructions
CONSOLE INSTRUCTIONS DISPLAY FUNCTIONS - Display the rotation per minute with range from 0~ 199. - Display current training speed. Maximum speed is 99.9 KM/H or ML/H. SPEED TIME - Count up - No pre-set target, Time will count up from 00:00 to maximum 1:59:59 with each increment is 1 minute. - Page 13 TIME, DISTANCE, CALORIES, WATTS, SPEEED, RPM and HEART RATE will flash in sequence every 1s (Figure 4 - Figure 16). If no input of key operation or RPM signal or pulse input for 60s, computer will go to Sleeping mode. Figure4 Figure 6 Figure5 Figure7 ELITE PURSUIT AIR BIKE ASSEMBLY MANUAL...
- Page 14 Figure8 Figure9 Figure 10 Figure 11 Figure 12 Figure 13 Figure 14 Figure 15 Figure 16 Figure 17 Figure 18 Figure 19...
- Page 15 1s. ②Cycle time counts down from 3 to 0 then console start, meanwhile buzzer beeps once per second and READY flashes once per second, counting displays ‘00/08’(Figure 24). ELITE PURSUIT AIR BIKE ASSEMBLY MANUAL...
- Page 16 ③Cycle time counts down from 20 to 0 and WORK flashes once per second along with 20 beeps. Meantime windows display rotation animation and count down from 4 minutes. Then TOTAL TIME, DISTANDE, CALORIES,WATTS, SPEED & RPM start calculating, counting displays ‘01/08’ (Figure 25).
- Page 17 0:00~9:59 circularly (Figure 34). Press ENTER to confirm along with buzzer beeps 1s and INTERVAL CUSTOM continues lighting up. ③Cycle time counts down from 3 to 0 then console start, meanwhile, Buzzer beeps once per second and READY flashes once per second, counting displays ‘00/XX’(Figure 35). ELITE PURSUIT AIR BIKE ASSEMBLY MANUAL...
- Page 18 ④Cycle time counts down from the pre-set total time and WORK flashes once per second along with buzzer beeps. Then TOTAL TIME, DISTANDE, CALORIES,WATTS, SPEED & RPM start calculating, counting 6 displays ‘01/XX’ (Figure 36). ⑤Cycle time counts down from and REST flashes once per second along with buzzer beeps (Figure 37), meanwhile, READY will flash in last 3s(Figure 38).
- Page 19 1s and TARGET DISTANCE lasting lighting up. ③Preset value & workout distance switch to display in every 5s until counts down to 0, then TIME, CALORIES,WATTS, SPEEED, RPM start to count up. (Figure 42) ELITE PURSUIT AIR BIKE ASSEMBLY MANUAL...
- Page 20 ④Press START button once enter into PAUSE mode; buzzer will sound for 0.5s per second within 30s. All values are displaying on LCD and flashing in every 2s. If continue to stop training for 5 minutes, buzzer sounds 2s and enter to Wake-up mode. Press START to resume workout. ⑤No signal input for 30s, buzzer sounds 1s and enter to Wake-up mode.
- Page 21 ⑩With pulse signal input, PULSE window will display user actual pulse and 65%, 85% MAX (Figure 21~23). Pulse window displays nothing if no pulse signal input (Figure 19~20). ⑪Press any PROGRAM key then perform the program accordingly. ELITE PURSUIT AIR BIKE ASSEMBLY MANUAL...
- Page 22 Figure 47 Figure 48 Figure 49 OPTION SETTING: SETTING Mode- 1. Hold on STOP&ENTER key for 2s, buzzer will sound 1 long beep. DISTANCE keep lighting up, M/KM flash once per second (Figure 50~51). 2. Press UP or DOWN to select KM or ML, press ENTER to confirm then skip to Standby mode. 3.
-
Page 23: Care And Maintenance
If the machine is put in storage or not intended to be used for any period longer than 4 weeks, please remove the batteries from the console to avoid any corroding and potential damage to the console. ELITE PURSUIT AIR BIKE ASSEMBLY MANUAL... -
Page 24: Maintenance Log
MAINTENANCE LOG Prolong the life of your Air Bike by performing periodic maintenance checks. Not only does this ensure your machine is in full working order, but it will save you service costs in the long run. Every time you perform maintenance, record the date and if you can, the distance and hours operated. -
Page 25: Limited Warranty
A) As a result of abuse, neglect, accident, or unauthorized modification; B) The damage due to incorrect adjustment of the machine; Repair and Maintenance Service Please contact our Elite Fitness Service Department at eliteservice@elitefitness.co.nz or visit www.elitefitness.co.nz for any service related issues or advice on preventative maintenance servicing procedures. -
Page 26: Warm-Up Exercise
WARM-UP EXERCISE Warm up exercise is important in preparing the muscles for activity whilst minimising the risk of injury. You may choose to warm up with a light/brisk walking pace for 5-10 minutes before stopping and performing some simple stretches. (As shown in the pictures below) —... -
Page 27: Training Stages
Note: Contact heart rate may provide inaccurate readings and is designed only as a guide Example: 220 – 39 = 181 BPM 181 x 85% (0.85) = 154 BPM (Upper Training Limit) 181 x 65% (0.65) = 118 BPM (Lower Training Limit) ELITE PURSUIT AIR BIKE ASSEMBLY MANUAL... -
Page 28: Parts
PARTS We recommend 2 people assist in assembling this unit. Place all parts of the Air Bike in a cleared area and remove the packing materials. Do not dispose of the packing materials until assembly is completed. Before you start installation, inspect and prepare all parts and screws featured in this manual. - Page 29 Double drive assembly ϕ110*107 Double drive inner sleeve ϕ16*ϕ12.2*91.1 Belt 5PK1346 Chain Cover 3 248*269*80 Short Fixing Tube ϕ25*ϕ20.5*9 Bolt 1 GB/845-85 M4*12 Handle 79*32*32.6 Flywheel outer tube ϕ16*ϕ12.2*35 Flywheel inner casing ϕ16*ϕ12.2*53.1 Bottle Cage ϕ6 ELITE PURSUIT AIR BIKE ASSEMBLY MANUAL...
- Page 30 PART NO. NAME Q’TY SPEC Screw 3 GB/T 5780-2000 M5*10 Left Wheel Cover ϕ690*55 Right Wheel Cover ϕ690*55 Fan baffle ϕ170*10 Handle rotary copper sleeve ϕ12*20 Bolt 3 M10*45 Nut Bolt GB/T 889.1-2000 M10 Bolt 16 M6*35 Handle Cover ϕ16.4*10.3*5.5 Little Rubber 19.6*15.6*13.7 Computer...
-
Page 31: Exploded Drawing
EXPLODED DRAWING ELITE PURSUIT AIR BIKE ASSEMBLY MANUAL... -
Page 32: Notes
NOTES... - Page 33 For more information about our Elite exercise equipment or other brands that we stock for your home, visit www.elitefitness.co.nz Copyright © 2019 Elite Fitness Elite Fitness, 28 Morrin Road, Saint Johns, Auckland, New Zealand. 0800 243 834, www.elitefitness.co.nz Keep up to date with the latest products, competitions and equipment, follow us on our social media sites.
Need help?
Do you have a question about the Pursuit Air and is the answer not in the manual?
Questions and answers