Table of Contents
Advertisement
Quick Links
Advertisement
Table of Contents

Subscribe to Our Youtube Channel
Related Manuals for Konvision KRM-404U


Summary of Contents for Konvision KRM-404U
- Page 1 www.konvision.com...
- Page 2 V1.0 KRM-404U KRM-802U KRM-1002U USER MANUAL 12G-SDI KRM 4K Series Rackmount Konvision LCD Monitor w w w k o n v i s i o n c o m...
-
Page 3: Table Of Contents
Catalogue Notes..........2 Security ........2 Screen Maintenance ....2 Screen Burning Notes ....2 Cabinet Maintenance ....2 IMPORTANT NOTICE ....2 Installation ........3 Rack mount Installation ....3 Transportation ......3 The following does not belong to failures: ........3 Parts and Functions ......4 Front View ........4 Rear View ........6 Menu Operation ......14 Source: ........8... -
Page 4: Notes
Avoid striking the screen with any object. · Notes Do not wipe the screen hard. · Do not wipe the screen with solvents such as · alcohol, thinner or gasoline. Do not spray detergent or other cleaners on · Security the monitor or LCD panel, as it may cause fault because of water droplets into the monitor. -
Page 5: Installation
Do not wipe the cabinet with solvents such · The following does not belong to as alcohol, thinner or gasoline. failures: Do not use any pesticides and/or other · volatile substances. Do not allow prolonged contact with rubber · 1. If the static image displayed too long, it will or plastic. -
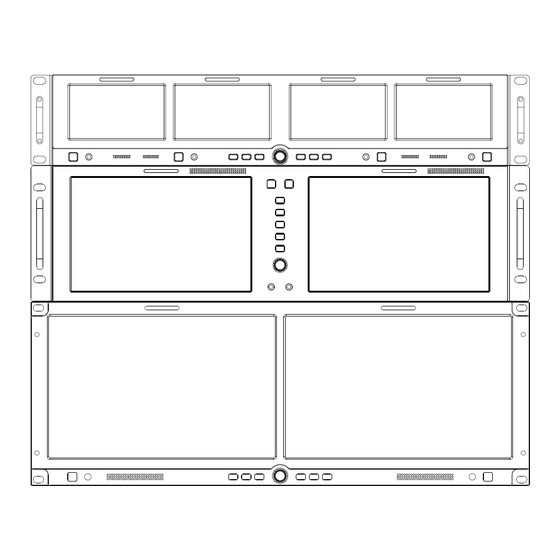
Page 6: Parts And Functions
Parts and Functions Front View KRM-404U Front View: (Note: Screen operation through power/SEL key) KRM-802U Front View: (Note: Screen operation through power/SEL key) - Page 7 Power button and screen select key functions can be setting in the menu. When connects to the power supply the device will automatically turn on,the indicator light is red, Konvision logo MENU Button will appear and then the indicator light turns bule,when enter Press the Menu button to turn on/off the OSD menu.
-
Page 8: Rear View
Rear View KRM-404A Rear View: (Note: Print respectively indicate the first, second, third and fourth screens I/O areas.) KRM-802U Rear View: (Note: Print respectively indicate the first, second, third and fourth screens I/O areas.) - Page 9 KRM-1002U Rear View: (Note: Print respectively indicate the first, second, third and fourth screens I/O areas.) Rear View Instructions SDI IN RS422 IN Description Signal Name For SDI signal input, SDI1&SDI2. Enable GPI1 when Pin1 connects GPI1 to GND (or LOW), the GPI1 function can be set in the menu.
-
Page 10: Menu Operation
Function: SERVICE For firmware updates of each screen. DC 12V IN DC power input interface, power input 12V. Pin Description: Pin 1: GND Pin 3: Null Pin 2: Null Pin 4: 12V Equilibrium Potential Interface For cabinet grounding. Menu item Description AC POWER IN&SWITCH The Function keys can be set to the... -
Page 11: Scopes
Scopes: Menu item Description WaveForm S e l e c t d i ff e r e n t w a v e f o r m s t o monitor the situation of luminance or chrominance in the video signal. When set to Off, the Waveform Scale and Waveform Alarm are invalid. -
Page 12: Image
Image: Menu item Description EOTF The EOTF is the transfer function having the picture or video signal as input and converting it into the linear light output of the display, ensure the display device reduce the actual luminance and chrominance of the original scene. -
Page 13: Display
Menu item Description Menu item Description Set the hue of the screen. Overscan With overscan on a small percentage · 0-200,default 100 of the outermost active video will not be displayed. Sharpness Set the contrast of the edges in the ·... -
Page 14: Marker
Menu item Description Menu item Description Audio Meter Level Set the audio meter display. Center Marker Set the center marker display on the · Off screen. · Opaque · Off · transparent · On Meter Select Set the amount of audio meter channels Safety Area Set the safety area of broadcast to display. -
Page 15: Assist
Menu item Description UMD Tally Color Set the UMD protocol to TSL3.1 to set the UMD Tally color. · Off · RG · GR · RGY LED Tally Set the Tally on/off. · Off · On Assist: Menu item Description UMD Display Set the UMD display on/off. -
Page 16: Menu Operation
Menu item Description Menu item Description Zebra Level Set the brightness range of Zebra. Gateway Set the gateway. · 1-100, default 80 · 192.168.1.188 TimeCode VITC: Vertical Interval Time code.LTC: Display the physical address. Linear time code. · 00-29-AB-30-83-A0 · Off ·... -
Page 17: Factory Reset
Factory Reset This function is to reset the monitor to factory preset. Please try to reset the monitor, when the following situations occur: 1. The monitor parameters are adjusted incorrect by user. 2. The monitor picture or sound is abnormal, and not due to hardware problem.
Need help?
Do you have a question about the KRM-404U and is the answer not in the manual?
Questions and answers