Table of Contents
Advertisement
Quick Links
Advertisement
Table of Contents

Related Manuals for Dover markem-imaje 2000


Summary of Contents for Dover markem-imaje 2000
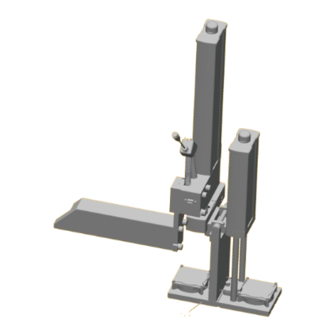
- Page 1 application guide 2000 corner wrap applicator...
-
Page 2: Table Of Contents
Table of Contents 1 General 1.1 Introduction 1.2 Conditions 1.3 Preliminary Instructions 1.4 Safety Requirements 1.5 Recycling 2 Installation 2.1 Applicator Module – Tamp L 250 3 Adjustments 3.1 Applicator Positioning 3.2 Special Applicator Adjustments 4 Spare Parts... -
Page 3: General
1. General 1.1 Introduction Congratulations to your new 2000 Print & Apply system. We have done our outmost to develop a system that you will find easy to use and easy to maintain. It is made robust in order to provide the functionality required for demanding operations. -
Page 4: Preliminary Instructions
1. General 1.3 Preliminary Instructions Read these instructions before starting to work with the system. Liability Markem-Imaje shall not be held responsible for any damage if the safety instructions are not followed, or if general, elementary safety rules are not applied when using and servicing Markem-Imaje equipment. This equipment is certified in accordance with the requirements for CE marking. - Page 5 1. General The Print & Apply System should only be used when correctly mounted and secured, to prevent it from tipping over. Consumables (ink ribbons, cleaning products, cleaning cloths) not recommended by Markem-Imaje must not be used. If such consumables are used, any consequences shall be under the entire responsibility of the user. Types of Markem-Imaje consumables other than those for which the system is intended should not be used without Markem-Imaje’s prior approval.
-
Page 6: Safety Requirements
1. General 1.4 Safety Requirements Markem-Imaje disclaims all responsibility regarding the CE certification if the printer is used, altered or installed in any way other than described in this manual. This symbol is used to indicate circumstances that may be dangerous to the user or cause serious damage to the equipment. -
Page 7: Installation
2. Installation 2.1 Applicator Module – Tamp L 250 1. Assemble the applicator and the applicator bracket. 2. Slide the bracket onto the print unit. Fasten the L-profile in position with the 6 pre-mounted s crews. ee section 3 Adjustments fo r final adjustments. -
Page 8: Adjustments
3. Adjustments 3.1 Applicator Positioning Note: Disconnect the power to the printer and turn off the air supply before adjusting the applicator. 1. Position the applicator pad 1.5 mm from the peel-off bar and 0,75 mm below. Note: The chamfered end of the plate must be placed towards the peel-off bar. - Page 9 3. Adjustments 3. Adjust the L-profile to position the applicator. 4. Loosen the applicator interface screw to release the air pressure. Pull out the applicator arm. 5. Use 2 x 13 mm wrenches to adjust the home position of the applicator pad.
-
Page 10: Special Applicator Adjustments
3. Adjustments 3.2 Special Applicator Adjustments Arm speed 1. Loosen the cylinder nut (24 mm) and remove the cover. Set the speed of the applicator arm using a screwdriver. Clockwise decreases the speed. Counterclockwise increases the speed. 2. Adjust the speed of the arm going out. -
Page 11: Spare Parts
4. Spare Parts Item Part number Description Remark ENM314325 CYLINDER 160 CW KIT ENM314329 CYLINDER SENSOR KIT ENM317015 SPRING AND HOLDER KIT 400176 APPLICATOR PAD KIT ENM308086 DISPENSING EDGE ENM314326 CYLINDER REGULATOR ENM325209 FAN KIT 400175 FAN CABLE KIT... - Page 12 the team to trust 9, rue Gaspard Monge - B.P. 110 26501 Bourg-lès-Valence Cedex France Tel: +33 (0) 4 75 75 55 00 Fax : +33 (0) 4 75 82 98 10 316800-C 005050-C 305796-B Götaverksgatan 6A SE-4617 55 Göteborg Sweden Tel: +46 (0) 31 721 46 00...
Need help?
Do you have a question about the markem-imaje 2000 and is the answer not in the manual?
Questions and answers