Table of Contents
Advertisement
Quick Links
Installation manual 2000.ai 29/10/2009 10:16:26
Installation manual 2000.ai 29/10/2009 10:16:26
the team to trust
the team to trust
C
M
J
CM
MJ
CJ
CMJ
N
318897-B
www.markem-imaje.com
9, rue Gaspard Monge B.P. 110
26501 Bourg-lès-Valence Cedex
France
Tél. : +33 (0) 4 75 75 55 00
Fax : +33 (0) 4 75 82 98 10
150 Congress Street
Keene, NH 03431
United States of America
Tel.: +1 800-258-5356
Fax: +1 603-357-1835
installation manual
Advertisement
Table of Contents

Related Manuals for Dover markem-imaje 2000


Summary of Contents for Dover markem-imaje 2000
- Page 1 Installation manual 2000.ai 29/10/2009 10:16:26 Installation manual 2000.ai 29/10/2009 10:16:26 the team to trust the team to trust installation manual 9, rue Gaspard Monge B.P. 110 26501 Bourg-lès-Valence Cedex France Tél. : +33 (0) 4 75 75 55 00 Fax : +33 (0) 4 75 82 98 10 318897-B 150 Congress Street Keene, NH 03431...
-
Page 2: Table Of Contents
Table of Contents 1. General 1.1 Introduction 1.2 Conditions 1.3 Preliminary Instructions Liability Applications Environment Installation Moving the system Service Safety instructions 1.4 Safety Requirements 2. Product Presentation 2.1 Positions Stand Pillar Positions Print Unit Positions 2000 Pallet Applicator Versions Pallet Applicator –... - Page 3 Table of Contents Print Unit Bracket – Pallet Print Unit – Pallet Support Blow Tube – Pallet Applicator Connection Board – Pallet 3.2 Print Engine Module Fastener Bracket 3.3 Terminal Mechanical Installation Terminal – Printer Connection Data Input Device Settings Terminal –...
- Page 4 Table of Contents 4. Adjustments 4.1 Print Engine Module Introduction Label Adjustment Ribbon Adjustment Printout Adjustment Dispensing Adjustment Pneumatic Module Adjustments 4.2 Batch Kit Introduction Positioning Adjustment 4.3 Blow Applicator Adjustment 4.4 Wipe Applicator Change Applicator Mode Applicator Positioning Special Applicator Adjustments 4.5 Tamp S Applicator Applicator Positioning Special Applicator Adjustments...
- Page 5 Table of Contents 5.3 Firmware Update (NetCenter) Introduction 5.4 Message Center Introduction File Versions Workflow Overview Program Overview Creating a Database Editing a Database Creating Database Variables Creating Configuration Prompts Creating Operator Prompts Creating a Label Layout Exporting Label Data to the Terminal 5.5 ASCII User Interface Introduction Connecting...
-
Page 6: General
1. General 1.1 Introduction Congratulations to your new 2000 Print & Apply system. We have done our outmost to develop a system that is easy to use and maintain. The 2000 Print & Apply system is robust and provides the functionality required for the most demanding operations. This manual contains detailed information about installation and adjustment of the 2000 Series and Pallet. -
Page 7: Preliminary Instructions
1. General 1.3 Preliminary Instructions Read these instructions before starting to work with the system. Liability Markem-Imaje shall not be held responsible for any damage if the safety instructions are not followed, or if general, elementary safety rules are not applied when using and servicing Markem-Imaje equipment. This equipment is certified in accordance with the requirements for CE marking. -
Page 8: Use
1. General 1.3 Preliminary Instructions The Print & Apply System should only be used when correctly mounted and secured, to prevent it from tipping over. Consumables (ink ribbons, cleaning products, cleaning cloths) not recommended by Markem-Imaje must not be used. If such consumables are used, any consequences shall be under the entire responsibility of the user. Types of Markem-Imaje consumables other than those for which the system is intended should not be used without Markem-Imaje’s prior approval. -
Page 9: Safety Requirements
1. General 1.4 Safety Requirements Markem-Imaje disclaims all responsibility regarding the CE certification if the equipment is used, altered or installed in any way other than described in this manual. This symbol indicates circumstances that may be hazardous to the user or cause damage to the equipment. -
Page 10: Product Presentation
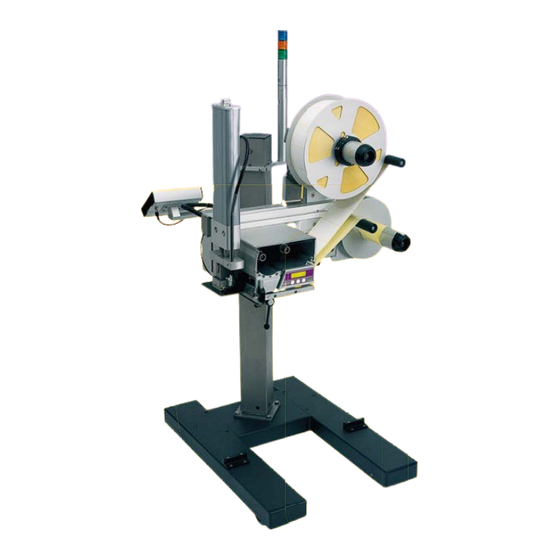
2. Product Presentation 2.1 Positions Stand Pillar Positions The pillar can be mounted in three various positions on the floor stand base, as shown below. The information in this manual (for all applicators, except the Pallet applicator) is based on the middle position. -
Page 11: Print Unit Positions
2. Product Presentation 2.1 Positions Print Unit Positions The print unit can be mounted in different positions on the stand, as shown below. All procedures are the same regardless of in which position the print unit is mounted. Note: To prevent the stand from tipping over, make sure that it is properly balanced when the print unit is mounted. -
Page 12: 2000 Pallet Applicator Versions
2. Product Presentation 2.1 Positions 2000 Pallet Applicator Versions 2000 Pallet is available in two versions, right- and left-handed. As shown below, the pallet applicator is always mounted with the pillar in the left position and the pallet applicator mounted to the right. -
Page 13: Pallet Applicator - Stand And Pillar Recommendations
2. Product Presentation 2.1 Positions Pallet Applicator – Stand and Pillar Recommendations The 2000 Pallet Applicator can be used both with a fixed and an adjustable stand pillar. The stand pillar can be mounted directly to the floor or used with a stand base and docking station. a. -
Page 14: 2000 Pallet Positioning Parameters
2. Product Presentation 2.1 Positions 2000 Pallet Positioning Parameters To achieve the best performance of the 2000 Pallet applicator, the positioning and distance to the pallet is important. Recommentations how to position the applicator, both with and without the docking station is described below. Several factors have to be considered. - Page 15 2. Product Presentation 2.1 Positions Positioning of left-hand version: 127,5 min 300 max 480 label p=157,5 min 125 max 250 Pallet...
-
Page 16: Recommended Floor Positioning
2. Product Presentation 2.1 Positions Recommended Floor Positioning The pillar can be mounted directly to the floor or to a docking station. A lot of factors have to be considered when mounting the pallet applicator by the conveyor. The values below shows an approximate recommentation of where to place the pillar and docking station. - Page 17 2. Product Presentation 2.1 Positions Positioning of left-hand version: a. Distance from pillar to pallet Max value: 958 mm Min value: 778 mm b. Distance from pillar to docking station Fixed value: 574 mm c. Distance from pillar to corner of pallet Max value: 118 mm Min value: 7 mm d.
-
Page 18: Floor Space Plan
2. Product Presentation 2.2 Floor Space Plan Pallet Applicator Right-hand position: R 1100 Work Area... - Page 19 2. Product Presentation 2.2 Floor Space Plan Left-hand position: R 1100 Work Area...
-
Page 20: Example
2. Product Presentation 2.2 Floor Space Plan Example The drawing below shows one of several possible mounting positions for the Tamp S applicator. Since there are so many possibilities, please see the Markem-Imaje intranet Planet or contact Markem-Imaje for additional floor space plans Tamp S applicator: 862 mm (de pending on machine position) 430 mm... -
Page 21: Tools Required
2. Product Presentation 2.3 Tools Required The following tools are required: Screwdriver T10, T15:1.5 Screwdriver: 2.5 mm Allen keys: 1.5 – 10 mm U-ring keys: 7, 8, 10, 12, 13, 19 mm... -
Page 22: Technical Specification
2. Product Presentation 2.4 Technical Specification Air Consumption The air consumption is in liter per minute and show as an average air consumption with the air knife set to 50%. 6 labels per 25 labels per 50 labels per 120 labels per minute minute minute... -
Page 23: Assembly Instructions
3. Installation 3.1 Assembly Instructions For troubleshooting, please see 2000 Series and Pallet User Manual. Docking Station and Stand Base 1. Mount the cross bars to the side guides, wheels inwards, using 4 x 6 mm Allen screws. The cross bar with the white plastic rollers must be inserted through the two guide rails. -
Page 24: Pillar
3. Installation 3.1 Assembly Instructions Pillar 1. Place the pillar on the floor stand base. Fasten with 4 x M12 x 25 mm screws. 2. Drive the six plastic plugs into the holes not used for the pillar. 3. If an adjustable pillar is used, make sure the lock handle is pointing towards the conveyor. -
Page 25: Installation
3. Installation 3.1 Assembly Instructions Print Unit This section is not valid for the Pallet applicator. See section Applicator Module Pallet for more information. Note: If the print unit is installed using a floor stand module from another supplier than Markem- Imaje, see section Fastener Bracket for fastener bracket drawings. - Page 26 3. Installation 3.1 Assembly Instructions Note: The following operation requires two people. 5. Lift the print engine module with the fastened arm onto the mounting kit. Retighten the handle. 6. Remove the protection part. Assemble the label roll holder onto the shaft using the 1 x M6 x 10 mm Allen screw.
-
Page 27: Applicator Pad
3. Installation 3.1 Assembly Instructions Applicator Pad Note: This step is required for the Wipe, Tamp S and Tamp L applicators. See section Applicator Module Pallet for assembly of the Pallet applicator pad. The illustration shows mounting of the applicator pad for Wipe applicator. See section Adjustments for pad positioning. -
Page 28: Applicator Module - Blow, Wipe, Tamp S
3. Installation 3.1 Assembly Instructions Applicator Module – Blow, Wipe, Tamp S Note: The following steps are not required for the Tamp L and Pallet applicators. 1. Assemble the applicator and the L-profile. a. Blow applicator b. Wipe applicator c. Tamp S applicator... - Page 29 3. Installation 3.1 Assembly Instructions 2. Slide the L-profile onto the print unit. Fasten the profile in position with the 6 pre-mounted screws.
-
Page 30: Applicator Module - Tamp L (250, 450, 700)
3. Installation 3.1 Assembly Instructions Applicator Module – Tamp L (250, 450, 700) Note: The following steps are not required for the Blow, Wipe, Tamp S and Pallet applicators. 1. Assemble the applicator and the applicator bracket. 2. Remove the screw. Note: The screw should be handled as waste. - Page 31 3. Installation 3.1 Assembly Instructions 3. Slide the block onto the print unit. 4. Mount the block in the indicated position with the included Allen screw.
- Page 32 3. Installation 3.1 Assembly Instructions 5. Slide the bracket onto the print unit. Fasten the profile in position with the 6 pre-mounted screws. See section Adjustments for final adjustments.
-
Page 33: Support Blow Tube
3. Installation 3.1 Assembly Instructions Support Blow Tube Note: The following steps are not required for the Pallet applicator.See section Applicator Module Pallet for assembly of the Pallet applicator support blow tube. 1. Mount the support blow tube with one Allen screw. - Page 34 3. Installation 3.1 Assembly Instructions 2. Fit the applicator interface into position and 4. Connect the air tube to the support blow fasten with the pre-mounted screw. tube. 3. Connect the applicator interface connector to connection board position B. Note: Use the cable detensioner. Replace the control box cover.
-
Page 35: Applicator Module - Pallet
3. Installation 3.1 Assembly Instructions Applicator Module – Pallet Note: The following steps are not required for the Blow, Wipe, Tamp S and Tamp L applicators. Open the box and remove the top padding. Read the Instructions manual carefully. 1. Lift the box straight up to uncover the pallet applicator. - Page 36 3. Installation 3.1 Assembly Instructions 3. Fasten the two brackets with the included Allen screws. There are three screws for each bracket. Note: The two brackets are fastened in exactly the same place for both the right- and left-hand versions. 4.
- Page 37 3. Installation 3.1 Assembly Instructions Note: If an adjustable pillar is used, the distance (d) must be exactly 260 mm. Otherwise the locking lever can not be used to lock the pillar. For other combinations of stand pillar, stand base and docking station see section Product Presentation for more information.
-
Page 38: Print Unit Bracket - Pallet
3. Installation 3.1 Assembly Instructions Print Unit Bracket - Pallet Note: The following steps are not required for the Blow, Wipe, Tamp S and Tamp L applicators. 1. Attach the print unit bracket to the pillar using the included screws. Note: Make sure that the lower part of the bracket is touching the upper surface of the applicator module bracket. - Page 39 3. Installation 3.1 Assembly Instructions 3. Check the marking of each cable. Connect the following cables: to the CPU board. 4. Connect the support blow. Replace the cover and tighten the two screws. Note: Make sure the cable is correctly placed in the special opening in the cover (5).
-
Page 40: Print Unit - Pallet
3. Installation 3.1 Assembly Instructions Print Unit - Pallet Note: The following steps are not required for the Blow, Wipe, Tamp S and Tamp L applicators. 1. Fasten the arm onto the print unit interface using 2 x M8 x 20 mm Allen screws. Make sure the arm is fastened in the correct print position. - Page 41 3. Installation 3.1 Assembly Instructions 4. Remove the protection part. Assemble the label roll holder onto the shaft using the 1 x M6 x 10 mm Allen screw. Use of a rubber hammer might be necessary. Note: Make sure the green friction belt is put over the guiding pin and over the friction wheel on the label roll holder.
-
Page 42: Support Blow Tube - Pallet
3. Installation 3.1 Assembly Instructions Support Blow Tube - Pallet Note: The following steps are not required for the Blow, Wipe, Tamp S and Tamp L applicators. 1. Mount the support blow tube with one Allen screw. Use the washers. Note: Make sure the support blow tube is mounted parallel to the peel-off bar. -
Page 43: Applicator Connection Board - Pallet
3. Installation 3.1 Assembly Instructions Applicator Connection Board - Pallet Note: The following steps are not required for the Blow, Wipe, Tamp S and Tamp L applicators. 1. Loosen the center screw to remove the control box cover. 2. Fit the connection board into position and fasten with the included two screws. - Page 44 3. Installation 3.1 Assembly Instructions Check the marking of each cable. Connect the cable P8 to the connection board. 4. Connect the B cable to B. 5. Connect the communication cable to COM2. Replace the control box cover. 6. Connect the air tube to the support blow tube.
-
Page 45: Print Engine Module
3. Installation 3.2 Print Engine Module Fastener Bracket Note: This is not valid for the Pallet applicator. The fastener bracket is a multi-purpose interface for installation of the print unit when using a floor stand module from another supplier than Markem-Imaje. M8 (4x) -
Page 46: Terminal
3. Installation 3.3 Terminal Mechanical Installation Note: Turn off the printer before installation. Mount the bracket onto the pillar at the preferred height, using 2 included Allen screws. Fasten the terminal onto the bracket with 2 x 10 mm Torx screws. Connect the power cable. -
Page 47: Terminal - Printer Connection
3. Installation 3.3 Terminal Terminal – Printer Connection Serial Connection Connect the COM1 port on the terminal to the COM1 port on the 2000 printer with an RS232 serial cable. In the terminal, enter the menu Control Panel/Communication Settings/ Terminal – Printer Connection. -
Page 48: Data Input Device Settings
3. Installation 3.3 Terminal Enter the printer’s IP address and press enter. Select yes on the question test connection. Data Input Device Settings This feature allows you to receive indata from an external device, such as a scale or a barcode scanner. - Page 49 3. Installation 3.3 Terminal Example 2: Select Month from a Barcode In the terminal, enter the menu Control Panel/Communication Settings/Data Input Device Settings/Filter Test. Scan the barcode. Since we have not changed any settings yet, the result becomes PN:123D:20081215<CR><LF>. Enter the menu Packet Stop Marker. In this case the packet ends with <CR><LF>.
-
Page 50: Terminal - G1
3. Installation 3.3 Terminal Terminal – G1 Note: Disconnect the power supply to the printer before installation. 1. Mount the bracket onto the pillar at the preferred height, using 2 included Allen screws. 2. Fasten the terminal onto the bracket with 2 x 10 mm Torx screws. -
Page 51: Accessories
3. Installation 3.4 Accessories Batch Kit Note: This is not valid for the Pallet applicator. 1. Assemble the batch kit and the L-profile using the two Allen screws. 2. Mount the support blow tube onto the batch kit. Note: If the batch kit is added later, the support blow tube must be removed from the print unit and mounted onto the batch kit. -
Page 52: Status Beacon
3. Installation 3.4 Accessories Status Beacon Note: This is valid for the Blow, Wipe and Tamp applicators. See section Status Beacon – Pallet for installation of the Status Beacon for Pallet applicator. Note: Disconnect the power supply to the printer before installation. -
Page 53: Status Beacon - Pallet
3. Installation 3.4 Accessories Status Beacon - Pallet Note: This is only valid for the Pallet applicator. See section Status Beacon for installation of the Status Beacon for Blow, Wipe and Tamp applicators. 1. Fasten the beacon onto the bracket using the included Allen screw. -
Page 54: Stand Extension
3. Installation 3.4 Accessories Stand Extension Note: See section Assembly Instructions for assembly of the stand base and pillar. Note: The illustration shows the mounting on a stand base. The extension can also be mounted directly on the floor. 1. Place the stand extension on the stand base. Fasten with the 4 included screws. -
Page 55: Degree Kit
3. Installation 3.4 Accessories 360 Degree Kit Note: This is not valid for the Pallet applicator. Detach the outer arm from the mounting kit. See section Assembly Instructions for details. 1. Fasten the outer arm onto the 360 degree kit using 2 included Allen screws and washers. - Page 56 3. Installation 3.4 Accessories Note: The following operation requires two people. 3. Lift the print unit with the fastened kit onto the stand. 4. Loosen the 2 screws on the 360 degree kit to adjust the print unit. Note: The print unit can now rotate freely.
-
Page 57: Barcode Reader
3. Installation 3.4 Accessories Barcode Reader Two types of bar code readers are available for the 2000 series: Sick and Datalogic. Note: For 2000 Pallet only Sick is available. For the Tamp and Pallet applicators are brackets included. Otherwise use brackets made locally to mount the barcode reader. -
Page 58: Height Position Gauge
3. Installation 3.4 Accessories Height Position Gauge 1. Glue the gasket to the gauge. Reset the gauge. Lower the pillar to the bottom position. See the User Manual for stand height adjustment. 2. Loosen 2 Allen screws to remove the handle. 3. -
Page 59: Electric Installation
3. Installation 3.5 Electric Installation General The main supply input is reached from the outside. All other connectors are locted behind the control unit cover. Note: All connector cables should be fastened in the cable detensioners. 1. Main supply 2. Ethernet port 3. -
Page 60: Mains Supply
3. Installation 3.5 Electric Installation Mains Supply The mains supply to the 2000 printer is 110-240 VAC, 50-60 Hz with a ground pin connector. Make sure that no other machines are connected to the same outlet. Interface – Ethernet RJ-45 Configuration Use a standard Ethernet RJ-45 connector for communication with a networked computer. -
Page 61: Interface I/O Connection Configuration
3. Installation 3.5 Electric Installation Interface – I/O Connection Configuration The connection board has one part with internal connectors and one part with external connectors. The internal connectors, for fixed purposes, are Molex snap on, 9-pol D-sub and Amphenol C091. The external connectors consist of terminal blocks and are for customer use. - Page 62 3. Installation 3.5 Electric Installation Output C. Relay outputs. The relays are dimensioned for 1 A at 30 VDC or 0.5 A at 125 VAC. Maximum ratings: 1 A, 125 VAC, 60 VDC, 62.5 VA and 30 W. Output functions are selectable. Configure outputs with the ASCII user interface or web server interface.
- Page 63 3. Installation 3.5 Electric Installation Input D. Main trig. Photocell input for NPN and PNP photocells. E. Pre trig. Photocell input for NPN and PNP photocells. F. Return sensor. Photocell input for NPN and PNP photocells. Signal D1, E1, F1: 24 V NPN, PNP D2, E2, F2: NPN or PNP signal D3, E3, F3: GND...
- Page 64 3. Installation 3.5 Electric Installation Label Handling Module H. Internal connector to Label Handling Module. 1. Paper Low 2. Label Handling Module enabled 3. GND Fan cable. Internal cable to print engine cooling fan. 1. 24 VDC 2. Cooling fan PWM signal (Pulse Width Modulation)
-
Page 65: Interface Barcode Reader
3. Installation 3.5 Electric Installation Interface Barcode Reader Barcode Reader J. 9-pin D-sub female connector for a barcode reader. Pin configuration: 1. 24V 2. Rx 3. Tx 4. Start 5. GND 6. Good read 7. not used 8. not used 9. -
Page 66: Interface - Pallet
3. Installation 3.5 Electric Installation Interface – Pallet Air pressure sensor 1. 24 V 2. Pressure guard 3. Ground Air valves 1. 24 V 2. Blow 3. 24 V 4. Supportblow 5. 24 V 6. Vacuum... - Page 67 3. Installation 3.5 Electric Installation Interface external stop In case of emergency, the pallet applicator can be stopped by pressing the red emergency stop button. This action immediately shuts off the compressed air. It also stops the fans in the applicator head and stops printer and LHU operation.
-
Page 68: Interface - Terminal
3. Installation 3.5 Electric Installation Interface – Terminal Ethernet RJ45 Use a standard Ethernet RJ45 connector for communication with a networked computer. Cable from Control Box, RJ45 (female). 1 = TX+ 2 = TX- 3 = RX+ 6 = RX- COM1 For serial communication with the COM1 port a RJ45 connector is used. - Page 69 3. Installation 3.5 Electric Installation Status Beacon For the Status Beacon an amphenol C091 connector is used. 1. GND 2. Yellow 3. Not used 4. Blue 5. Green...
-
Page 70: Examples
3. Installation 3.6 Examples Two-sided Application The Wipe applicator uses two photocells to apply two labels on adjacent sides of an object (front/side). This print & apply cycle is described below. Note: The two labels will be identical. Print & Apply Cycle: 1. - Page 71 3. Installation 3.6 Examples Follow the instructions below to set the printer for two-sided application. Connect the main trig photocell to connector Connect the head return photocell to connector F. If a 2000 terminal is used, connect to connector E. Set “two-sided application”...
-
Page 72: Test Print
3. Installation 3.7 Test Print Instructions The status and print quality of your 2000 printer is easily checked with a test print. The test print displays the setup of the printer. For basic diagnostics, please refer to the Book for Service Engineers. -
Page 73: Auto Adjustment Of Mps
3. Installation 3.8 Auto Adjustment of MPS Instructions The sensitivity level of the media position sensor (MPS) is set automatically with a printout in test mode 3. The printer feeds some paper to determine the transparency of the paper and then sets the sensitivity level of the sensor. -
Page 74: Adjustments
4. Adjustments 4.1 Print Engine Module Introduction The performance of the 2000 print engine module is optimized and fine-tuned by several easy adjustments. Label Adjustment Dislocated labels are adjusted by the following steps: 1. The label path must be straight and the labels must run adjacent to the inner wall of the print engine module. -
Page 75: Ribbon Adjustment
4. Adjustments 4.1 Print Engine Module Ribbon Adjustment Insert the ribbon rolls as shown in the illustration. Check that the ink is facing downwards by blotting a label. The ink should stick to the label. Creased ribbon is adjusted by the following steps: 1. -
Page 76: Printout Adjustment
4. Adjustments 4.1 Print Engine Module Printout Adjustment Use the print head adjustment screws to give a balanced pressure on the print head. Change the position of the print head adjustment screws to fit labels of different width. Note: The pressure should be as light as possible while maintaining high quality printing. - Page 77 4. Adjustments 4.1 Print Engine Module 4. To increase the pressure on the print head, turn the lower nuts clockwise (downwards). This tightens the spring. 5. To decrease the pressure on the print head, turn the lower nuts counterclockwise (upwards). 6.
-
Page 78: Dispensing Adjustment
4. Adjustments 4.1 Print Engine Module Dispensing Adjustment The labels are dispensed from the print engine module to the applicator pad. 1. Ensure that the dispensing plate is parallel to the edge. 2. The distance (d) from the plate to the edge is set to 0.4 mm when delivered. -
Page 79: Pneumatic Module Adjustments
4. Adjustments 4.1 Print Engine Module Pneumatic Module Adjustments Remove the CPU-box cover. 1. Adjust the pressure switch alarm level by turning the screw. Pressure switch alarm lamp. Factory default alarm level is 0.2 Mpa (2 bar). General air pressure indicator. Factory default is 0,5 Mpa (5 bar). -
Page 80: Batch Kit
4. Adjustments 4.2 Batch Kit Introduction Use the batch kit when printing small labels. The complete label surface including the dispensing feed can be used. Note: The batch kit is not used with the Pallet applicator. Positioning 1. Assemble the batch kit with the two screws and washers. - Page 81 4. Adjustments 4.2 Batch Kit 2. Position the batch kit 1.5 mm from the applicator pad, and 0.75 mm above the pad. 3. Position the L-profile such that the edge of a printed label runs along the edge of the batch kit. The distance (d) depends on the label size.
-
Page 82: Adjustment
4. Adjustments 4.2 Batch Kit Adjustment The angle of the peel-off bar is intentionally left unadjusted when delivered. It must be adjusted during installation. 1. Insert label web and feed some labels to check the dispensing. Note: The web must run tightly along the peel- off bar. -
Page 83: Blow Applicator
4. Adjustments 4.3 Blow Applicator Adjustment Note: The air-knife must be adjusted when changing label size. It is important that the air knife and label are centered. Follow these steps to center the air knife and label: 1. Adjust the L-profile to get the applicator pad in position. -
Page 84: Wipe Applicator
4. Adjustments 4.4 Wipe Applicator Change Applicator Mode The applicator can operate in left-handed (default) or right-handed mode. Left-handed mode: Right-handed mode: Before changing mode, check the applicator part number and note the last two ending digits. They indicate which adjustment operation to use. 1. - Page 85 4. Adjustments 4.4 Wipe Applicator Version 1: Part number ending with –00 or –01 1. Detach the applicator from the L-profile, and remove the top part. 2. Rotate the lower part of the applicator 180 degrees. Make sure not to twist or jam cables and tubes.
-
Page 86: Applicator Positioning
4. Adjustments 4.4 Wipe Applicator Applicator Positioning 1. Adjust the L-profile. 2. Adjust the applicator to position the applicator pad relative to the dispensed labels. 3. Position the applicator pad 1.5 mm from the peel-off bar, and 0.75 mm below the peel-off bar (e). - Page 87 4. Adjustments 4.4 Wipe Applicator 4. Make sure that 1.5 mm of the label protrudes from the edge that will touch the case first. The applicator pad must be parallel in all directions to the print unit. Adjust both the pad angle and pad height.
-
Page 88: Special Applicator Adjustments
4. Adjustments 4.4 Wipe Applicator Special Applicator Adjustments Note: When adjusting the cylinder, turn out the applicator arm. Arm speed 1. Adjust the speed of the arm going out. Screw in the screw into the end position. Unscrew three turns. 2. -
Page 89: Tamp S Applicator
4. Adjustments 4.5 Tamp S Applicator Applicator Positioning Note: Disconnect the power to the print engine module and turn off the air supply before adjusting the applicator. 1. Position the applicator pad a 1.5 mm from the peel-off bar (e). Note: The chamfered end of the plate must be placed towards the peel-off bar. -
Page 90: Special Applicator Adjustments
4. Adjustments 4.5 Tamp S Applicator Special Applicator Adjustments Vacuum suction 1. Adjust the vacuum suction on the applicator pad with the screw. Arm speed Set the speed of the applicator arm using a screwdriver. Clockwise decreases the speed. Counterclockwise increases the speed. Factory default: 6 turns from the bottom position. -
Page 91: Tamp L Applicator
4. Adjustments 4.6 Tamp L Applicator Applicator Positioning Note: Disconnect the power to the printer and turn off the air supply before adjusting the applicator. 1. Position the applicator pad a 1.5 mm from the peel-off bar (e). Note: The chamfered end of the plate must be placed towards the peel-off bar. - Page 92 4. Adjustments 4.6 Tamp L Applicator 5. Position the applicator pad b 0.75 mm below the peel-off bar (e), see step 1 above. Note: The chamfered end of the plate must be placed towards the peel-off bar. 6. Loosen 4 x M4 Allen screws to dismount the applicator pad using an M3 Allen key.
-
Page 93: Special Applicator Adjustments
4. Adjustments 4.6 Tamp L Applicator Special Applicator Adjustments Vacuum suction 1. Adjust the vacuum suction on the applicator pad with the screw. Arm speed 2. Loosen the cylinder nut (24 mm) and remove the cover. Set the speed of the applicator arm using a screwdriver. -
Page 94: Pallet Applicator
4. Adjustments 4.7 Pallet Applicator Applicator Positioning Note: Disconnect the power to the print engine module and turn off the air supply before adjusting the applicator. 1. Adjust the applicator to position the applicator pad relative to the dispensed labels. To center the label on the applicator pad, loosen the screw and adjust the print unit to the left or right. -
Page 95: Special Applicator Settings
4. Adjustments 4.7 Pallet Applicator Special Applicator Settings Arm Return Sensor Use the arm return sensor to adust the switching point value. The factory default value for switching point value of the arm return sensor is set to 0.5 Bar. A higher switching point value decreases the pressure of the applicator pad on the pallet. - Page 96 4. Adjustments 4.7 Pallet Applicator Follow these steps to set a new switching point value: 1. Press Edit to activate edit mode (Out A (up) flashes) 2. Press B to set Out B (Out B (down) flashes) 3. Press Edit two times 4.
- Page 97 4. Adjustments 4.7 Pallet Applicator Pneumatic Indicators 1. Loosen the Allen screw. Pull out the pneumatic box to access the pneumatic indicators. 1. Manometer, pressure zone 2 Value: 0,25-0,3 Mpa (low pressure zone) 2. Regulator, pressure zone 2 3. Manometer, pressure zone 1 Value: 0,4-0,45 Mpa (high pressure zone) 4.
-
Page 98: Applicator Arm Angle Adjustment
4. Adjustments 4.7 Pallet Applicator Applicator arm angle adjustment 1. Remove the covers. 2. Loosen the lock nut on the damper by using a 17 mm U-ring key. 3. Loosen the 6 Allen screws 3 turns by using a 5 mm Allen key. 4. -
Page 99: Software
5. Software 5.1 Introduction General Overview There are many software packages included in the 2000 Print & Apply system. All software documentation can be found on the Markem-Imaje web site www.markem-imaje.com and the 2000 Series and Pallet Getting Started CD. Labelpoint The 2000 Print &... -
Page 100: Firmware Update (Flashup)
5. Software 5.2 Firmware Update (FlashUp) Introduction FlashUp is a user-friendly application used to upload firmware for the following Markem-Imaje printers: • Compact ITP series • NOVA ITP series • 2300 ITP series • 2000 series • 2000 terminal • 4020 FlashUp is also used to upload new projects from Message Center to the 2000 Terminal. -
Page 101: Upgrade Procedure
5. Software 5.2 Firmware Update (FlashUp) Upgrade Procedure a. Turn off the power to the printer unit. b. Connect the serial cable between the COM1 port on the PC and the COM1 port on the printer. If no COM1 port is available, see below. c. - Page 102 5. Software 5.2 Firmware Update (FlashUp) To use another COM port, follow these steps: a. Click Stop. b. Select COM port used for printer/terminal from the list. c. Follow steps d-h on previous page.
-
Page 103: Firmware Update (Netcenter)
5. Software 5.3 Firmware Update (NetCenter) Introduction NetCenter is a tool to locate, manage and control Markem-Imaje printers connected to the same local area network (LAN). It is mainly intended for network administrators. Currently the NetCenter tool is used for the following Markem-Imaje products: •... -
Page 104: Message Center
5. Software 5.4 Message Center Introduction Message Center is a powerful program to design, download and print labels on the 2000 printer. Message Center uses the features of the printer such as system fonts, scalable fonts, barcodes etc. The program generates an lbl file, which can easily be downloaded to the terminal and stored together with graphics in the 2000 terminal memory. -
Page 105: Program Overview
5. Software 5.4 Message Center Program Overview 1. Object Browser window: All components of the current label project are displayed in a tree structure. Choose the object you want to work with. 2. Object Properties window: View and edit the properties of the object marked in the object browser window. 3. -
Page 106: Creating A Database
5. Software 5.4 Message Center Creating a Database 1. To create a new database, select Database Designer in the Tools menu. 2. Enter data in the fields to create a database table. 3. Layout Field: Select the FieldName in the database which describes the layout to use. Note: The DataType must be Text. -
Page 107: Editing A Database
5. Software 5.4 Message Center Editing a Database 1. To edit a new or existing database, open the Product Data Editor in the Tools menu. Note: To edit a database, the corresponding layout or project must be opened. 2. Enter the database values in the fields. The table columns will appear in the same order as they were entered in Database Designer. - Page 108 5. Software 5.4 Message Center Note: A label project in Message Center can contain more than one database, but only one database can be exported with the project to the terminal. Select the project in the Object Browser window and choose between available database tables in the Object Properties window.
-
Page 109: Creating Database Variables
5. Software 5.4 Message Center Creating Database Variables 1. Open the Variables folder in the Object Browser window. 2. Select New Variable and Database Variables to add a new database variable to the label project. 3. Select the required field from the database table in Select Field. 4. -
Page 110: Creating Configuration Prompts
5. Software 5.4 Message Center Creating Configuration Prompts 1. Open the Variables folder in the Object Browser window 2. Select New Variable and Configuration Prompt to add a new configuration prompt. 3. To view and edit configuration prompt data, open the Object Properties window. The Value field can be left empty or with a default value. -
Page 111: Creating Operator Prompts
5. Software 5.4 Message Center Creating Operator Prompts 1. Open the Variables folder in the Object Browser window 2. Select New Variable and Operator Prompt to add a new configuration prompt. 3. To view and edit operator prompt data, open the Object Properties window. The Value field can be left empty or with a default value. -
Page 112: Creating A Label Layout
5. Software 5.4 Message Center Creating a Label Layout One or more label layouts can be added to the project. Place text, barcodes, images, variables, counters etc on the label in the Label View window. Note: The label project must contain at least one database variable to function in the terminal. This variable does not need to be placed on the layout. -
Page 113: Exporting Label Data To The Terminal
5. Software 5.4 Message Center Exporting Label Data to the Terminal Label data can be transferred to the terminal by either serial or Ethernet connection. If you are using a serial connection, the terminal need to be restarted before the transfer starts. Make sure that the terminal and PC are connected by either serial or Ethernet connection. -
Page 114: Ascii User Interface
5. Software 5.5 ASCII User Interface Introduction Tera Term is an easy to use configuration tool for the 2000 Series, Nova and Compact printers. It provides access to the printer’s internal setup menu where all parameters, such as port and network settings, print, label and applicator settings are defined. -
Page 115: Connecting
5. Software 5.5 ASCII User Interface Connecting Tera Term configuration tool can be used to connect the printer with serial and network connections. When using a serial cable, first select which port to use for the connection. Select Setup Serial port from the menu to configure the port. -
Page 116: Configuration Menu
5. Software 5.5 ASCII User Interface Configuration Menu The command to enter the setup menu is: !A <enter>. Use the Arrow keys and the Enter key to select menus and to toggle and select settings. Use the Esc key to exit menus. You can also use the keyboard commands shown in the lower part of the window. - Page 117 5. Software 5.5 ASCII User Interface Restart When Restart is selected and confirmed the printer is restarted. The printer must be restarted when the following parameters have been changed: In Print Settings: Strobe Boost. In COM1 and COM2: BaudRate, Parity, DataBits, StopBits, BufferSize, FlowCtrl, Com Port Mode, TCP Port.
- Page 118 5. Software 5.5 ASCII User Interface Applicator Behavior Settings: Select applicator model and Behavior Settings --> sequence Timer Settings --> Timer Settings: Set timers and delays Trig Settings --> Trig Settings: Applicator start signal settings --> Sensor Settings Sensor Settings: Configuration of applicator sensors Display Settings -->...
-
Page 119: Behavior Settings
5. Software 5.5 ASCII User Interface Behavior Settings Applicator Model: Select the applicator Applicator Model Wipe model corresponding to your machine sign. Applicator Update If None is set, these menus are not accessible: Timer, Trig, and Sensor Sequence 1.Trig->Print&Apply Settings, Barcode Reader, Miscellaneous. Note: For Pallet applicator, the model is Two-Sided already set to Pallet and can not be... - Page 120 5. Software 5.5 ASCII User Interface No of Retries: Set the number of retries (0- Applicator Model Wipe 3) after one of the following application Applicator Update errors: Barcode Error, Matchcode Error, Barcode Sequence 1.Trig->Print&Apply Quality, No Label On Grid, or No Returnsignal.
- Page 121 5. Software 5.5 ASCII User Interface Timer Settings – Blow Applicator ApplyDelay: Time from trig signal to start of applicator. ApplyDelay (ms) In use when sequence 1 is active. Value: 0-6141 ms (0-6,1 s). Resolution 3 ms, that is 1-4 ApplyTime (ms) ms will be rounded off to 3 ms, 5-7 ms to 6 ms, etc.
- Page 122 5. Software 5.5 ASCII User Interface Timer Settings – Tamp L Applicator ApplyDelay: Time from trig signal to start of ApplyDelay (ms) applicator. In use when sequence 1 is active. Value: 0-6141 ms (0-6,1 s). Resolution 3 ms, that is: ApplyTimeout (ms) 1-4 ms will be rounded off to 3 ms, 5-7 ms to 6 ms, etc.
- Page 123 5. Software 5.5 ASCII User Interface Timer Settings – Tamp S Applicator ApplyDelay: Time from trig signal to start of ApplyDelay (ms) applicator. In use when sequence 1 is active. Value: 0-6141 ms (0-6,1 s). Resolution 3 ms, that is: 1- ApplyTimeout (ms) 4 ms will be rounded off to 3 ms, 5-7 ms to 6 ms, etc.
-
Page 124: Sensor Settings
5. Software 5.5 ASCII User Interface Trig Settings TrigFilter: To set minimum required time for a TrigFilter (ms) start signal. Value: 0-1020 ms. Resolution 4 ms, that is 0-1 PreTrigEdge Positive Edge ms will be rounded off to 0 ms, 2-5 ms to 4 ms, etc. -
Page 125: Display Settings
5. Software 5.5 ASCII User Interface Display Settings Language: Set LCD display language. Language English Contrast: Set LCD display contrast. Contrast 6 [..I..] Upside Down: Rotate LCD display text 180 UpsideDown degrees. Status Beacon Settings Set the status signals flashing frequency Error LED (ms) between 0 and 5000 ms. -
Page 126: Barcode Reader Settings
5. Software 5.5 ASCII User Interface Barcode Reader Settings Barcode Reader: Select type of barcode reader Barcode Reader None (None, Sick CLV420, Datalogic DS2400A). Note: Only None and Sick CLV420 are Timeout (ms) 2000 available for Pallet. NoReadsBeforeStop 1 Timeout: Set the time how long the beam is lit No Of Barcodes 1 [I..] after start signal. -
Page 127: Input Status
5. Software 5.5 ASCII User Interface Input Status Internal Inputs: Shows status of the inputs. Internal Inputs --> [*] = signal is high. [ ] = signal is low. External Inputs --> External Inputs: Shows status of the inputs. [*] = signal is high. [ ] = signal is low. Internal Inputs This menu is intended for troubleshooting. -
Page 128: External Inputs
5. Software 5.5 ASCII User Interface PadJointAskew: active if the pad is forced out of its position. External Inputs This menu is intended for troubleshooting. Active external signals are displayed. MainTrig MainTrig: Main trig for the print and apply cycle. PreTrig PreTrig: Additional trig. -
Page 129: Printer Overview
5. Software 5.5 ASCII User Interface Printer Overview From the printer menu the following information is accessed: • Ports: Configure the COM ports or give the printer an IP-address (network settings). • Label Settings: Set label feed and adjust the print area. •... -
Page 130: Ports And Network Settings
5. Software 5.5 ASCII User Interface Ports and Network Settings Ports –2000 Series and 2300 COM1, COM2: Configure the COM ports. COM1 --> Network Settings: Configure network settings COM2 --> Network Ports: Port information. Network Settings --> External Output: Configuration of the output Network Ports -->... - Page 131 5. Software 5.5 ASCII User Interface Network Settings The IP Address is set when DHCP is disabled. IP Address Otherwise the printer asks the DHCP server for an IP Address, IP Mask and Gateway. IP Mask 255.255. KeepAlive: Defines for how long (0-7200 sec) Default the printer will try to keep the Telnet Gateway...
-
Page 132: External Output
5. Software 5.5 ASCII User Interface External Output See chapter 6.7 Input and output settings for Output 1 Not Active location and specification of the outputs. 2000 Series: 5 outputs. Output 1 Type NormallyOpen 2300: 2 outputs. Output 2 Not Active Output: All information, warning and error signals can be used. -
Page 133: Label And Character Settings
5. Software 5.5 ASCII User Interface Label and Character Settings Label Settings Disp feed: The distance the paper is fed after the Disp feed (mm) 10.0 next label has reached the print area (for label stock), or after printing is completed (for Rev feed (mm) continuous stock). - Page 134 5. Software 5.5 ASCII User Interface Print Settings –2000 Series Print speed: Speed during printing. Print speed (mm/s) 200[...I..] Feed speed: Blank feed speed. Can be set higher than the normal print speed. Feed speed (mm/s) 200[...I..] Barc. speed: Can be set lower or equal to the normal print speed to get a higher print Barc.
-
Page 135: Print And Sensor Settings
5. Software 5.5 ASCII User Interface Print and Sensor Settings Character Settings Command Char: All decimal ASCII code Command Char numbers are valid. Default is 33. EOL Char EOL Char: End of line character. All decimal ASCII values are valid. Character Set CP-1252 Character Set: Changes the code page for... -
Page 136: Other Settings
5. Software 5.5 ASCII User Interface Other Settings Date and Time Settings Date dd/mm/yyy: Set date in the Date dd/mm/yyy 07/12/2006 printer. Time hh:mm:ss 09:07:34 Time hh:mm:ss: Set time in the Date Change 00:00 printer. hh:mm Date Change hh:mm: Set time for date to change Miscellaneous Settings Factory Defaults: Reset to factory... -
Page 137: Web Server
5. Software 5.6 Web Server Overview Web Server Configuration Menu –2000 Series The best way to configure a printer is by accessing it through the web server. All network information in the printer must be defined before it can be accessed. Enter the IP address of the printer in the browser address field to connect to printer. - Page 138 5. Software 5.6 Web Server Web Server Menu Overview This is a brief description of what you can define in the menu sections. Please see Labelpoint Programmer’s Reference Manual for more information. Printer Label Settings: Set label feed and adjust the print area. Print Settings: Set print and feed speed.
-
Page 139: Printer Menu
5. Software 5.6 Web Server Printer Menu Label Settings Dispense feed: The distance the paper is fed after the next label has reached the print area (for label stock) or after printing is completed (for continuous stock). It can be set to position the paper for tear-off after printing, or to dispense pre-cut labels properly. -
Page 140: Printer Settings
5. Software 5.6 Web Server Printer Settings Print Type: Choose between DT or TT printing mode. Print density: The darkness of the printout in percent of nominal strobe value, 50-150%. Default is 100%. (Valid for 2000 Series). Strobe time (μs) Compact, NOVA: Compact default 490 μs. Historic compensation: When printing at high speed, problems may arise with “bleeding”... - Page 141 5. Software 5.6 Web Server Character Settings Command char: All decimal ASCII code numbers are valid. Default is 33. EOL Char: End of line character. All decimal ASCII values are valid. Character set: Changes the code page for the Labelpoint printer command language. Sensor Settings Detection: Auto (Startup): Printer detects sensor type at start-up (reboot).
- Page 142 5. Software 5.6 Web Server Sensor Settings (continued) Sensitivity: Sets the sensitivity of the MPS receiver. Set low for very thin medias. Set to High or Extra High for very thick medias. Note: Not available for Compact and NOVA. Current level: Sets the energy level of the MPS transmitter (luminous intensity). Offset value: The value that indicate the breakpoint between gap and label.
-
Page 143: Applicator Menu
5. Software 5.6 Web Server Applicator Menu Behavior Settings Applicator Model: Select the applicator model corresponding to your machine sign. If None is set, these menus are not accessible: Timer, Trig, and Sensor Settings, Barcode Reader, Miscellaneous. Note: For Pallet applicator, the model is already set to Pallet and can not be changed. - Page 144 5. Software 5.6 Web Server Timer Settings – Blow Applicator Apply delay: Time from trig signal to start of applicator. In use when sequence 1 is active. Value: 0-6141 ms (0-6,1 s). Resolution 3 ms, that is 1-4 ms will be rounded off to 3 ms, 5-7 ms to 6 ms, etc.
- Page 145 5. Software 5.6 Web Server Timer Settings – Tamp L Applicator Apply delay: Time from trig signal to start of applicator. In use when sequence 1 is active. Value: 0-6141 ms (0-6,1 s). Resolution 3 ms, that is: 1-4 ms will be rounded off to 3 ms, 5-7 ms to 6 ms, etc.
- Page 146 5. Software 5.6 Web Server Timer Settings – Tamp S Applicator Apply delay: Time from trig signal to start of applicator. In use when sequence 1 is active. Value: 0-6141 ms (0-6,1 s). Resolution 3 ms, that is: 1-4 ms will be rounded off to 3 ms, 5-7 ms to 6 ms, etc.
- Page 147 5. Software 5.6 Web Server Trig Settings Trig filter: To set minimum required time for a start signal. Value: 0-28 ms. Resolution 4 ms, that is 0-1 ms will be rounded off to 0 ms, 2-5 ms to 4 ms, etc. PreTrigEdge: Set photocell pre trigger edge.
- Page 148 5. Software 5.6 Web Server Display Settings Language: Set LCD display language. Contrast: Set LCD display contrast. Upsidedown: Rotate LCD display text 180 degrees.
- Page 149 5. Software 5.6 Web Server Barcode Reader Settings Barcode reader: Select type of barcode reader (None, Sick CLV420, Datalogic DS2400A). Timeout: Set the time how long the beam is lit after start signal. (0-10200 ms = 0-10.2s) No reads before stop: Specifies the number of continuous failed barcode read attempts, before the system stops and signals.
-
Page 150: Communication Menu
5. Software 5.6 Web Server Communication menu COM1, COM2 Settings Baud Rate: 1200 - 115 200 baud. (Default is 9 600 baud). Parity: None, Odd, Even, Zero or One. Number of data bits per character: 7 or 8. (Default is 8). Number of Stop Bits: 1 or 2. - Page 151 5. Software 5.6 Web Server Network Settings The IP Address is set when DHCP is disabled. Otherwise the printer asks the DHCP server for an IP Address, IP Mask and Gateway. TCP keepalive: Defines for how long (0-7200 sec) the printer will try to keep the Telnet communication.
-
Page 152: Output Settings
5. Software 5.6 Web Server Output Settings See chapter 6.7 Input and output settings for location and specification of the outputs. 2000 Series: 5 outputs. 2300: 2 outputs. Output: All information, warning and error signals can be used. Output n Type: Select NormallyClosed or NormallyOpen. Input Settings See chapter 6.7 Input and output settings for location and specification of the inputs. -
Page 153: System Menu
5. Software 5.6 Web Server System Menu System Info System Info: Displays printer status and information. Date and Time Settings Date dd/mm/yyy: Set date in the printer. Time hh:mm:ss: Set time in the printer. Date Change hh:mm: Set time for date to change. Security Security: Set web server password. - Page 154 5. Software 5.6 Web Server Miscellaneous Clear filesystem: Remove all file system data. Restore factory defaults: Reset to factory defaults and restart. Application mode: Not supported Restart When Restart is selected and confirmed the machine is restarted. The printer must be restarted when the following parameters have been changed: In Print Settings: Strobe Boost.
-
Page 155: Input And Output Settings
5. Software 5.7 Input and Output Settings Output Settings Relay output Type Description signal Not Active Software Information The relay output is controlled with a software command sequence. Controlled ApplyDelay too Warning The printout has not finished when the apply cycle was supposed to Short start, i.e. - Page 156 5. Software 5.7 Input and Output Settings Paper Out Error No paper. Cover Open Error The ribbon cover is open. Overheated Error The temperature around the power unit is to hot. System OK Information System is OK and ready to print and apply. Offline Information The system is offline, i.e.
-
Page 157: Input Settings
5. Software 5.7 Input and Output Settings Input Settings Opto input signal Description Not Active Offline Set the system "Offline", i.e. not ready for a print and apply cycle. Startbutton Emulates a pressed start button. Applicator Start Emulates a pressed start button on the pallet applicator. Applicator Stop Emulates a pressed stop button on the pallet applicator. -
Page 158: Revisions To This Manual
12/ 2003 05/ 2005 6. Revision 11/ 2006 03/ 2007 05/ 2008 Revisions to this manual Revision index Date published Revision index documentation Software index 12/2009 Photographs and drawings are not binding in detail. This document was originally written in English. The English text of this document shall alone be authentic and shall prevail in the event of a dispute.
Need help?
Do you have a question about the markem-imaje 2000 and is the answer not in the manual?
Questions and answers