Akuvox R28 Series Manual
Hide thumbs
Also See for R28 Series:
- Administrator's manual (122 pages) ,
- Admin manual (59 pages) ,
- User manual (12 pages)
Table of Contents
Advertisement
Quick Links
Advertisement
Table of Contents

Related Manuals for Akuvox R28 Series


Summary of Contents for Akuvox R28 Series
- Page 1 About This Manual About This Manual...
- Page 2 Thank you for choosing Akuvox R28 series door phones. This manual is intended for the administrators who need to properly configure the door phone. This manual is written based on the 28.30.10.3 version, and it provides all the configurations for the functions and features of the Akuvox door phone.
-
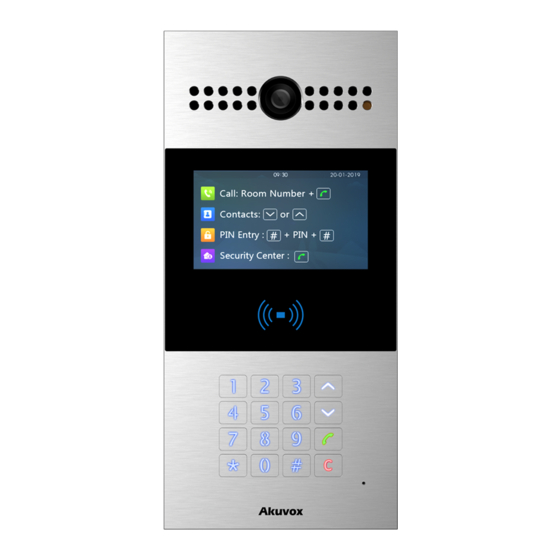
Page 3: Product Overview
The security that comes with being able to control who comes into your building along with the ability to verbally and visually confirm their identity is immeasurable. Akuvox R28A is a SIP-compliant, hands-free, and video(optional) door phone. It can be connected with Akuvox indoor monitors for remote access controlling and monitoring. -
Page 4: Change Log
Change Log Change Log High Security Mode. -
Page 5: Model Specification
Model Specification Model Specification Model Model R28A R28A Camera 2 Megapixels, automatic lighting Relay In Relay Out ✔ RS485 ✔ Card Reader... - Page 6 Introduction to Configuration Menu Introduction to Configuration Menu Status Status: this section gives you basic information such as product information, network information, and account information, etc. Intercom Intercom: this section cover intercom call setting, user, access schedule, Input control, Relay, Card settings, PIN Code, Wiegand connection, ONVIF, RTSP, and Mjpeg monitoring, lift control, motion detection, HTTP API, etc.
-
Page 8: Access The Device
Access the Device Access the Device Access the Device Access the Device Door phones' system settings can be either accessed on the device directly or on the device web interface. Obtain Device IP Address Obtain Device IP Address Searching the device IP by the IP scanner in the same LAN network. Just click the Scan Scan tab in the IP scanner to check the device IP. - Page 9 The initial user name and password are all admin admin, and please be case-sensitive to the user names and passwords entered. Note Note You can obtain the device IP address using the Akuvox IP scanner to log in to the device web interface. To download: https://knowledge.akuvox.com/docs/akuvox-ip-scanner?highlight=IP https://knowledge.akuvox.com/docs/akuvox-ip-scanner?highlight=IP Detailed guide: https://knowledge.akuvox.com/v1/docs/en/how-to-obtain-ip-address-via-ip-...
-
Page 10: Language Setting
Language and Time Setting Language and Time Setting Language Setting Language Setting You can select device language and device language icons, and customize interface text including configuration names and prompt text. To set up the language you need, go to Phone > Time/Lang Phone >... - Page 11 Time settings on the web interface allows you to set up the NTP server address that you obtained to automatically synchronize your time and date. When a time zone is selected, the device will automatically notify the NTP server of the time zone so that the NTP server can synchronize the time zone setting in your device.
- Page 12 Screen Display and LED Setting Screen Display and LED Setting Infrared LED Setting Infrared LED Setting Infrared LED is mainly designed to reinforce the light for facial recognition at night or in a dark environment, you can configure the infrared LED in the device and on the web interface. You can set up it on the device web Intercom >...
- Page 13 You can enable or disable the LED lighting on the card reader area as needed on the web interface. Meanwhile, if you do not want to have the LED light on the card reader area stay on, you can also set the timing for the exact time span during which the LED light can be disabled in order to reduce electrical power consumption.
-
Page 14: Lcd Screen Display
You can enable or disable the LED lighting of the screen as needed on the web interface. Meanwhile, if you prefer not to have the LED light on the screen stay on, you can also set the timing for the exact time span during which the LED light can be enabled in order to reduce the electrical power consumption, etc. -
Page 15: Backlight Setting
You can customize the text if needed. Contacts Only: if you select it, then only the Contacts will be displayed on the Contacts Only home screen. Hide Contacts & Room Number: if you select it, then Contacts and room Hide Contacts & Room Number number will be hidden on the home screen. - Page 16 Parameter Set-up : Parameter Set-up Screensaver Time (Sec) Screensaver Time (Sec): Set the screen saver start time. For example, if you set the start time as 5 minutes, then the screen saver will start if there is no operation on the device or no one is approaching the device during the five minutes interval.
-
Page 17: Volume Configuration
Volume and Tone Configuration Volume and Tone Configuration Volume and tone configuration include microphone volume, the AD volume, keypad volume, speaker volume, tamper alarm volume, and open-door tone configuration. Moreover, you can upload the tone you like to enrich your personalized user experience. Volume Configuration Volume Configuration To set up the volumes, you can set them up on the device web Phone >... -
Page 18: Ringback Tone Setting
Parameter Set-up Remote, Local As Backup Remote, Local As Backup : If selected, when the door phone calls another device, for example, Akuvox indoor monitor and the SIP server returns 183, the callee will see the video preview without voice. - Page 19 Upload Tone Files Upload Tone Files You can configure the door phone ringback tone and other tones related to the door opening. Upload Open Door Tone Upload Open Door Tone You can upload the tone for open door failure and success on the device web interface. The outside tone is heard when you open the door via card, DTMF or PIN code.
- Page 20 1, then the tone will be played only once after the door opening. Broadcast Interval Broadcast Interval: select the time interval between every two open door tones. For example, if you select 2, then the interval between two open door tones will be two seconds.
-
Page 21: Network Setting
Network Setting Network Setting Network Status Network Status To check the network status on the web Status > Network Information Status > Network Information interface. Device Network Configuration Device Network Configuration To ensure normal functioning, make sure that the device has its IP address set correctly or obtained automatically from the DHCP server. - Page 22 Device Deployment in Network Device Deployment in Network To facilitate device control and management, configure Akuvox intercom devices with details such as location, operation mode, address, and extension numbers. So, you can do it on web Network > Advanced > Connect Setting Network >...
-
Page 23: Nat Setting
Device Extension Device Extension: enter the device extension number for the device you installed. Device Location Device Location: enter the location in which the device is installed and used. Device Local RTP Configuration Device Local RTP Configuration Real-time Transport Protocol(RTP RTP ) lets devices stream audio and video data over a network in real time. -
Page 24: Snmp Setting
To do this configuration on web Account > Advanced > NAT Account > Advanced > NAT interface. Parameter Set-up : Parameter Set-up UDP Keep Alive Messages UDP Keep Alive Messages: if enabled, the device will send out the message to the SIP server so that the SIP server will recognize if the device is in online status. - Page 25 A Virtual Local Area Network (VLAN) is a logical group of nodes from the same IP domain, regardless of their physical network segment. It separates the layer 2 broadcast domain via switches or routers, sending tagged packets only to ports with matching VLAN IDs. Utilizing VLANs enhances security by limiting ARP attacks to specific hosts and improves network performance by minimizing unnecessary broadcast frames, thereby conserving bandwidth for increased efficiency.
- Page 26 To do the configuration on the web Network > Advanced > TR069 Network > Advanced > TR069 interface. Parameter Set-up : Parameter Set-up Version Version: select supported TR069 version (version 1.0 or 1.1). ACS/CPE ACS/CPE : ACS is short for auto-configuration servers on the server side, and CPE is short for customer-premise equipment as client-side devices.
- Page 27 To do this configuration on the web Network > Advanced > Web Server Network > Advanced > Web Server interface. Parameters Set-up : Parameters Set-up HTTP Port HTTP Port: set up the port for HTTP access method. 80 is the default port. HTTPS Port HTTPS Port: set up the port for HTTPS access method.
- Page 28 SIP Account Registration SIP Account Registration Each device needs a SIP account to make and receive SIP calls. Akuvox intercom devices support the configuration of two SIP accounts, which can be registered under two independent servers. Configure SIP Account Configuration...
-
Page 29: Sip Server Configuration
SIP servers enable devices to establish and manage call sessions with other intercom devices using the SIP protocol. They can be third-party servers or built-in PBX in Akuvox indoor monitor. To do this configuration also on web Account > Basic > SIP Server Account >... - Page 30 Port: enter the port number for establishing call sessions via the backup outbound proxy server. Configure Data Transmission Type Configure Data Transmission Type Akuvox intercom devices support four data transmission protocols: User Datagram User Datagram Protocol(UDP), Transmission Control Protocol(TCP Protocol(UDP)
- Page 31 To do this configuration on web Account > Basic > Transport Type Account > Basic > Transport Type interface. Parameter Set-up : Parameter Set-up UDP : select UDP UDP for unreliable but very efficient transport layer protocol. UDP is the default transport protocol.
-
Page 32: Group Call
Internet phone eavesdropping is a network attack that allows unauthorized parties to intercept and access the content of the communication sessions between intercom users. This can expose sensitive and confidential information to the attackers. SIP hacking protection is a technique that secures SIP calls from being compromised on the Internet. - Page 33 Sequence Call is a feature that allows you to dial a group of numbers in a predefined order until one of them answers. This feature is supported by Akuvox SmartPlus, which provides a set of sequence call numbers for the application.
- Page 34 if the call is rejected by the called party. If you select Call Next Call Next, then the sequence call will be continued to the next called party if it is rejected by the first called party. Web Call Web Call The web call feature allows for making calls via the device’s web interface, commonly used for remote call testing purposes.
-
Page 35: Auto Answer
To configure the number replacement on the device, navigate to Phone > Dial Plan Phone > Dial Plan, then click Add . To replace the number in batch, you can import the .xml file to the door phone. And the file from the door phone can be exported out before importing them to other door phones. - Page 36 Parameters Set-up: Parameters Set-up: Auto Answer Delay Auto Answer Delay: set up the delay time (from 0-5 sec.) before the call can be answered automatically. For example, if you set the delay time as 1 second, then the call will be answered in 1 second automatically. Mode Mode : set up the video or audio mode you preferred for answering the call automatically.
- Page 37 To do the configuration on the web Phone > Multicast Phone > Multicast interface. Parameters Set-up : Parameters Set-up Multicast Priority Paging Barge Multicast Priority Paging Barge : multicast or how many multicast calls are higher priority than SIP calls, if you disable Paging Priority Active, SIP calls will have high priority. Paging Priority Enabled Paging Priority Enabled : multicast calls are called in order of priority or not.
- Page 38 The door phone allows you to set up the call time duration in receiving the call from the calling device as the caller side might forget to hang up the intercom device. When the call time duration is reached, the door phone will terminate the call automatically. To do this configuration on the web Intercom >...
- Page 39 the door phone will hang up the incoming call automatically if the call is not answered by the door phone in 60 seconds. 60 seconds is the dial-in time duration by default. Dial out Time Dial out Time : enter the dial-in time duration for your door phone (ranging from 5-120 sec).
- Page 40 On R28 door phones, the Cancel Cancel Keys and Dial Dial keys can be different in their positions functionally and physically. Either the Cancel Cancel key is right on the top of the Dial Dial key or the other way round. You can reverse their functional positions on the web to match their physical position on the keypad.
-
Page 41: Audio Codec Configuration
Audio & Video Codec Configuration Audio & Video Codec Configuration Audio Codec Configuration Audio Codec Configuration The door phone supports three types of Codec (PCMU, PCMA, and G722) for encoding and decoding the audio data during the call session. Each type of Codec varies in terms of sound quality. - Page 42 Video Codec Configuration Video Codec Configuration The door phone supports the H264 codec that provides better video quality at a much lower bit rate with different video quality and payload. To set up video codec on web Account > Advanced Account >...
- Page 43 To do so, you can go to Phone > Call Feature > IP Video Parameters Phone > Call Feature > IP Video Parameters. Parameter Set-up : Parameter Set-up Video Resolution Video Resolution: select the code resolution for the video quality among four options: CIF, VGA, 4CIF CIF, VGA, 4CIF , and 720P 720P .
- Page 44 are required to set it up only when the third party device is to be matched with adopts such modes: Info, Info+Inband, Info+RFC2833 Info, Info+Inband, Info+RFC2833 , and Info +Inband + RFC2833 Info +Inband + RFC2833 . DTMF Payload DTMF Payload : set the payload according to the specific data transmission payload agreed on between the sender and receiver during the data transmission.
-
Page 45: Managing Contacts
Contact List Configuration Contact List Configuration Managing Contact Group Managing Contact Group You can create and edit a contact group for the contacts. The contact group will be used when you are adding a user. Navigate to Contacts > Contacts List > Group Contacts >... - Page 46 You can search, create, display, edit and delete the contacts in your phone book. Contacts > Contacts > Contact List. Contact List Parameters Set-up : Parameters Set-up Contact Contact: you can choose to show all contact information or one group's contact information.
- Page 47 is sorted before uppercase. If Room Number Room Number is selected, sort by room name. If there is no room name, the room number is taken as the room name by default. The room number is available after enabling Cloud contact. If Import Import is selected, sort by contacts in the imported file.
-
Page 48: Relay Setting
Relay Setting Relay Setting Relay Switch Setting Relay Switch Setting You can configure the relay switch(es) and DTMF for the door access on the web Intercom Intercom > Relay interface. > Relay Parameter Set-up : Parameter Set-up Trigger Delay (Sec) Trigger Delay (Sec): set the relay trigger delay timing (ranging from 1-10 Sec). - Page 49 Security Relay Setting Security Relay Setting The Security Relay, known as Akuvox SR01, is a product designed to bolster access security by preventing unauthorized forced entry attempts. Installed inside the door, it directly governs the door opening mechanism, ensuring that the door remains secure even in the event of damage to the device.
- Page 50 Parameter Set-up : Parameter Set-up Connect Type Connect Type : select the connection type between the security relay and the door phone. You can select connection via the door phone Relay A Power Output or RS485. Trigger Delay (Sec) Trigger Delay (Sec): set the relay trigger delay timing (ranging from 1-10 Sec.) For example, if you set the delay time as 5 sec.
- Page 51 W eb Relay Setting W eb Relay Setting A web relay has a built-in web server and can be controlled via the Internet or a local network. The device can use a web relay to either control a local relay, or a remote relay somewhere else on the network.
- Page 52 Web relay needs to be set up on the web Phone > Web Relay Phone > Web Relay interface. IP address, Username, and Password are provided by the web relay manufacturer. Parameter Set-up : Parameter Set-up Type Type : select among three options Disabled, Web Relay Disabled, Web Relay, and Both Both.
- Page 53 Configure W hite List for Door Relay Configure W hite List for Door Relay In order to secure the door access via DTMF codes, you can set up the DTMF whitelist on the device web Intercom > Relay > Open Relay Via DTMF Intercom >...
- Page 54 Door Access Schedule Management Door Access Schedule Management Configure Door Access Schedule Configure Door Access Schedule A door access schedule lets you decide who can open the door and when. It applies to both individuals and groups, ensuring that users within the schedule can only open the door using the authorized method during designated time periods.
- Page 55 To do this configuration on web Intercom > Schedule Intercom > Schedule interface. Parameters Set-up : Parameters Set-up Schedule Type Schedule Type : set the type of time period. There are three types to choose from: Daily, Daily, Weekly Weekly, and Normal Normal.
- Page 56 Date Range Date Range : set the corresponding date. This field will only be displayed when the Normal Normal type is selected. Import and Export Door Access Schedule Import and Export Door Access Schedule You can create door access schedules one by one or in bulk. You can export the current schedule file, edit it or add more schedules following the format, and import the new file to the desired devices.
- Page 57 Door Unlock Configuration Door Unlock Configuration Akuvox door phone offers you two types of door access via PIN code and RF card. You can configure them on the device and web interface. Moreover, you can import or export the configured files to maximize your RF card configuration efficiency.
- Page 58 You can enable or disable the IC and ID card function if needed. You can navigate to Intercom > Intercom > Card Setting > Card Type Support. Card Setting > Card Type Support Mifare Card Encryption Mifare Card Encryption The door phone can encrypt Mifare cards for greater security. When this feature is enabled, it reads the data in the cards’...
- Page 59 You can tap the RF card on the reader and click obtain obtain to add an RF card for the user. Path: Intercom > User. Click Add Intercom > User Add to see the screenshot below. Parameter Set-up : Parameter Set-up User ID User ID : enter the user ID.
- Page 60 Import and Export User Data of Access Control Import and Export User Data of Access Control The door phone supports user data of access control to be shared among Akuvox door phones through import and export, and then import it to a third-party device.
- Page 61 AES Key For Import AES Key For Import: enter the AES code before importing the AES-encrypted .tgz file to the door phone. Configure Open Relay via HTTP for Door Unlock Configure Open Relay via HTTP for Door Unlock You can unlock the door remotely without approaching the device physically for door entry by typing in the created HTTP command (URL) on the web browser to trigger the relay when you are not available by the door for door entry.
- Page 62 When users need to open the door from inside by pressing the Exit button, you need to set up the Input terminal that matches the Exit button to activate the relay for the door access. Navigate to Intercom > Input Intercom >...
- Page 63 Configure Public Code for Door Unlock Configure Public Code for Door Unlock The device supports public pin codes for administrators or cleaners to open the door. To do this configuration on the web Intercom > PIN Setting > Public PIN Intercom >...
- Page 64 Parameter Set-up : Parameter Set-up Code Code : enter the user’s private PIN. After user information and PIN code are entered, you can scroll down to Access Setting Access Setting and configure private PIN code access control. Parameter Set-up : Parameter Set-up Relay Relay: select the relay(s) that you want to apply the private PIN code for the door unlock.
- Page 65 Schedule Schedule : select from the created door access schedule on the right box and move the one to be applied to the user(s)-specific PIN code door access to the box on the right side. You are required to enable the PIN code before you can get door access via private PIN code, you can navigate to Intercom >...
- Page 66 Web Server Certificate Web Server Certificate It is a certificate sent to the client for authentication when the client requests an SSL connection with the Akuvox door phone. Please upload the certificates in accepted formats.
-
Page 67: Client Certificate
Security > Advanced > Web Server Certificate . Server Certificate Client Certificate Client Certificate This certificate verifies the server to the Akuvox door phone when they want to connect using SSL. The door phone verifies the server's certificate against its client certificate list. - Page 68 To upload and configure client certificates on the same page. Parameter Set-up : Parameter Set-up Index Index: select the desired value from the drop-down list of Index. If you select Auto Auto value, the uploaded certificate will be displayed in numeric order. If you select values from 1 1 to 10 , the uploaded certificate will be displayed according to the value that the user selected.
-
Page 69: Configure Motion Detection
Before applying for a SIP account from a SIP or a DNS server using the TLS protocol, you'll need to upload a TLS certificate. This certificate is essential for server authentication. To upload the TLS certificate, go to Security > Advanced > SIP Server Certificate Security >... - Page 70 detection detection to enable the video-based motion detection during the monitoring of the suspicious moving object. Detection Accuracy Detection Accuracy: set the detection accuracy for the detection sensitivity. The higher the value is, the greater the sensitivity is. The default detection accuracy value is 3. Time Interval Time Interval: the absolute triggering interval is 3 seconds.
- Page 71 Go to Intercom > Action > Email Notification Intercom > Action > Email Notification interface. The email notification will show as the captures. Parameter Set-up : Parameter Set-up SMTP Server Address SMTP Server Address : enter the SMTP server address of the sender. SMTP User Name SMTP User Name : enter the SMTP user name, which is usually the same as the sender’s email address.
- Page 72 Go to Intercom > Action > FTP Notification Intercom > Action > FTP Notification. Parameter Set-up : Parameter Set-up FTP Server FTP Server: enter the address (URL) of the FTP server for the FTP notification. FTP Test FTP Test: click FTP Test FTP Test, then a triggered event snapshot will be sent to the FTP server for testing purposes.
- Page 73 Parameter Set-up : Parameter Set-up Action To Execute Action To Execute : select FTP, Email or HTTP method for the notification. If FTP is selected, a screenshot of the caller will be sent via as notification. If Email is selected, the Emails containing a screenshot of the caller will be sent.
-
Page 74: Action Url
You can use the device to send specific HTTP URL commands to the HTTP server for certain actions. These actions will be triggered when the relay status, input status, PIN code, or RF card access changes. Akuvox Action URL: Akuvox Action URL:... - Page 75 Event Parameter format Example Make Call $remote Http://server ip/ Callnumber=$remote Hang Up $remote Http://server ip/ Callnumber=$remote Relay Triggered $relay1status Http://server ip/ relaytrigger=$relay1status Relay Closed $relay1status Http://server ip/ relayclose=$relay1status Input Triggered $input1status Http://server ip/ inputtrigger=$input1status Input Closed $input1status Http://server ip/ inputclose=$input1status Valid Code Entered $code Http://server ip/...
-
Page 76: Voice Encryption
Path: Phone > Action URL Phone > Action URL . Voice Encryption Voice Encryption Secure Real-time Transport Protocol (SRTP) is a protocol derived from the Real-time Transport Protocol (RTP). It enhances the security of data transmission by providing encryption, message authentication, integrity assurance, and replay protection. -
Page 77: User Agent
Parameter Set-up : Parameter Set-up User Agent User Agent : support to enter another specific value, it is "Akuvox” by default. High Security Mode High Security Mode High security mode is designed to enhance the security. It employs encryption across various facets, including the communication process, door opening commands, password storage methods, and more. - Page 78 Important Notes Important Notes 1. The High Security mode is off by default when you upgrade the device from a version without the mode to one with it. But if you reset the device to its factory settings, the mode is on by default. 2.
- Page 79 If the mode is off, the device can use both the new formats above and the old format below: l http://deviceIP/fcgi/do? action=OpenDoor&UserName=username&Password=password&DoorNum=1 4. It is not allowed to import/export configuration files in tgz. format between a device with the high security mode and another one without it. For assistance with file transfer, please contact Akuvox technical support.
- Page 80 MJPEG, or Motion JPEG, is a video compression format that uses JPEG images for each video frame. Akuvox devices display live streams on the web interface and capture monitoring screenshots in MJPEG format. Settings related to MJPEG determine video quality and the on/off status of the live stream function.
- Page 81 You are required to set up the RTSP function on the device web Intercom > RTSP > RTSP Intercom > RTSP > RTSP Basic interface in terms of RTSP authorization, authentication, and password, etc. before you are Basic able to use the function. Parameter Set-up : Parameter Set-up RTSP Authorization Enabled...
- Page 82 Video Enabled : the door phone can send video information to the monitor. After enabling the RTSP feature, the video RTSP is enabled by default and cannot be modified. 2nd Video Enabled 2nd Video Enabled : Akuvox door phones support 2 RTSP streams, you can enable the second one. Audio Codec Audio Codec: choose a suitable audio codec for RTSP audio.
- Page 83 Parameter Set-up : Parameter Set-up Video Resolution Video Resolution: select video resolutions among seven options: QVGA, CIF, VGA, QVGA, CIF, VGA, 4CIF, 720P 4CIF, 720P , and 1080P 1080P . The default video resolution is 720P 720P . and the video from the door phone might not be able to be shown on the indoor monitor if the resolution is set higher than 720P 720P .
- Page 84 Parameter Set-up : Parameter Set-up MJPEG Authorization MJPEG Authorization : tick it to access device video or real-time screenshots through a browser (http address such as: http://device IP:8080/video.cgi (dynamic video), http://device IP:8080/jpeg.cgi (static screenshot) ). Video Resolution Video Resolution: select video resolutions among seven options: CIF, VGA, 4CIF, CIF, VGA, 4CIF, 720P 720P , and 1080P...
-
Page 85: Live Stream
You can access the real-time video from the device's camera using the Akuvox indoor monitor or other third-party devices like Network Video Recorder(NVR NVR). Enabling and setting up the ONVIF function on the device will allow its video to be visible on other devices. - Page 86 Go to the device web Intercom > Live Stream Intercom > Live Stream interface.
- Page 87 Logs Logs Call Logs Call Logs If you want to check on the calls inclusive of the dial-out calls, received calls, and missed calls in a certain period of time, you can check and search the call log on the device web interface and export the call log from the device if needed.
- Page 88 Go to Phone > Door Log Phone > Door Log interface. Parameter Set-up : Parameter Set-up Status Status: select between Success Success and Failed Failed options to search for successful door accesses or Failed door accesses. Time Time : select the specific time span of the door logs you want to search, check, or export. Name/Code Name/Code : select the Name Name and Code...
- Page 89 Type Type : if opening the door via PIN code, Password Password will be displayed. If opening the door via RF cards, Card Card will be displayed, and if the door is opened by HTTP command, Http Http will be displayed.
-
Page 90: System Log
Parameter Set-up Log Level Log Level: select log levels from 1 to 7 levels. You will be instructed by Akuvox technical staff about the specific log level to be entered for debugging purposes. The default log level is 3 3 , the higher level is 5 5 , and the more complete log is 7 7 . - Page 91 On the web, Navigate to Upgrade > Advanced > Remote Debug Server Upgrade > Advanced > Remote Debug Server. PCAP PCAP PCAP is used to capture the data package going in and out of the devices for debugging and troubleshooting purposes. You can set up the PCAP on the device web Upgrade >...
-
Page 92: Firmware Upgrade
Firmware Upgrade Firmware Upgrade Akuvox devices can be upgraded on the device web interface. Go to Upgrade > Basic Upgrade > Basic interface. Parameter Set-up : Parameter Set-up Upgrade Upgrade : choose .rom firmware from your PC, then click Upgrade Upgrade to update. - Page 93 Backup Backup You can import or export encrypted configuration files to your Local PC. Go to Upgrade > Advanced > Others Upgrade > Advanced > Others interface if needed. Parameter Set-up : Parameter Set-up Choose File Choose File : to choose the config file in your PC. Export/Import Export/Import: to export the current config file (Encrypted) or import a new config file.
-
Page 94: Auto Provisioning
Provisioning Principle Auto-provisioning is a feature used to configure or upgrade devices in batch via third-party servers. DHCP, PNP, TFTP, FTP, and HTTPS are the protocols used by the Akuvox devices to access DHCP, PNP, TFTP, FTP, and HTTPS the URL of the address of the third-party server which stores configuration files and firmware, which will then be used to update the firmware and the corresponding parameters on the device. - Page 95 Configuration Files for Auto-provisioning Configuration Files for Auto-provisioning Configuration files have two formats for auto-provisioning. One is the general configuration files used for the general provisioning and the other one is the MAC-based configuration provisioning. The difference between the two types of configuration files is shown below: The difference between the two types of configuration files is shown below: General configuration General...
-
Page 96: Pnp Configuration
AutoP Schedule AutoP Schedule Akuvox provides you with different Autop methods that enable the device to perform provisioning for itself according to the schedule. Navigate to Upgrade > Advanced > Automatic Autop Upgrade > Advanced > Automatic Autop . Parameter Set-up :... - Page 97 Static Provisioning Configuration Static Provisioning Configuration You can manually set up a specific server URL for downloading the firmware or configuration file. If an auto-provision schedule is set up, the device will perform the auto-provisioning at a specific time according to the auto provision schedule you set up. In addition, TFTP, FTP, HTTP, and HTTPS are the protocols that can be used for upgrading the device firmware and configuration.
- Page 98 FTP: ftp://192.168.0.19/(allows anonymous login) ftp://username:password@192.168.0.19/(requires a user name and password) HTTP: http://192.168.0.19/(use the default port 80) http://192.168.0.19:8080/(use other ports, such as 8080) HTTPS: https://192.168.0.19/(use the default port 443) Akuvox do not provide user specified server. Please prepare TFTP/FTP/HTTP/HTTPS server by yourself.
- Page 99 Integration with Third Party Device Integration via W iegand Integration via W iegand The Wiegand feature enables Akuvox door phone to act as a controller or a card reader. you can configure the Wiegand on the web Intercom > Wiegand Intercom > Wiegand interface.
- Page 100 All at once : select it if the third-party device adopts All at once format. When it is selected, the PIN code will not be transferred until you enter the whole PIN code. Integration via HTTP API Integration via HTTP API HTTP API is designed to achieve a network-based integration between the third-party device and the Akuvox device.
- Page 101 You can configure the HTTP API function on the web Intercom > HTTP API Intercom > HTTP API interface for the integration. Parameter Set-up : Parameter Set-up HTTP API HTTP API: select Enable Enable or Disable Disable to enable or disable the HTTP API function for the third-party integration.
- Page 102 No authentication is required for HTTP API as it is only used for demo None testing. Normal This mode is used by Akuvox developers only. If this mode is selected, you are only required to fill in the IP address of Allowlist the third-party device for the authentication. The whitelist is suitable for operation in the LAN.
- Page 103 Integration with Lift Control The door phones can be connected to the Akuvox lift controller for the lift control. Users can summon the lift to go down to the ground floor when they are granted access through various types of access methods on the door phone.
- Page 104 Select Keyking if you want to integrate with the KeKing lift controller. Select ZKT if you want to integrate with the ZKTeco lift controller. Select Akuvox EC32 if you want to connect the device with the Akuvox Akuvox EC32 EC32 lift controller.
-
Page 105: Password Modification
Password Modification Password Modification Modifying Device W eb Interface Password Modifying Device W eb Interface Password To change the default web password on web Security > Basic Security > Basic interface. Select admin admin for the administrator account and User User for the User Account. - Page 106 Configure W eb Interface Automatic Logout Configure W eb Interface Automatic Logout You can set up the web interface's automatic log-out timing, requiring re-login by entering the user name and the passwords for security purposes or for the convenience of operation. To do the configuration on the web Security >...
- Page 107 System Reboot&Reset System Reboot&Reset Reboot Reboot If you want to restart the device system, you can operate it on the device Upgrade > Basic Upgrade > Basic web interface as well. Reset Reset You can select Reset To Factory Setting Reset To Factory Setting if you want to reset the device (deleting both configuration data and user data such as RF cards, face data, and so on).
Need help?
Do you have a question about the R28 Series and is the answer not in the manual?
Questions and answers