Table of Contents
Advertisement
Quick Links
Before you being using the device, please check the version you obtained and ensure that the following
items are included in the shipped box:
Universal Accessories:
R20A x 1
Rope x 1
Diode
x
2
Wall-mounting Accessories :
ST4x20 screw x 4
Allen Wrench x 1
Wall-mounting bracket x 1
Wall-mounting Installation
Back cover x 1
Cable locking plate x 1
M4x30 screw x 2
Plastic Wall Anchor x 4
R20A
M2.5x6 screw x 6
Rubber Plug x 3 (S,M,L)
Allen screw x 2
Wall-mounting screw x 4
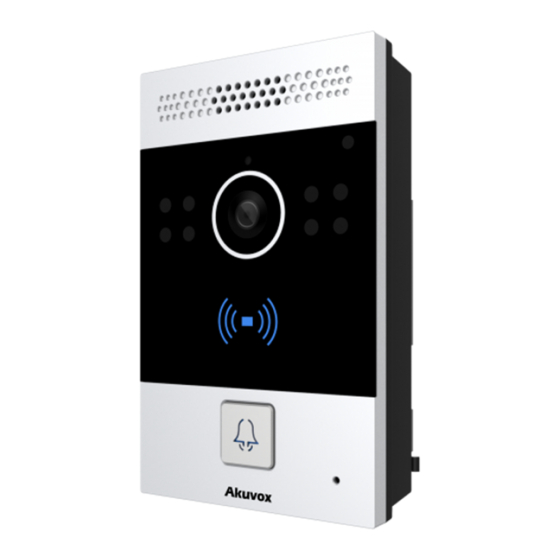
Infrared LED
Infrared sensor
Camera
Mic
RF card reader
Speaker
Advertisement
Table of Contents

Related Manuals for Akuvox R20A


Summary of Contents for Akuvox R20A
- Page 1 Before you being using the device, please check the version you obtained and ensure that the following items are included in the shipped box: Universal Accessories: R20A x 1 Back cover x 1 M2.5x6 screw x 6 Cable locking plate x 1 Rubber Plug x 3 (S,M,L)...
- Page 2 R20A Wall-mounting Installation Indoor and outdoor installation are supported. If installing the device outdoors, please don't place device under direct sunlight, it will bring a bad effect or be broken with the high temperature. If installing the device indoors, please keep device at least 2 meters away from light, and at least 3 meters away from window and door.
- Page 3 For convenient wiring, hang Make cables go through the back Fasten the back cover with four R20A on the wall-mounting cover, connecting to the corresponding M2.5x6 screws, then fix four bracket with rope. interfaces of the main board.
- Page 4 R20A Wall-mounting Installation SIP Video Phone Indoor Monitor PC(third party) Network Video Recorder (third party) R20A R20A R20A R20A Device Wiring Warning When you connect a device containting a coil, such as a relay or an electromagnetic lock, it is necessary to protect the intercom against voltage peak while switching off...
- Page 5 Wall-mounting Installation IP Announcement 1. While R20A starts up normally, hold the call button for several seconds after the Status LED turns blue, voice system will enter IP announcement mode. 2. In announcement mode, the IP address will be announced periodically.
- Page 6 Note: For more LED settings, please refer to R20 webUI: Intercom -> LED Setting. Notice Information Akuvox R20A firmware contains third-party open source software under the terms of the GNU General Public License(GPL). Akuvox is committed to meeting the requirements of the GNU General Public License (GPL) and will make all required source code available.
Need help?
Do you have a question about the R20A and is the answer not in the manual?
Questions and answers