Lippert SolidStep 4.0 Oem Installation Manual
With lift assist
Hide thumbs
Also See for SolidStep 4.0:
- Owner's manual (8 pages) ,
- Owner's manual (8 pages) ,
- Installation and owner's manual (12 pages)
Advertisement
Table of Contents
Advertisement
Table of Contents

Related Manuals for Lippert SolidStep 4.0


Summary of Contents for Lippert SolidStep 4.0
- Page 1 SolidStep 4.0 with ® Lift Assist OEM INSTALLATION MANUAL...
-
Page 2: Safety Information
Failure to correctly follow the provided instructions may result in death, serious personal injury, severe product and/or property damage, including voiding of the Lippert limited warranty. The "WARNING" symbol above is a sign that a procedure has a safety risk involved and may cause death or serious personal injury if not performed safely and within the parameters set forth in this manual. -
Page 3: Resources Required
Always wear eye protection when performing service, maintenance or installation procedures. Other safety equipment to consider would be hearing protection, gloves and possibly a full face shield, depending on the nature of the task. Moving parts can pinch, crush or cut. Keep clear and use caution. Resources Required •... -
Page 4: Installation
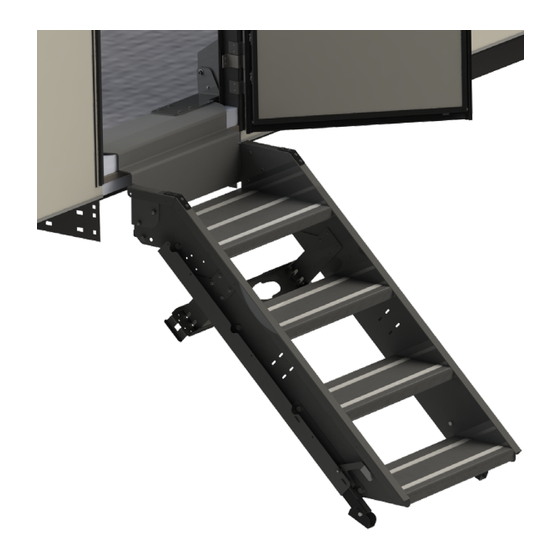
Installation Remove the trim on the inside of the doorframe where the mounting brackets are to be installed. NOTE: Door trim removal is a requirement to prevent interference issues (Fig. 1). The trim may be cut to length and installed so that it is 16 1/4" above the floor at the strut mounting bracket and 8 7/16" at the support mounting bracket. - Page 5 Engage the transport lock in order to hold the step assembly in its upright stowed position. See "Adjust Transport Lock" on page 6. Position the step assembly in the doorframe so that the strut mounting bracket is flush against the wall and floor (Fig.
- Page 6 Adjust Transport Lock Before using the transport lock, the latching mechanism may need to be adjusted to the proper left-right orientation and tightened in position. Attempting to engage the transport lock without proper adjustment may cause damage to the door frame or step assembly. Lift the step to its stored position (Fig.
- Page 7 Do not overtighten the bolts. Overtightening the bolts may damage the threads or cause the bolt heads to break off. Once the transport lock mechanism (Fig. 8A) and the transport latch flanges (Figs. 9A and 10A) are in the correct position, tighten the bolts (Figs. 9B and 10B) with a 7/16" wrench or socket. Once the transport lock has been adjusted, test its functionality by shaking the step assembly to simulate road vibration.
-
Page 8: Operation
From the stowed position (Fig. 11), disengage the transport lock by pulling the transport lock knob (Fig. 11A) to the left. Firmly grasp and pull out the vertically-stored SolidStep 4.0 and rest the step firmly on the ground (Fig. 12). - Page 9 Fig. 15 If necessary, retract leg extensions. See Leg Extension Adjustment section. Lift up SolidStep 4.0 to its stored position (Fig. 11) until the transport lock engages and clicks into place. Make sure the transport latch flanges (Page 6, Fig. 5A) are resting against the door frame.
- Page 10 Notes Page 10 Rev: 07.25.24 CCD-0008400...
- Page 11 Notes Page 11 Rev: 07.25.24 CCD-0008400...
- Page 12 Lippert representative has been provided. Any unauthorized use shall void any applicable warranty. The information contained in this manual is subject to change without notice and at the sole discretion of Lippert. Revised editions are available for free download from lippert.com.
Need help?
Do you have a question about the SolidStep 4.0 and is the answer not in the manual?
Questions and answers