Advertisement
Quick Links
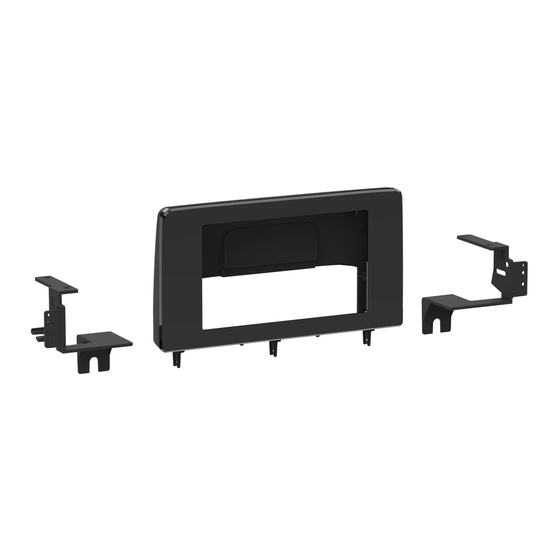
KIT COMPONENTS
• A) Radio display front panel • B) Radio display back panel • C) • Radio chassis brackets • D) Radio display brackets
• E) #8 x 3/8" Phillips screws (8) • F) #4 x 3/8" Phillips screws (2)
A
B
Metra. The World's Best Kits.
®
Honda Civic
2022-2024
Visit
MetraOnline.com
for more detailed information about the product and up-to-date vehicle
specific applications
KIT FEATURES
Designed specifically for Pioneer modular 6.8" radios like the
DMH-C2550NEX and DMH-WC5700NEX.
†† Refer to the radio manufacturer for current models
• Requires the Pioneer extension cable (sold separately)
• Textured and painted to match the factory finish.
C
MetraOnline.com
D
E
© COPYRIGHT 2024 METRA ELECTRONICS CORPORATION
107-HO1
I N S TA L L AT I O N I N S T R U C T I O N S
TABLE OF CONTENTS
Dash Disassembly ..................................................2
Kit Assembly ..........................................................3
WIRING & ANTENNA CONNECTIONS (sold separately)
Visit metraonline.com for audio/video and
steering wheel control interface options.
Wire harness: AXTC-HN1
Antenna adapter: 40-HD11
TOOLS REQUIRED
• Panel removal tool • Phillips screwdriver
F
Attention!
With the key out of the ignition,
disconnect the negative battery terminal
before installing this product. Ensure that all
installation connections are secure before
cycling the ignition to test this product.
REV. 3/27/24 INST107-HO1
Patent Pending
Advertisement

Related Manuals for Metra Electronics 107-HO1


Summary of Contents for Metra Electronics 107-HO1
- Page 1 Ensure that all installation connections are secure before cycling the ignition to test this product. Metra. The World’s Best Kits. ® MetraOnline.com © COPYRIGHT 2024 METRA ELECTRONICS CORPORATION REV. 3/27/24 INST107-HO1...
- Page 2 DASH DISASSEMBLY 1. Unclip and remove the trim panel below 3. Remove (2) Phillips screws under trim the radio screen that includes the A/C panel on top of dash behind radio control and A/C vents. (Figure A) screen. (Figure C) 2.
- Page 3 KIT ASSEMBLY 1. Place the three factory panel clips onto 6. Secure the radio chassis to the back of the bottom of the radio display the radio display front panel using (4) back panel of the supplied #8 screws. (Figure D) 7.
- Page 4 Monday - Friday: 9:00 AM - 7:00 PM Saturday: 10:00 AM - 5:00 PM Sunday: 10:00 AM - 4:00 PM Metra recommends MECP certified technicians Metra. The World’s Best Kits. ® MetraOnline.com © COPYRIGHT 2024 METRA ELECTRONICS CORPORATION REV. 3/27/24 INST107-HO1...
Need help?
Do you have a question about the 107-HO1 and is the answer not in the manual?
Questions and answers