Advertisement
Available languages
Available languages
Quick Links
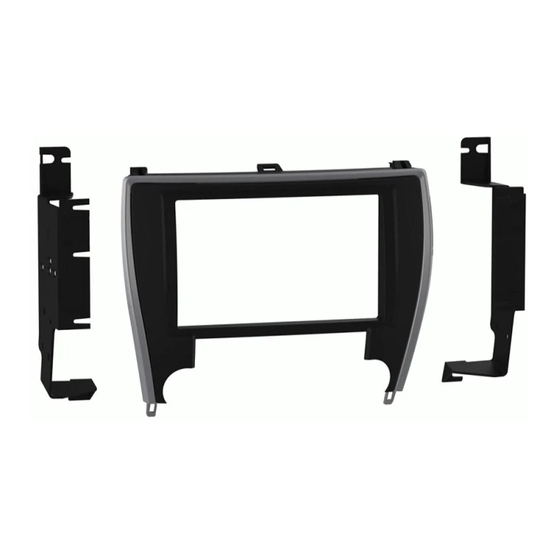
KIT COMPONENTS
• A) Radio trim panel • B) Radio brackets
A
Metra. The World's Best Kits.
®
Toyota Camry
KIT FEATURES
• Designed specifically for the Pioneer DMH-C5500NEX 8-inch radio
• Built and painted in multiple colors to match the factory
color and appearance
B
MetraOnline.com
2015-2017
© COPYRIGHT 2019 METRA ELECTRONICS CORPORATION
108-TO4
I N S TA L L AT I O N I N S T R U C T I O N S
Patent Pending
TABLE OF CONTENTS
Dash Disassembly ...............................................2-3
Kit Preparation .......................................................4
Kit Assembly ..........................................................5
WIRING & ANTENNA CONNECTIONS (sold separately)
Wire Harness: 70-1761 • TYTO-02 (amplified models)
Antenna Adapter: 40-LX11
Steering Wheel Control Interface: ASWC-1
TOOLS REQUIRED
• Panel removal tool • Phillips screwdriver
• 10mm socket wrench
Attention!
Let the vehicle sit with the key
out of the ignition for a few minutes before
removing the factory radio. When testing the
aftermarket equipment, ensure that all factory
equipment is connected before cycling the
key to ignition.
REV. 11/22/19 INST108-TO4
Advertisement

Related Manuals for Metra Electronics 108-TO4


Summary of Contents for Metra Electronics 108-TO4
- Page 1 When testing the aftermarket equipment, ensure that all factory equipment is connected before cycling the key to ignition. Metra. The World’s Best Kits. MetraOnline.com ® © COPYRIGHT 2019 METRA ELECTRONICS CORPORATION REV. 11/22/19 INST108-TO4...
- Page 2 DASH DISASSEMBLY 1. Unclip and remove the console storage tray. (Figure A) 2. Push down on the collar below the shift knob, then unscrew the shift knob. (Figure B) 3. Remove (2) Phillips screws from the shifter trim, then unclip and remove the trim.
- Page 3 DASH DISASSEMBLY (CONT) 4. Remove (2) Phillips screws securing the factory pocket, then unclip and remove the pocket. (Figure D) 5. Unclip and remove the vent panel above the radio. (Figure E) 6. Remove (4) 10mm screws securing the radio/climate control panel (2 above and 2 below).
- Page 4 (Figure B) To the 108-TO4 radio brackets: 4. Secure the climate controls to the brackets using the factory screws. (Figure B) To the 108-TO4 radio trim panel: (Figure A) 5. Attach the factory panel clips to the panel. (Figure C) Continue to Kit Assembly (Figure C) 1.800.221.0932...
- Page 5 KIT ASSEMBLY Note: For steps 1 and 2, reference the installation manual provided with the radio for which hardware to use. The display screen and radio chassis use two different types of screws. 1. Secure the radio brackets to the radio chassis using (4) screws supplied with the radio.
- Page 6 1.800.221.0932 MetraOnline.com...
- Page 7 REV. 11/22/2019 INST108-TO4...
- Page 8 Log onto www.installerinstitute.com or call 800-354-6782 for more information and take steps toward a better tomorrow. Metra recommends MECP certified technicians Metra. The World’s Best Kits. MetraOnline.com ® © COPYRIGHT 2019 METRA ELECTRONICS CORPORATION REV. 11/22/19 INST108-TO4...
- Page 9 Además, no quite el radio de fábrica con la llave en la posición o de encendido ni con el vehículo funcionando. The World’s best kits. MetraOnline.com ® © COPYRIGHT 2019 METRA ELECTRONICS CORPORATION REV. 11/22/19 INST108-TO4...
- Page 10 DESMONTAJE DEL TABLERO 1. Desenganche y quite la charola de almacenamiento de la consola. (Figura A) 2. Empuje el collar debajo de la perilla de la palanca de velocidades y después desatornille la perilla. (Figura B) 3. Quite los (2) tornillos Phillips de la moldura de la palanca de velocidades, desenganche y quite la moldura. (Figura C) Continúa en la siguiente página (Figura A) (Figura B) (Figura C) 1.800.221.0932 MetraOnline.com...
- Page 11 DESMONTAJE DEL TABLERO (CONT) 4. Quite los (2) tornillos Phillips que sujetan la cavidad de fábrica, desenganche y quite la cavidad. (Figura D) 5. Desenganche y quite el panel de la rejilla de encima del radio. (Figura E) 6. Quite los (4) tornillos de 10mm que sujetan el ensamble del radio y clima de fábrica (2 arriba y 2 abajo). (Figura F) 7. Deslice el conjunto de radio y control de clima hacia afuera, luego desenchúfelo y retírelo. (Figura D) (Figura E) (Figura F) Continuar la preparación del kit REV. 11/22/2019 INST108-TO4...
- Page 12 1. Afloje ligeramente (10) los tornillos Phillips que sujetan los soportes de la radio a la radio. (Figura A) 2. Retire (4) tornillos Phillips que aseguran los controles climáticos, luego desenganche y retire los controles. (Figura A) 3. Retire (2) clips del panel de la radio. (Figura A) (Figura B) A los soportes de radio 108-TO4: 4. Asegure los controles climáticos a los soportes con los tornillos de fábrica. (Figura B) (Figura A) Al panel de recorte de radio 108-TO4: 5. Fije los clips del panel de fábrica al panel. (Figura C) (Figura C) C ontinúe con el ensamble del kit 1.800.221.0932 MetraOnline.com...
- Page 13 ENSAMBLE DEL KIT Nota: Para los pasos 1 y 2, consulte el manual de instalación provisto con la radio para saber qué hardware usar. La pantalla de visualización y el chasis de radio utilizan dos tipos diferentes de tornillos. 1. Deslice el chasis de la radio entre los soportes de la radio, luego asegúrelo con los (4) tornillos suministrados con la radio. (Figura A) 2. Sujete los soportes de radio a la pantalla de visualización de la radio con los (4) tornillos suministrados con la radio. (Figura B) 3. Localice el arnés de cableado de fábrica y el conector de la antena en el tablero. Metra recomienda el uso de adaptadores adecuados de acoplamiento de Metra y/o de AXXESS. Pruebe el radio para verificar si funciona bien. 4. Deslice el ensamblaje de radio completado en (Figura A) (Figura B) el tablero y asegúrelo usando el tornillos de fábrica 5. Conecte todo el arnés y el clip en el panel de la radio al vehículo, luego vuelva a ensamblar el tablero en el orden inverso al desmontaje para completar la instalación.
- Page 14 1.800.221.0932 MetraOnline.com...
- Page 15 REV. 11/22/2019 INST108-TO4...
- Page 16 800-354-6782 para obtener más información y avance hacia un futuro mejor. Metra recomienda técnicos con certificación del Programa de Certificación en Electrónica Móvil (Mobile Electronics Certification Program, MECP). The World’s best kits. MetraOnline.com ® © COPYRIGHT 2019 METRA ELECTRONICS CORPORATION REV. 11/22/19 INST108-TO4...
Need help?
Do you have a question about the 108-TO4 and is the answer not in the manual?
Questions and answers