Advertisement
Quick Links
Caution
•
Tie down long or wide loads at the front and rear of the vehicle with non-elastic straps. If it looks like it can catch
some air, it will. TIE IT DOWN!
•
When loading your surf gear or kayak, ensure that it is mounted correctly using the tie downs provided and is
positioned centrally, parallel to the vehicle.
•
Check straps periodically during travel and tighten if necessary. Replace any straps that are worn or frayed before
using (see your Prorack dealer).
Important Warning
•
It is critical that all Prorack racks and accessories be properly and securely attached to your vehicle. Improper
attachment could result in an automobile accident, and could cause serious bodily injury or death to you or to others.
•
You are responsible for securing the racks and accessories to your car, checking the attachments prior to use, and
periodically inspecting the products for adjustment, wear, and damage. Therefore, you must read and understand all
HEADER TEXT
of the instructions and cautions supplied with your Prorack product prior to installation or use.
•
If you do not understand all of the instructions and cautions, or if you have no mechanical experience and are not
thoroughly familiar with the installation procedures, you should have the product installed by a professional installer
such as a boat carrier specialist.
FIRST TIME INSTALLATION
•
Please read instructions carefully before installation.
•
Check the contents of kit. Contact your dealer if any parts appear missing or damaged.
Kit Contents
Item
Component
IMPORTANT WARNING!
1
21 mm Slot Adapter Base
IT IS CRITICAL THAT ALL RACKS AND ACCESSORIES BE PROPERLY AND SECURELY ATTACHED
TO YOUR VEHICLE. IMPROPER ATTACHMENT COULD RESULT IN AN AUTOMOBILE ACCIDENT,
2
Slot Adapter Spring
AND COULD CAUSE SERIOUS BODILY INJURY OR DEATH TO YOU OR TO OTHERS. YOU ARE
RESPONSIBLE FOR SECURING THE RACKS AND ACCESSORIES TO YOUR CAR, CHECKING
THE ATTACHMENTS PRIOR TO USE, AND PERIODICALLY INSPECTING THE PRODUCTS FOR
ADJUSTMENT, WEAR, AND DAMAGE. THEREFORE, YOU MUST READ AND UNDERSTAND ALL OF
THE INSTRUCTIONS AND CAUTIONS SUPPLIED WITH YOUR PRODUCT PRIOR TO INSTALLATION OR
USE. IF YOU DO NOT UNDERSTAND ALL OF THE INSTRUCTIONS AND CAUTIONS, OR IF YOU HAVE
NO MECHANICAL EXPERIENCE AND ARE NOT THOROUGHLY FAMILIAR WITH THE INSTALLATION
PROCEDURES, YOU SHOULD HAVE THE PRODUCT INSTALLED BY A PROFESSIONAL INSTALLER
SUCH AS A ROOF RACK SPECIALIST.
CHECK CARRIER MOUNTING INSTRUCTIONS
1
Check Carrier Mounting Instructions
Check your mounting instructions for your carrier. Does it have (A) a removable T-Bolt
1
or (B) a fixed/drop-and-turn?
Check your mounting instructions for your carrier. Does it have (A) a removeable T-Bolt or (B) a fixed/drop
and turn?
(A)
Please follow steps specific for (A) or (B).
Please follow steps specific for (A) or (B).
PR3076 - Rev2
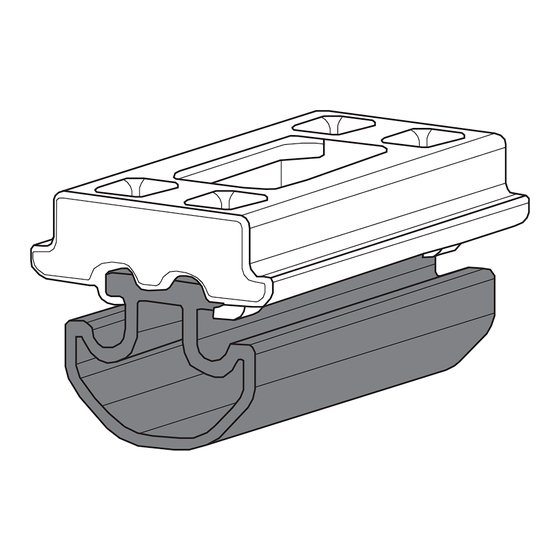
21 mm Slot Adapter
21MM S
Qty
1
1
1
(B)
LOT ADAPTER
2
REMOVABLE T-B
A1
Remove T-B
Page 1 of 5
KIT
Ite
1
2
TO
•
Advertisement

Related Manuals for Prorack PR3076


Summary of Contents for Prorack PR3076
- Page 1 Important Warning • It is critical that all Prorack racks and accessories be properly and securely attached to your vehicle. Improper attachment could result in an automobile accident, and could cause serious bodily injury or death to you or to others.
- Page 2 Remove rubber spring from adapter base, if not already disassembled. 80-13-030 Rev 1 Insert T-Bolt Insert T-Bolt into each adapter base as shown Insert T-Bolt After inserting T-Bolt, reinsert rubber spring as shown. Page 2 of 5 PR3076 - Rev2...
- Page 3 Ensure rubber spring is attached to the adapter base. Insert Slot Adapter into Crossbar Insert slot adapter into bar by angling in and pushing down with your finger as shown. Repeat for as many T-Bolts as your carrier has. Page 3 of 5 PR3076 - Rev2...
- Page 4 Follow the process in your carrier’s instructions for securing to T-Bolts. Ensure Carrier is Secure After instalation, ensure your carrier is secure. For Removal - Removable T-Bolt Specific Step For removal, push the slot adapter down, tilt and remove. Page 4 of 5 PR3076 - Rev2...
- Page 5 Prorack Freephone 17 Hinkler Court, Brendale AU: 1800 143 548 www.prorack.com.au QLD 4500, Australia NZ: 0800 4776 722 www.prorack.co.nz ALL CONTENT SUBJECT TO YAKIMA AUSTRALIA PTY LTD COPYRIGHT © 2017 Page 5 of 5 PR3076 - Rev2...
Need help?
Do you have a question about the PR3076 and is the answer not in the manual?
Questions and answers