
Related Manuals for RTA Products TECHNI MOBILI RTA-3806


Summary of Contents for RTA Products TECHNI MOBILI RTA-3806
- Page 1 www.technimobili.com L-SHAPE OR STRAIGHT-LINE COMPUTER DESK MODEL RTA-3806 ASSEMBLY INSTRUCTIONS REV.OL-1-8023-0423 Thank you for purchasing our product...
-
Page 2: Main Parts List
& Replacement Parts within the hardware listed below. 48 Contiguous United States: RTA Products will replace the part free of charge, while the customer is responsible Please email us at: for shipping costs plus any International local taxes or duties. -
Page 3: Hardware List
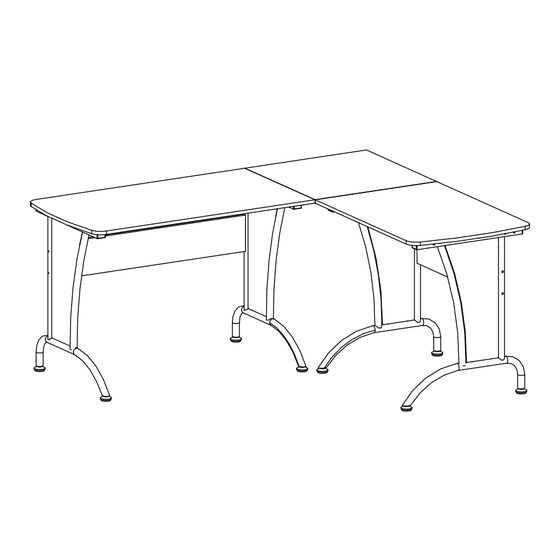
RTA-3806 MAIN PARTS LAYOUT (For reference) ( B a c k ) i g h ( F r o n t ) HARDWARE LIST INCLUDED TOOLS ITEM PART QTY SIZE / DESCRIPTION Phillips Screwdriver M6x12 mm 10 20 30 40 50 60 If you decide to use your own power driver: M6x35 •... - Page 4 RTA-3806 BEFORE YOU START THE ASSEMBLY, PLEASE READ THE FOLLOWING TIPS AND WARNINGS. • Do not discard this manual or any of the packaging material until the unit is completely assembled. • Please read the assembly instructions throughly and follow step by step. •...
-
Page 5: Assembly Steps
RTA-3806 ASSEMBLY STEPS WE RECOMMEND TO PLACE THE PIECES OVER BLANKETS OR TABLECLOTHS TO PROTECT THEIR FINISH DURING ASSEMBLY. STEP 1 Insert the glide studs #11 into the legs #1. STEP 2 Hardware Attach the side panels #2 to 5x45mm the legs #1 with screws F. - Page 6 RTA-3806 STEP 3 • FIRST: Assemble the back panels #3 and #5 in This step requires of between the legs #1 with screws E and barrell nuts H. 2 persons Hardware Surface with big holes M6x65 M6, Ø10mm Tools (included) ( B a c ( F r o Smooth...
- Page 7 RTA-3806 STEP 5 You must now choose the configuration you want for the desk. This step Choose an option below, place the frames as instructed for your requires of 2 persons option, and go to the pages with the specific set of instructions. Option A: Option B: STRAIGHT with the long table on the LEFT.
- Page 8 RTA-3806 STEP A1 Attach the brackets #12 to the outside Hardware of the legs #1 with screws C and nuts G as shown. M6x45 The brackets attach: • On the RIGHT leg of the LONG frame. Tools (included) • On the LEFT leg of the SHORT frame. ( B a c k ) ( B a...
- Page 9 RTA-3806 STEP A3 This step requires of 2 persons Hardware • FIRST assemble the middle tabletop #9 to the brackets #12 with screws A. M6x12 Tools (included) (View from underneath) • THEN secure the tabletops #7 and #8 to the brackets #12 with screws A. (View from underneath) •...
- Page 10 RTA-3806 STEP B1 Attach the brackets #12 to the outside Hardware of the legs #1 with screws C and nuts G as shown. M6x45 The brackets attach: • On the RIGHT leg of the SHORT frame. Tools (included) • On the LEFT leg of the LONG frame. ( B a c k ) ( B a...
- Page 11 RTA-3806 P.10 P.10 STEP B3 This step requires of 2 persons Hardware • FIRST assemble the middle tabletop #9 to the brackets #12 with screws A. M6x12 Tools (included) (View from underneath) • THEN secure the tabletops #7 and #8 to the brackets #12 with screws A. (View from underneath) •...
- Page 12 RTA-3806 P.11 P.11 STEP C1 Hardware Attach ONLY 2 of the brackets #12 to the outside of the legs #1 with screws C and M6x45 nuts G, but ONLY at the FRONT. The brackets attach: ONLY AT THE FRONT! Tools (included) •...
- Page 13 RTA-3806 P.12 P.12 STEP C3 FIRST: Use qty. 10 screws B to assemble the tabletops #7 and #8 This step requires of to the legs #1 of their respective frames and to the support #10. 2 persons DO NOT TIGHTEN THE SCREWS YET! Hardware M6x12 M6x35...
- Page 14 RTA-3806 P.13 P.13 STEP D1 Hardware Use screws C and nuts G to attach ONLY qty 2 of the brackets #12 to the outside of M6x45 the legs #1 and ONLY at the FRONT. The brackets attach: ONLY AT THE FRONT! Tools (included) •...
- Page 15 RTA-3806 P.14 P.14 STEP D3 FIRST: Use qty. 10 screws B to assemble the tabletops #7 and #8 This step requires of to the legs #1 of their respective frames and to the support #10. 2 persons DO NOT TIGHTEN THE SCREWS YET! Hardware M6x12 M6x35...
-
Page 16: Weight Limits
RTA-3806 P.15 P.15 WEIGHT LIMITS 30 Lbs (13.6 Kg) 50 Lbs (22.7 Kg) 50 Lbs (22.7 Kg) WARNINGS • Do not exceed the indicated weight limits. • Do not expose the surfaces to direct sunlight or to extreme environmental conditions. •... - Page 17 RTA Products LLC will replace any defective part, at its discretion, and without charge to the original purchaser other than the freight from the end consumer to RTA Products.
Need help?
Do you have a question about the TECHNI MOBILI RTA-3806 and is the answer not in the manual?
Questions and answers