
Related Manuals for RTA Products Techni Mobili RTA-B018


Summary of Contents for RTA Products Techni Mobili RTA-B018
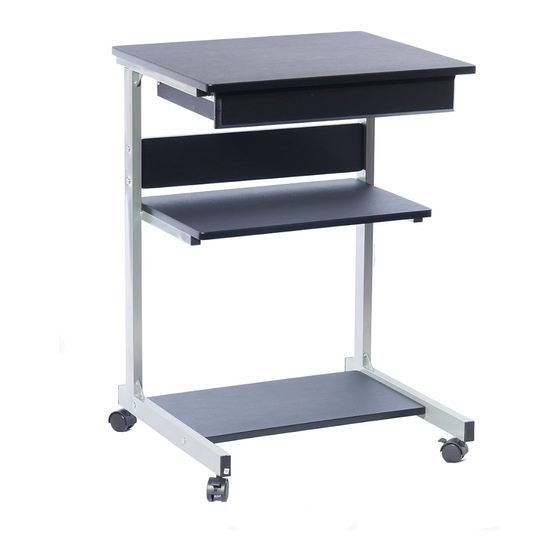
- Page 1 MODEL RTA-B018 ASSEMBLY INSTRUCTIONS Thank you for purchasing our product. REV.032021-2...
- Page 2 RTA-B018 • Please read carefully the assembly instructions before the installation. • Do not discard this manual or any of the packaging material until the unit has been completely assembled. • Might require two people.
-
Page 3: Main Parts List
RTA-B018 MAIN PARTS LIST Drawer back panel Drawer right panel Drawer left panel Drawer bottom panel Right frame Drawer front panel Left frame Back panel Bottom panel Slider Main panel Middle panel LIST OF HARDWARE MAIN PARTS LAYOUT (FOR REFERENCE): PART ITEM M5x60... - Page 4 RTA-B018 ☛ This unit uses cam bolts and locks. The following explains how to use them. This is not an assembly step; it is a guide for when you are actually doing the assembly using this kind of hardware. Cam Bolt Cam Lock 1.
- Page 5 RTA-B018 BEFORE YOU START THE ASSEMBLY, PLEASE READ THE FOLLOWING TIPS AND WARNINGS. ❼ ❶ To avoid Do a quick inventory misalignments, always to make sure the package leave the screws loose contains all the parts and and tighten them until hardware listed in the all pieces are assembly instructions.
-
Page 6: Assembly Steps
RTA-B018 ASSEMBLY STEPS STEP 1 Insert the bolts C into panel 5, then join it to panels 2 and 4. Insert the cam locks B and turn them to lock the panels as shown and as Screws/Tools: explained in page 3. Then insert the panel 3 through the grooves of all the panels, and finally, assemble the back panel 1 to the side panels 2 M5x60 and 4 with screws A as shown. - Page 7 RTA-B018 STEP 3 Assemble the back panel 8 and the bottom panel 9 to both frames with screws A from the outside as shown. Screws/Tools: M5x60 STEP 4 10 to the middle bars on the frames with Attach the middle panel screws F from underneath.
- Page 8 RTA-B018 STEP 5 Place the main panel 11 over the frames and secure it with screws F from underneath. Screws/Tools: M6x30 STEP 6 Pull out the sliders and attach to them the utility drawer with screws G. Screws/Tools: ST4x12...
- Page 9 RTA-B018 ALL DONE! Give yourself a nice pat on the back. You did a great job!
-
Page 10: Weight Limits
RTA-B018 AFTER THE ASSEMBLY IS DONE, PLEASE READ CAREFULLY THE FOLLOWING CARE AND MAINTENANCE WARNINGS: WEIGHT LIMITS 90 Lbs (40.82 Kg) 10 Lbs (4.53 Kg) 90 Lbs (40.82 Kg) 70 Lbs (31.75 Kg) • Do not exceed the indicated weight limits. •... - Page 11 RTA Products, LLC warrants to the Original Purchaser who acquired a new product from RTA Products or its authorized resellers that this product will be free from defects in its workmanship and materials, under normal use and service conditions, as described herein.
- Page 12 P.11 RTA-B018 P.11 FOR SEVERAL HELP OPTIONS INCLUDING REPLACEMENT PARTS ORDERS _________________________________________________________________ WWW.TECHNIMOBILI.COM VISIT: CLICK ON SUPPORT TAB Scan QR Code to order replacement parts SUPPORT@RTAPRODUCTS.COM OR EMAIL US:...
Need help?
Do you have a question about the Techni Mobili RTA-B018 and is the answer not in the manual?
Questions and answers