Advertisement
Quick Links
Advertisement

Related Manuals for RTA Products Techni Mobili RTA-3800SU


Summary of Contents for RTA Products Techni Mobili RTA-3800SU
- Page 1 MODEL RTA-3800SU ASSEMBLY INSTRUCTIONS Thank you for purchasing one of our products. Please read carefully the assembly instructions before the installation. Do not discard this manual or any of the packaging material until the unit has been completely assembled...
-
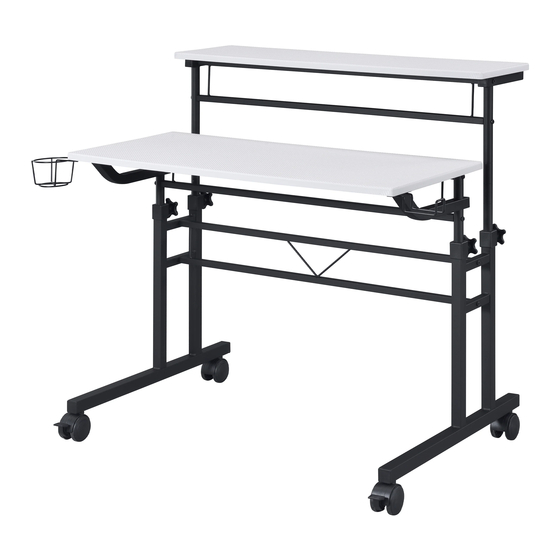
Page 2: Main Parts List
RTA-3800SU ❸ ❹ ❶ ❷ MAIN PARTS LIST Back tabletop Front tabletop Metal leg Back structure ❼ ❺ ❻ ❽ Front structure Central structure Back lift structure Front lift structure ❿ ❾ Headphone hanger Cup holder HARDWARE ���� ���� ���� ����... - Page 3 RTA-3800SU BEFORE YOU START THE ASSEMBLY, PLEASE READ THE FOLLOWING TIPS AND WARNINGS. ❶ ❷ Do a quick inventory to Missing, damaged and make sure the package defective parts can be contains all the parts and replaced at no cost to you. hardware listed in the Please refer to the CONTACT assembly instructions.
-
Page 4: Assembly Steps
RTA-3800SU ASSEMBLY STEPS STEP 1 First install the non-locking casters Ⓔ at the back of the legs, and the locking casters Ⓕ at the top of the legs ③, but leave them loose. the front using the cone wrench (spanner) as shown. Then attach the covers/knobs sets Ⓖ to Hardware/Tools: ����... - Page 5 RTA-3800SU Assemble the back structure ④ to the back lift structures ⑦ using screws Ⓐ as shown. STEP 3 Hardware/Tools: ���� M6x38mm ④ ���� ⑦ ⑦ Assemble the front structure ⑤ to the front lift structures ⑧ using screws Ⓐ as shown. STEP 4 Hardware/Tools: ����...
- Page 6 RTA-3800SU ⑧ thru the covers and into the legs ③, but DO NOT TIGHTEN the screw knobs yet. STEP 5 First make sure the covers and screw knobs Ⓖ are loose, then insert the front lift structures ⑧ ⑧ Ⓖ ③...
- Page 7 RTA-3800SU ⑦ thru the covers and into the legs ③, but DO NOT TIGHTEN the screw knobs yet. STEP 7 First make sure the covers and screw knobs Ⓖ are loose, then insert the back lift structures ⑦ ⑦ (Front) Ⓖ...
- Page 8 RTA-3800SU Assemble the headphone hanger ⑨ and the cup holder ⑩ to the front tabletop ② on the STEP 9 sides of your preference using screws Ⓓ from underneath as shown. Hardware/Tools: ���� M4x12mm ���� ⑨ ⑨ ② ② ⑩ ⑩...
-
Page 9: Weight Limits
RTA-3800SU AFTER THE ASSEMBLY IS DONE, PLEASE READ CAREFULLY THE FOLLOWING CARE AND MAINTENANCE WARNINGS: WEIGHT LIMITS 11 Lbs. (5 Kg) 2.2 Lbs. (1 Kg) 44 Lbs. (20 Kg) 2.2Lbs. (1 Kg) • Do not exceed the indicated weight limits. •...
Need help?
Do you have a question about the Techni Mobili RTA-3800SU and is the answer not in the manual?
Questions and answers