
Related Manuals for Amos AST 500


Summary of Contents for Amos AST 500
- Page 1 AST 500 (Version:AMOSAST500OP20240204) Semi-automatic Cryostat Microtome Operation Manual AMOS SCIENTIFIC PTY.LTD. ABN37 159 778 140 www.amos-scientific.com...
- Page 2 Presented in this Operation manual are the structure, performance and user’s guideline. Read carefully prior to operating the equipment.
- Page 3 Foreword AST500 Cryostat Microtome is a semi- automatic microtome, designed with input from global customers, capable of meeting diverse requirements in routine sectioning. To ensure the machine's smooth, durable, and safe functioning, it is essential to read this operational manual thoroughly. Our company takes responsibility for maintenance products...
-
Page 4: Table Of Contents
Contents 1. Safety Notes……………………………………………………...………..1 1.1 Overview……………………………………………………………………..………..1 1.2 Safety Warning………………………………………………………………..…..…..1 1.3 Safety Device………………………………………………......…...…..…...2 2. Performance & Parameters……………………………......3 2.1 Instrument Components Overview….……………………………….….…..….…..3 2.2 Performance Index……………………………………………………………..……...4 2.3 Technical Parameters…………………………………………………………..……...4 3. Preparation before operation…………………………………….….…..6 3.1 Requirement of Installation ………………………………………………..……..…..6 3.2 Standard Delivery………………………………………………………….....…..6 3.3 Installation ………………………………………………………………....…..7 3.4 Electrical Connection…………………………………………………....…...9 4. -
Page 5: Safety Notes
1. Safety Notes 1.1 Overview The Operation Manual contains important safety instructions and information. The operation manual is an important part of the instrument, which the operator must read carefully prior to startup to ensure safe operation. It performs a critical role in maintaining personal safety and preventing equipment damage. -
Page 6: Safety Device
● Turn the handwheel in a clockwise direction to maintain the desired sectioning results. Incorrect rotation may affect the sectioning outcome. ● While sectioning, avoid frequent back-and-forth rotation of the handwheel when it is positioned at the top or bottom, as this may impact the thickness of the sections. ●... -
Page 7: Performance & Parameters
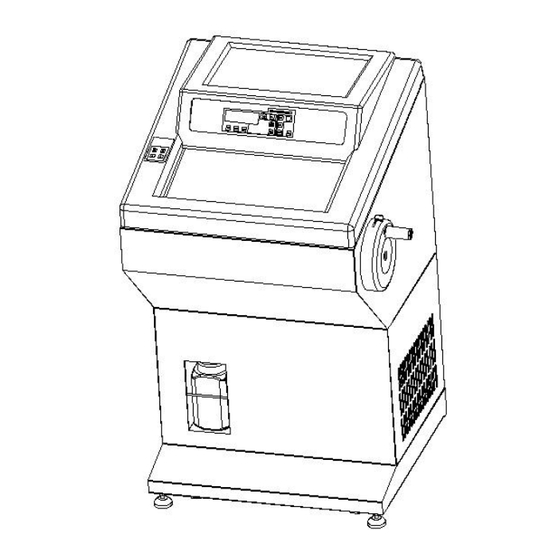
2. Performance & Parameters 2.1 Instrument Components Overview Display Control Panel Heating Glass Left Control Panel Stationary Heat Specimen Clamp Extractor Quick Freeze Shelf Blade holder Peltier on freeze Lock Lever shelf Freeze Area Handwheel Waste Container Tool Shelf ---3--- AST500 Cryostat Microtome Ver: AMOSAST500OP20240204... -
Page 8: Performance Index
2.2 Performance Index AST500 is a semi-automatic cryostat microtome, the movement and feed of the sample are automatically controlled by a stepper motor, ensuring higher sectioning precision and simplified operation. Below are some performance features of the device: ⊙ The instrument adheres to ergonomic design principles for a more aesthetically pleasing appearance, crafted through CNC for precision. - Page 9 Rapid 900µm/s±30µm/s ⊙ Section thickness range: 0 to 100µm 0 to 3µm, in 0.5µm increments 3 to 10µm, in 1µm increments 10 to 20µm, in 2µm increments 20 to 100µm,in 5µm increments ⊙ Trimming thickness range: 10 to 600µm 10 to 50µm, in 5µm increments 50 to 100µm, in 10µm increments 100 to 600µm, in 50µm increments ⊙...
-
Page 10: Preparation Before Operation
3. Preparation before operation 3.1 Installation site requirement ⊙ This machine is a mobile floor-standing unit equipped with four caster wheels at the bottom and two fixed support feet. The front two casters are used when movement is required. After removing the packaging, move the machine to the desired location. Once in position, adjust the two fixed support feet to deactivate the front casters. -
Page 11: Installation
3.3 Installation 3.3.1 Unpacking As showed in the diagram,the following instrument accessories: ⊙ Carton Cover(1) ⊙ Upper Support(2) ⊙ Corner Support *1(3) ⊙ Carton body(4) ⊙ Glass Support(5) ⊙ Corner Support *2(6) ⊙ Corner Support *3(7) ⊙ Handwheel(8) ⊙ Blade holder(9) ⊙... - Page 12 3.3.2 Handwheel assembly ·Take out the handwheel accessories from handwheel box · Tighten the handwheel shaft (14) into handwheel (13) with 7mm wrench . In the following order, insert · bearing (15) , handwheel sleeve (16) Tighten them with M5 × 16 and handle pad (17).
-
Page 13: Electrical Connection
3.4 Electrical Connection ●The input voltage is set before exiting factory. Prior to installation, please check that this setting complies with the local power requirements of your laboratory, as incompatible voltage may cause damage to the equipment. ● For safety during instrument operation, the power supply must be equipped with a grounding wire, adhering to safety standards. -
Page 14: Operation
4. Operation 4.1 Control panel function & Control All the parameters are set and displayed via control panel. After power on, use the control panel to operate: 4.1.1 Display Control Panel Display area shows information such Indicator light The area is to set the value of section thickness, trimming... - Page 15 The two keys are used for setting “ + ” , “ - ” section/trimming thickness , time and temperature. Section thickness value: 0 to 100µm 0 to 3µm,in 0.5µm increments 3 to 10µm,in 1µm increments 10 to 20µm,in 2µm increments 20 to 100µm, in 5µm increments Trimming thickness value: 10 to 600µm 10 to 50µm,in 5µm increments...
- Page 16 is a cycle key to select desired time mode Short press to toggle between real-time, real-time clock setting, defrost time setting, disinfection time setting, sleep time setting, wake-up time setting, and day setting. is the real-time indicator light When in real-time setting, the real-time clock indicator is illuminated.
- Page 17 Keyboard locking key This key is used to lock the keyboard. Hold on this button until the icon " " shows up on display panel (As shown in left diagram), the keyboard has been locked. All other keys (other than itself and the lamp key) are disabled at this moment and release the lock by long press the locking key again.
-
Page 18: Installation Of Blade Holder
4.2 Installation of blade holder As shown in the diagram, the blade holder consists of the following components: base (1), vertical slider (2), rotating slider (3), movable knife clamp (4), fixed knife clamp (5), anti-curling plate (6), lever 1 (7), lever 2 (8), lever 3 (9), lever 4 (10), anti-curling plate locking knob (11), anti-curling plate height adjustment knob (12). - Page 19 Installation of blade holder and base As shown in the diagram, slide the blade holder (13) horizontally along the track on the cryostat microtome (14), rotate lever 2 (8) to secure it, and adjust the adjustable handle on lever 2 (8) to a horizontal position.
-
Page 20: Clamping The Specimen & Inserting The Blade
4.3 Clamping the Specimen & Inserting the Blade Clamping the specimen Lift the sample clamp lever upwards as shown in the diagram, place the sample into the sample clamp (1), and release the sample clamp lever (2). ● Always clamp the specimen before installing the blade to avoid injury . -
Page 21: Temperature Setting
4.4 Temperature setting 4.4.1 Specimen clamp temperature setting -After pressing , as shown in the left diagram, the border of Board area Border the temperature area will be bolded. When the display shows it entered specimen clamp temperature display mode. -Press to enter temperature setting. -
Page 22: Time Setting
4.4.4 Ambient temperature Board area Border 区域边框 Press and the border of the temperature area will be bolded. When the display shows , it entered ambient temperature display mode. The temperature on display reflects the actual ambient temperature. Ambient Temperature 环境温度... - Page 23 4.5.2 Defrosting time setting Press and the border of the time display area will be bolded. When the light is on, it enters defrost time mode as the left diagram illustrates. Press to enter defrost time setting. The value can be set through ;Press to switch to minute setting, then press again to switch to...
- Page 24 4.5.4 Sleep time setting Press and the border of the time display area will be bolded. When the light is on, it enters sleep time mode as the left diagram illustrates. press to enter sleep time setting. The value can be set through ;...
-
Page 25: Section Setting
4.6 Section/Trimming setting ⊙ Section setting Section thickness Press SECT/TRIM, and the border of the section display area will be bolded. When the letter on the left side of the progress bar becomes "S", it enters sectioning mode. Press to enter section setting. -
Page 26: Section Reference
1. When using the cryostat microtome, mastering the appropriate sectioning speed and correctly adjusting the anti-curling plate are the most crucial factors for cutting ideal tissue sections. The suitable sectioning speed is acquired through practical experience. The adjustment of the anti-curling plate involves multiple components that may interact with each other. -
Page 27: Cleaning
5.1 Cleaning ⊙ Cleaning the instrument Clean the instrument's exterior with a dry cloth, ensuring effective removal of dust. In areas that require more thorough cleaning, a damp cloth may be necessary, focusing on frequently touched components, such as the right-hand wheel handle. ⊙... -
Page 28: Maintenance
● The handwheel must be locked before initiating the cleaning and maintenance procedure. ● Open the glass after turning off the instrument to keep the chamber dry ● Do not use corrosive liquids to clean the instrument. ● Ensure that no liquids enter equipment during the cleaning and maintenance. ●... - Page 29 Below you find a list of the problems that most frequently occur. And they are mostly caused by operation, so please read the operation manual carefully before using it. Problem Possible causes Corrective action · The mains cable is not ·Reconnected the main cable or ·...
- Page 30 Wavy sectioning · Improper inclination of the ·Readjust the tilting gradient. · surface sectioning blade. The section flies · It is effected by static. ·Increase the surrounding · away and sticks to the humidity to get rid of the static. microtome or other near objects 如果其它故障或上述故障不能排除,请与公司联系...
- Page 31 Standard accessories list AST500 Accessory Name Notes Cryostat Microtome 1 set Blade Holder 1 set Handling wheel 1 pc Specimen Clamp 10 pcs M5 Allen Wrench 1 pc M3Allen Wrench 1 pc 7mm Wrench 1 pc Disposable blade 1 box Power cord 1 pc Brush...
- Page 32 Published by: AMOS SCIENTIFIC PTY.LTD 24/632-643 Clayton Road, Clayton South, VIC 3169 Melbourne, Australia Tel: +61-4-10190188 ABN 37 159 778 140 www.amos-scientific.com Email: info@amos-scientific.com...
Need help?
Do you have a question about the AST 500 and is the answer not in the manual?
Questions and answers