
Subscribe to Our Youtube Channel
Related Manuals for Amos AEM 480


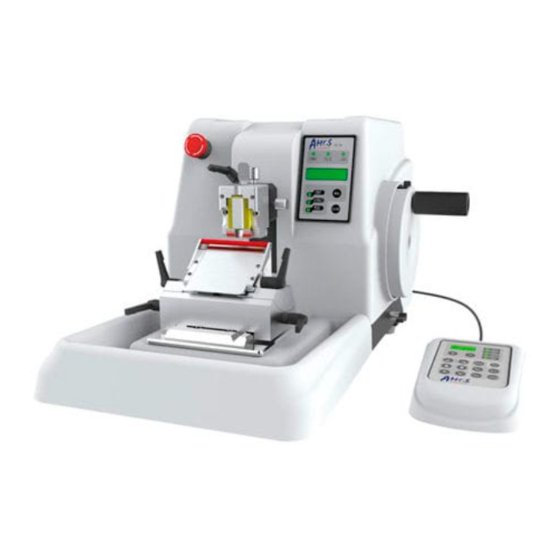
Summary of Contents for Amos AEM 480
- Page 1 AEM 480 (Version:AMOSAEM480OP20180306) Fully-automatic Microtome Operation Manual AMOS SCIENTIFIC PTY.LTD. ABN37 159 778 140 www.amos-scientific.com...
- Page 3 Display Panel Knife holder Section Waste tray Handwheel Locking Mechanism Separate control panel Smooth-turning handwheel Lever for activating the handwheel brake This Operation manual introduces the instruments component, key features and using notes. Be sure to read these instructions before using the instrument.
- Page 4 Foreward AEM480 Motorized Microtome designed for the worldwide user. It can meet the different requirement in the fields of biology, medicine and industry. It is necessary to read this technical manual to ensure that the instrument is snuff, long haul and safely used. Our company is responsible for service after the microtome have been used, our agents have ability to service, the client all of...
-
Page 5: Table Of Contents
Contents 1、Safety Notes………………………………………………………1 1 . 1 O v e r v i e w … … … … … … … … … … … … … … … … … … … … … … … … … … 1 1.2 Safety Warnin g……………………………………………………………... -
Page 6: 1、Safety Notes
1、Safety Notes 1.1 Overview The Instruction Manual contains important safety instructions and information. The operation manual is an important part of the instrument, which the operator must be read carefully prior to startup and use in order to running safely. It will at a critical moment to ensure personal safety and avoid instrument damage. - Page 7 1.2.2 Warnings-Operation ● Take care when handling microtome knives and disposable blades. The cutting edge is extremely sharp and can cause serious injury! ● Always remove the knife/blade before detaching the knife holder from the instrument, and put the knives back into the knife box when not in use! ●...
-
Page 8: Safety Devices
1.3 Safety Devices Handwheel locking mechanism As showed in the Fig, lever(1) and(2) can be to lock the handwheel. To clockwise push lever(1)until it lock the handwheel while specimen place at the top position. And also can clockwise rotate lever (2) about 180 °... -
Page 9: 2、Performance & Parameters
Activate Emergency switch —turn off power switch—deactivate—turn on power switch. 2、 Performance & Parameters 2.1 Overview- Instrument Structure Specimen clamp adjustor Emergency-stop Switch Display panel Quick release cassette clamp Handwheel locking Mechanism-lock fixed position Knife guard at knife holder Knife holder Handwheel locking mechanism-lock... -
Page 10: Performance Index
Performance Index AEM480 is a motorized rotary microtome. The stepper motor operated the specimen movement forward and back, coarse feed and sectioning in manual operation. It is better in precision sectioning, easy operation. ⊙ The crust is made in ABS plastic with fire prevention function, and streamlined designed in artistic appearance. -
Page 11: 3、Preparing Before Using
⊙ Retraction thickness: 5-100µm. 5µm increments (can deactivate) ⊙ Specimen horizontal feed:28mm ⊙ Specimen vertical feed:70mm ⊙ Maximum specimen :40x50x30mm, or standard cassette ⊙ Specimen holder adjusted system: Horizontal orientation: ±8° Vertical orientation: ±8° ⊙ Repositioning of knife holder base(left-right):50mm ⊙... -
Page 12: Installation
3.3 Installation 3.3.1 Unpacking As Fig shows: ⊙ Box Cover(1) ⊙ Microtome(2) ⊙ Back protect board(3) ⊙ Section Waste Tray(4) ⊙ Knife holder(5) ⊙ Front protect board(6) ⊙ Specimen Clamp(7) ⊙ Box Base(8) Cut off the tie and then remove the cover (1), and then take knife holder (5), waste tray (4), standard cassette clamp (7), front protect board... -
Page 13: Electrical Connection
3.3.4 Separate Control Panel Take the separate control panel (12)and connecting cable(13) out from the box,As Fig shows, insert the plug of the connecting cable into the control panel ( 12) and socket ( 14) on the rear of instrument. And fasten the plug, tighten the two screws. -
Page 14: 4、Operation
● Power off as the left fig show and Turn the instrument on as right fig show. ● After the microtome is switched on, the display field in the control panel is lit up. And the specimen holder will back to zero automatically. A beep sound will follow. - Page 15 The LCD display area for two lines with blue screen and white words. The first line displays: Current set value of section Thickness/trimming section thickness setting The second line displays: section/trimming counter and section thickness sum. ● The trimming status be stand by when instrument switch on. Indicator Light If Power Led lit up, it shows the power working on.
- Page 16 4.1.2 Separate Control Panel Trim light: at trimming mode Display Area: Sect light: at sectioning mode Display sectioning, Retra light: at retraction mode trimming, retraction value. Run light: running at “Continue” and “Single” mode. Set the sectioning, trimming, retraction thickness Auto running on Continure/signle Adjust different speed of mode.
- Page 17 Buttons for setting the section thickness / trimming section thickness/ retraction value Section thickness setting range:0µm to 600µm Setting values: From 0.5µm to 2µm,in 0.5µm increments From 2µm to10µm,in 1µm increments From 10µm to 20µm,in 2µm increments From 20µm to 100µm,in 5µm increments From 100µm to600µm,in 50µm increments Retraction value:From 5µm to 100µm,in 5µm increments.
-
Page 18: Knife Holder Inserting
●Don’t active the button in manual operation, otherwise the others buttons have no response . Memorized coarse feed value and fast reload the next new specime Memo: Memorized the specimen coarse feed value. Feed: Push the button, the specimen move to the last memorized feed value automatically when reload the specimen. -
Page 19: Clamping The Specimen
Knife holder and the instrument base holder Insert the knife holder(11) along the track of the base holder(12), and then rotate lever 2 (7) to lock and adjust the adjustable handle of the lever 2(7) to horizontal position. ▲ Attention: Always remove the knife before detaching the knife holder from the instrument. -
Page 20: Specimen Clamps/Knife Inserting
shows. To change the specimen clamp, the user can loosen the screw connected the specimen and connector. The specimen clamp adjustor Loosen the lever 1(7), and adjust the vertical knob (8) to calibration the vertical angle of the specimen; and the horizontal adjusting knob(9) can be used to adjust the horizontal angle of the specimen. -
Page 21: Trimming
● Always clamp the specimen before install the blade to avoid causing injury. Inserting Blade Loosen the lever 1 (10), and then pull the blade (8) into the knife holder (7) as drawing shows direction, and then rotate the lever 1 (10) to clamp the blade. There are two kinds of blade can be used in the instrument: the Low disposable blade as it is showed in the picture and the High... - Page 22 value via , the value will display on .To exit the setting, push the others keys TRIM or SECT ⊙Trimming setting LED light up , the trimming Press button while function be activate. Press to select the trim thickness value displayed on ⊙...
-
Page 23: Sectioning
and improve efficiency. The Operations: Clamp one new specimen and lock the knife holder, adjust the specimen to close the cutting edge while press to memorize the position and go with buzzer rings. When reload next new specimen, press . the specimen move to the last memorized position automatically. -
Page 24: 5、Clearance & Maintenance
a、The hardness of the specimen b、The angle of the cutting blade c、If the blade is clamped tightly d、If the specimen is clamped tightly. To obtain a best section , first adjust a proper angle of the cutting blade and the specimen, the smaller the angle , the smaller the section compressed. - Page 25 the joint of the parts. And remember to clean the blade clamp every time before install the blade to ensure getting a good sectioning. Rotate the corresponding Levers to split into : Clamp, X-axis slider, Y-axis slider and Z-axis slider Clamp and its X-axis Slider and its Y-axis...
-
Page 26: Maintenance
5.2 Maintenance ⊙Replacing the Fuses ● put the fuse (1) in the installation part (2) and then insert the installation part into the socket(3). ● Cut off the power supply and pull out the plug before change the fuse. Attention: before change the fuse, please read the operation manual carefully. -
Page 27: 6、Trouble Shooting
6、 Trouble Shooting Below you find a list of the problems that most frequently occur. And they are most caused by the operator, so please read the operation manual carefully before use it. Problem Possible causes Corrective action · No display, no reaction ·... - Page 28 Problem Possible causes Corrective action ·Other reasons ·Use an ink brush to smooth the section, and ·The section is not continuous make the embedded cassette cling with one side of the blade edge, and if this method is effective, it can be applied afterwards and the section connection can be got in most situations.
- Page 29 Problem Possible causes Corrective action ·The section is extremely · · Change the paraffin, and embedded the The wax has been used several times which cause compressed, wrinkled or jammed specimen again the section damaged. together. ·The section is broken or the ·...
-
Page 30: 7、Instrument Diagram
Problem Possible causes Corrective action · The surface of the section is ·The gradient of blade is not · Re-adjust the gradient of the in wave. proper. blade · T he section flies away · It is affected by static. ·... - Page 31 Standard accessories list AEM480 Accessory Name Notes Microtome 1 unit Blade Holder 1 set Specimen Clamp 1 set Waste Tray 1 pc Separate control panel 1 set With connection cable Foot switch with 1 pc connection cable M3 Allen Wrench 1 pc M4 Allen Wrench 1 pc...
- Page 32 Published by: AMOS SCIENTIFIC PTY.LTD. 7 Gabrielle Court, Bayswater North VIC 3153 AUSTRALIA Tel: +61-4-10190188 Fax: +61-3-98081503 ABN 37 159 778 140 www.amos-scientific.com Email: info@amos-scientific.com...
Need help?
Do you have a question about the AEM 480 and is the answer not in the manual?
Questions and answers