Table of Contents
Advertisement
Quick Links
cPCI-SBC02
User Manual
Version 1.0
ⓒ 2005 DAQ SYSTEM Co., Ltd. All rights reserved.
Microsoft® is a registered trademark; Windows®, Windows NT®, Windows XP®, Windows 7®, Windows 8®, Windows 10®
All other trademarks or intellectual property mentioned herein belongs to their respective owners.
Information furnished by DAQ SYSTEM is believed to be accurate and reliable, However, no responsibility is assumed by DAQ SYSTEM for its use, nor
for any infringements of patents or other rights of third parties which may result from its use. No license is granted by implication or otherwise under
any patent or copyrights of DAQ SYSTEM.
The information in this document is subject to change without notice and no part of this document may ne copied or reproduced without the prior
written consent.
Advertisement
Table of Contents

Related Manuals for DAQ system cPCI-SBC02


Summary of Contents for DAQ system cPCI-SBC02
- Page 1 All other trademarks or intellectual property mentioned herein belongs to their respective owners. Information furnished by DAQ SYSTEM is believed to be accurate and reliable, However, no responsibility is assumed by DAQ SYSTEM for its use, nor for any infringements of patents or other rights of third parties which may result from its use. No license is granted by implication or otherwise under any patent or copyrights of DAQ SYSTEM.
-
Page 2: Table Of Contents
User‟s Manual Contents 1. cPCI-SBC02 Introduction 1-1 Features ----------------------------------------------------------------------------- 1-2 Specifications --------------------------------------------------------------------------- 2. cPCI-SBC02 Appearance ------------------------------------------------------------- 3. Driver Installation Sound Driver -------------------------------------------------------------------------- LAN Driver --------------------------------------------------------------------------- Touch Driver -------------------------------------------------------------------------- 3-4 Graphic Driver --------------------------------------------------------------------------- 4. Display Setup 4-1 Installation with LCD... -
Page 3: Cpci-Sbc02 Introduction
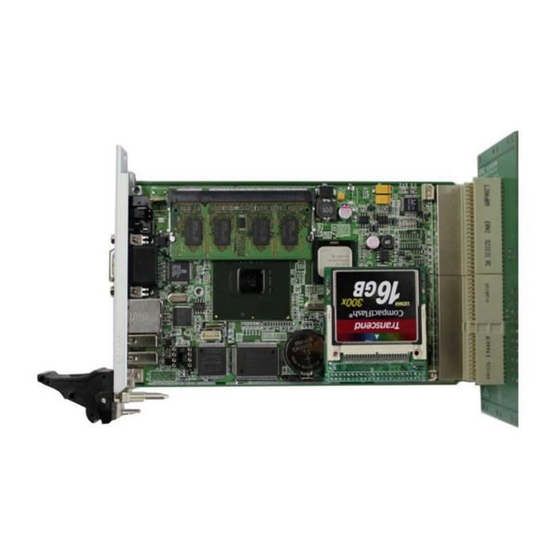
User‟s Manual 1. cPCI-SBC02 Introduction 1-1 Features Intel Atom Processor Z520PT(Z510PT, Z530P) Intel system controller hub US15WPT chipset Intel GMA500 graphics driver (VGA, LVDS) Single Power(+9V to +15V) operation Compact small size 160 x 100mm ... - Page 4 User‟s Manual Parallel Port Two USB A connector, Two with 10pin header Watch dog timer Status LEDS Indication for Ready and operation Power Input Single +9 to + 15V range power max current is 1.5A Debug Connector Operating Temperature...
-
Page 5: Cpci-Sbc02 Appearance
User‟s Manual 2. cPCI-SBC02 Appearance POWER S/W Main power switch of cPCI-SBC02 SO-DIMMDDAR2 256M ~ 2GB Memory MEMORY Intel US15WPTSCH Intel Atom PCI Express Slot You can use it by installing a PCI Express slot connector. COM1 (J17) PIN Connector for Serial Communication 1. - Page 6 User‟s Manual Speaker SPK connecter USB 1/2 USB connecter IDE 2.0mm 44 PIN Flash memory connecter Two USB 10pin Header (J10) 1.PIN , 2.PIN : +5 V 3.PIN : 1D- 4.PIN : 2D- 5.PIN : 1D+ 6.PIN : 2D+ 7.PIN , 8.PIN : GND...
-
Page 7: Driver Installation
User‟s Manual 3. Driver Installation 3-1 Sound Driver Install the sound driver by executing the CDROM:\Driver\audio\audio_WDM_R241\setup.exe file. 3-2 LAN Driver - Install the LAN driver by executing the CDROM:\Driver\Lan\AsusSetup.exe file. -
Page 8: Touch Driver
User‟s Manual 3-3 Touch Driver - Install the Touch driver by executing the CDROM:\Driver\Touch\SetupVista32-RS232.exe file. - If you double-click the execution screen, the following screen appears. - Click “HW Info” in the picture below. - Click the „Auto Search Touch‟ button in “HW Info” to check the connection port. -
Page 9: Graphic Driver
User‟s Manual - When the screen below appears, press and hold the blinking point. (Make sure to keep holding until the progress bar at the bottom is done.) - If you press all the way down in the correct order, the above screen appears. Click “Yes” to exit and you are done. -
Page 10: Display Setup
User‟s Manual 4. Display Setup 4-1 Installation with LCD Right-click on the desktop and select “Graphics Properties… Select ”. 1) MID Monitor Single Output When only MID Monitor is connected, only single display setting is possible. (Single screen output to MID Monitor) - Page 11 User‟s Manual 2) MID Monitor AND Desk Top Monitor Single Output When both MID Monitor and Desk Top Monitor (VGA Connecter) are connected, “Graphic Properties… ” This is the setting screen. In the “Single Display” setting, you can choose between MID Monitor or Desk Top Monitor for...
- Page 12 User‟s Manual 3) MID Monitor AND Desk Top Monitor Multiple Output - When “Intel(R) Dual Display Clone” is set in “Multi-Display” setting, the same screen output is possible on MID Monitor and Desk Top Monitor. (same screen output) - When setting “Expanded Desktop”, one of MID Monitor and Desk Top Monitor can be used as an...
-
Page 13: Installation Method When Only The Desk Top Monitor Is Connected Without Lcd
User‟s Manual 4-2 Installation method when connecting only Desk Top Monitor without LCD After installing the Graphic Driver and rebooting, the Windows logo screen is displayed on the Desk Top Monitor as follows. When the logo screen is finished, the graphic driver outputs the screen to the initial setting LCD, so no image is displayed on the Desk Top Monitor. -
Page 14: Appendix
(3) All DAQSYSTEM products have a one-year warranty. -. The warranty period is counted from the date the product is shipped from DAQ SYSTEM. -. Peripherals and third-party products not manufactured by DAQ SYSTEM are covered by the manufacturer's warranty. - Page 15 User‟s Manual MEMO Contact Point Web sit : https://www.daqsystem.com Email : postmaster@daqsystem.com...
Need help?
Do you have a question about the cPCI-SBC02 and is the answer not in the manual?
Questions and answers