
Related Manuals for Mount-It! MI-14002


Summary of Contents for Mount-It! MI-14002
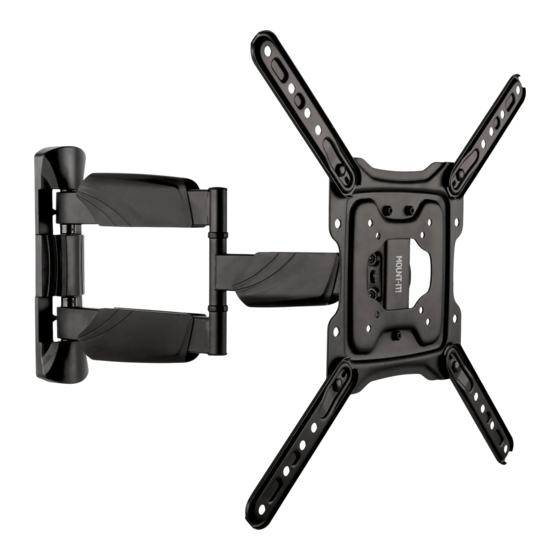
- Page 1 MI-14002 Scan this QR code for product information, videos, and assembly assistance. UL CERTIFIED FULL MOTION TV WALL MOUNT...
-
Page 2: Package Contents
PACKAGE CONTENTS Thank you for choosing Mount-It Mount-It! Decorative Cover VESA Extension Arms VESA Arm Bolts Mount-It! Mount Arm VESA Arm Nuts Wrench Hex Wrench VESA MOUNTING HARDWARE WALL MOUNTING HARDWARE Lag Screw Concrete Anchor Check carefully to make sure there are no missing or defective parts. Some hardware provided may not be used. - Page 3 Step 1 Step 3 Remove the Decorative Cover A. Wood Stud Installation Option • Remove the preinstalled decorative cover from the middle of the wall bracket on Mount Arm (#A) to • Using a stud finder locate the stud and center the Mount Arm (#A) on the stud at the desired height. allow access to the bolt hole beneath.
- Page 4 Step 4 B. Concrete/Brick Mounting Option Install the Decorative Covers • Use a bubble level to ensure straightness and hold the Mount Arm (#A) to the desired location on the • Reinstall the middle cover removed in step 1. wall. Mark the center of the 4 mounting holes indicated here with a pencil. •...
- Page 5 Step 6 Step 7 Attach the TV Hang the TV on the Wall Mount • Select the appropriate size mounting bolt (Select one size #M-A, M-B, M-C, or M-D) and washer (#M-E) 1. Hang the TV back on the end of the Mount Arm by hooking the top two bolts into the slots on top of for your display’s mounting holes and verify the length of the VESA bolt is not too long.
-
Page 6: Step 8 Cable Management
Step 8 Step 10 Cable Management Final Adjustments • Route the cables thought the cable clips on the underside of the arm segments. • Each arm joint can be turned 180° to fold and extend the arm. • The screen can be leveled +/- 3° •...
Need help?
Do you have a question about the MI-14002 and is the answer not in the manual?
Questions and answers