
Related Manuals for Mount-It! MI-4881


Summary of Contents for Mount-It! MI-4881
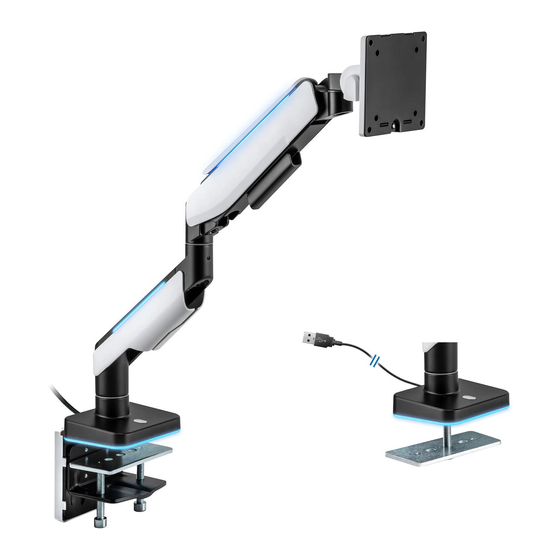
- Page 1 MI-4881 Please scan this QR code to visit the product page. HEAVY-DUTY SINGLE MONITOR ARM FOR ULTRAWIDE SCREENS...
- Page 2 Mount and Accessories Thank you for choosing Mount-It Mount-It! Mount-It! Clamp L-Bracket Clamp Screw VESA Head Clamp Cover Adhesive Pad Assembly VESA VESA Bolt Hex Wrench Hex Wrench Spring Arm Grommet Plate Clamping Plate Connector Connector Washer Bolt Mounting Hardware Check carefully to make sure there are no missing or defective parts.
-
Page 3: Clamp Installation
Step 1 Cut the Cable Tie • Connect the Clamp Screw Assembly onto the back of the L-Bracket. The four screws on the backside may need to be loosened so that there is a gap of approximately ¼in between the bracket and the bolt head. - Page 4 Step 2b • A grommet hole of 0.4-2.35in is required to install this mount. If one is not present in the desktop one can Grommet Installation be drilled using a 3/8” drill bit. • Place the mount over the grommet hole and install the Clamping Plate through the underside of the desktop. Tighten the bolt until secure using the Hex Wrench (#M).
-
Page 5: Step 5 Attaching The Monitor
Step 4 Step 6 Attach the VESA Plate to the Monitor Weight Balancing the Gas Spring Arm • Select the appropriate size mounting bolt (#M-A, M-B) for your monitors mounting holes and verify the • Gas Spring tension may need to be adjusted to suit the weight of the monitors. To weight balance the length of the VESA bolt is not too long. - Page 6 Note: If the monitor tilts forward on its own or is too difficult to tilt adjust the tightness of the bolt indicated here. Attach the Clamp Cover (#C) to the rear of the clamp to utilize the cable management clips and to store the Hex Wrenches.
Need help?
Do you have a question about the MI-4881 and is the answer not in the manual?
Questions and answers