
Related Manuals for Holman 4A815


Summary of Contents for Holman 4A815
- Page 1 Installation Guide 4A815 Holman Rancho Cordova, CA 95742 800-343-7486 InstallationSupport@holman.com 20221014R2 DATE: __________________...
-
Page 2: Table Of Contents
Step 3B – Drilling Required Installation Method ................. 5 Before You Begin Read all instructions prior to installing any Holman rack or accessory. Associated Clamp and Lock ladder rack must be assembled prior to installation of this accessory. -
Page 3: Hardware
Instructions – 4A815 Hardware Step 1 – Re-Locate Ladder Stop Remove ladder stop from the original location. For Technical Support Call: 800-343-7486, Monday-Friday, 7AM - 4 PM (PST) Page 2... -
Page 4: Step 2 - Stepladder Bracket Installation
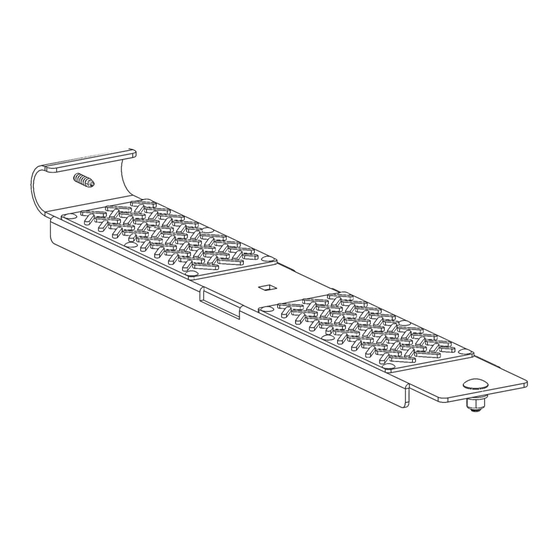
Instructions – 4A815 Bolt ladder stop to the stepladder bracket. Depending on the ladder being used, the ladder stop may be rotated to provide better clamping of the ladder. Snug tighten but allow for movement. Alternate Position Typical Position Step 2 –... -
Page 5: Step 3A - No-Drill Installation Method
Instructions – 4A815 Step 3A – No-Drill Installation Method Make note of the hole in L-bracket closest to the hole in stepladder bracket. Remove ladder. Using a 5/16” x 3/4” carriage bolt, 5/16” washer, and 5/16” lock nut, LOOSELY bolt the stepladder bracket to the L-bracket. -
Page 6: Step 3B - Drilling Required Installation Method
Instructions – 4A815 Step 3B – Drilling Required Installation Method With the ladder in place, mark the position of the hole, in the round end of the stepladder bracket, onto the round support tube. Mark the position of the square hole on ladder rack cross support L-bracket ... - Page 7 Instructions – 4A815 LOOSELY bolt stepladder bracket to the cross support angle bracket using one 5/16" x 3/4" carriage bolt, 5/16” flat washer, and 5/16" lock nut. If using drill driver, set drill clutch for the lowest setting.
Need help?
Do you have a question about the 4A815 and is the answer not in the manual?
Questions and answers