
Related Manuals for Holman 4A93M


Summary of Contents for Holman 4A93M
- Page 1 Installation Guide 4A93M Holman Rancho Cordova, CA 95742 800-343-7486 InstallationSupport@Holman.com 20231004R4 DATE: __________________...
-
Page 2: Table Of Contents
Step 10 – Install Clips for Handle ....................12 Before You Begin • Read all instructions prior to assembling or installing any Holman product. • Be sure vehicle specific mount kit is installed on vehicle prior to installing rack. • Place sealant around all swage connections. -
Page 3: Parts List
Instructions – 4A93M Parts List For Technical Support Call: 800-343-7486, Monday-Friday, 7AM - 4 PM (PST) Page 2... -
Page 4: Hardware
Instructions – 4A93M Hardware For Technical Support Call: 800-343-7486, Monday-Friday, 7AM - 4 PM (PST) Page 3... -
Page 5: Step 1 ─ Install Load Plates
Instructions – 4A93M Hardware (Continued) Step 1 ─ Install Load Plates • If installing a driver-side ladder rack add-on, skip this step. • At the end of each bow, opposite from the pan mechanism, attach the load plates using two 5/16” x 1” carriage bolts, two 5/16” flat washers and two 5/16” lock nuts as shown. -
Page 6: Step 2 ─ Determine Front And Rear Bow
Instructions – 4A93M Step 2 ─ Determine Front and Rear Bow • The front bow is shown below. This bow does NOT have a dampening mechanism on the underside. • The rear bow is shown below. This bow has the dampening mechanism assembled on the underside. -
Page 7: Step 3 - Install Ladder Clamps And Stops
Instructions – 4A93M Step 3 – Install Ladder Clamps and Stops Location of ladder clamps and stops for standard extension ladders. Location of ladder clamps and stops for standard step ladders. • Determine which location the ladder bow and ladder stop need to be installed. -
Page 8: Step 4 - Install Ladder Hooks
Instructions – 4A93M • On the rear bow, position the ladder stop in the desired location. Be sure the slot of the ladder stop aligns with the slot in the bow. • Bolt the ladder stop in place using 3/8” x 1” hex head bolt, 3/8” split lock washer and a 3/8”... -
Page 9: Step 5 - Install Handle Mount
Instructions – 4A93M • Using a 1/4" x 1" hex head, a 1/4” lock washer and a 1/4" flat washer, bolt ladder hook assembly to ladder hook weldment using the previously determined mounting location. • Tighten. DO NOT USE IMPACT WRENCH! AT LEAST 1/4”... -
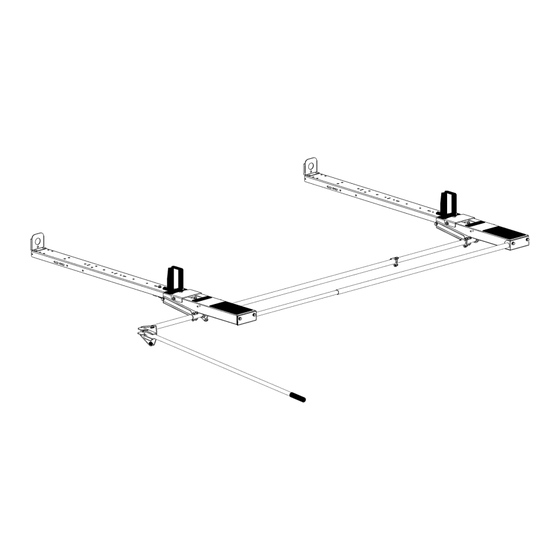
Page 10: Step 6 - Place Bows On Vehicle
Instructions – 4A93M Step 6 – Place Bows on Vehicle • Be sure to have the vehicle specific mounting installed on vehicle. • Place the front bow on top of the front most mounts and the rear bow on the rear most mounts. -
Page 11: Step 7 - Determine If The Extension Is Needed
Instructions – 4A93M Step 7 – Determine if the Extension is Needed • Measure the distance between the two bows as shown. If the distance is approximately 84.5”, the extension will be needed. • If the distance between the two bows is approximately 60”, the extension piece is NOT needed. -
Page 12: Step 9 - Install End Tube
Instructions – 4A93M • Bolt the torque tube to the front and the rear bow using 1/4" x 1” hex head bolt, two 1/4" flat washers and 1/4" lock nut at each location. If the extension is used, bolt together using the same method. -
Page 13: Step 10 - Install Clips For Handle
Instructions – 4A93M • Repeat at the end of both bows. Step 10 – Install Clips for Handle • Locate a good mounting place to install the upper clip for the handle. We recommend placing towards the rear of the van on the rear panel of a shelf. - Page 14 Instructions – 4A93M SQUARE AND POSITION THE RACK. START BY TIGHTENING THE FEET TO THE VEHICLE AND MOVING UPWARD AND OUTWARD ON THE RACK. ASSEMBLY AND INSTALLATION ARE NOW COMPLETE. For Technical Support Call: 800-343-7486, Monday-Friday, 7AM - 4 PM (PST)
Need help?
Do you have a question about the 4A93M and is the answer not in the manual?
Questions and answers