
Related Manuals for ZKTeco ULTIMA2 Series


Summary of Contents for ZKTeco ULTIMA2 Series
- Page 1 ADMIN U S E R G U I D E ULTIMA2 Series Time & Attendance Terminal ZKtechnology.com...
-
Page 2: Other Resources
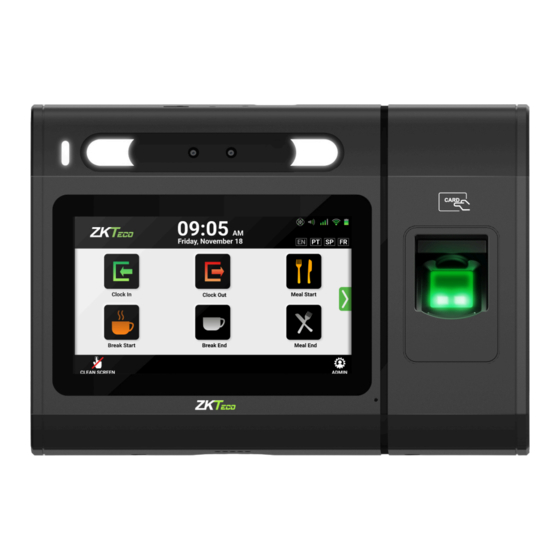
I N T R O D U C T I O N This is an interactive PDF document Simply click or touch to navigate. (on touch screen) Cover page Intro page (This page) Admin UI menu Ultima modules, plugs & indicators FCC Compliance Statements Other Resources Biometric Privacy Concerns... - Page 3 ULTIMA Base & Modules LED Indicator LED Light Camera LED Light RFID reader Facial & Palm Recognition Module Finger print scanner | ULTIMA Series2 Admin UI USER GUIDE | V:1.0...
- Page 4 Admin UI Authenticate to Access User Manager Tracking Code Device Setup Search a User Position Badge Setup - Wiegand Setup Enroll Fingerprint - Smart Card Setup Delete Fingerprint - Barcode Setup - Magnetic Setup Enroll Palm ID Fingerprint Setup Delete Palm ID Facial Detection Setup Enroll Badge Palm Detection Setup...
- Page 5 Admin UI Communication Attendance Setup Data Manager Ethernet Function Menu Attendance Data WiFi Attendance Rule Export Data Web Server Verification Rule Clean Data Network Diagnostics User Enrollment Maintenance Technical Support Provision Upgrade from USB Support Contact Update Upgrade from Server Troubleshooting Clock Back Up Initial Configurations...
- Page 6 Search a User User Manager Select the User Manager icon Select the Search field Start to enter users name or user ID. It is a dynamic string search field, which will show you results as you type | ULTIMA Series2 Admin UI USER GUIDE | V:1.0...
- Page 7 Fingerprint Enrollment User Manager Select the User Manager icon Select a name Select the Edit button Employee Select Enroll After reading the instruction. Select Continue | ULTIMA Series2 Admin UI USER GUIDE | V:1.0...
- Page 8 Fingerprint Enrollment User Manager Select any available fingerprint to be scanned. Scanning process takes 3 steps Step 1 For instance: Select number 7 (index finger). Place your index finger on to scanner bed firmly. Step 2 Step 3 Repeat the process Repeat the process.
- Page 9 Fingerprint Enrollment User Manager Employee Fingerprint On the fingerprint field shows number of fingerprint has been recorded. Select Save | ULTIMA Series2 Admin UI USER GUIDE | V:1.0...
- Page 10 Deleting Fingerprint User Manager Select the User Manager icon Select a name. Select the Edit button. Select Delete button. Select YES to confirm or NO to cancel | ULTIMA Series2 Admin UI USER GUIDE | V:1.0...
- Page 11 Deleting Fingerprint User Manager After delete the fingerprint, the pop up will display as "Deleted". Select Save button. After deleting the fingerprint, the pop up will display as "Employee information saved successfully". | ULTIMA Series2 Admin UI USER GUIDE | V:1.0...
- Page 12 Palm ID Enrollment User Manager Select the User Manager icon Select a Name Select the Edit button Employee Select the Enroll palm button Show your plam to the camera like shown in screen | ULTIMA Series2 Admin UI USER GUIDE | V:1.0...
- Page 13 Palm ID Enrollment User Manager "Employee After adding the palm, the pop up will display as Select Save button information saved successfully". | ULTIMA Series2 Admin UI USER GUIDE | V:1.0...
- Page 14 Deleting Palm ID User Manager Select the User Manager icon Select a name Select Edit Select the Delete palm button Select YES to confirm or NO to cancel | ULTIMA Series2 Admin UI USER GUIDE | V:1.0...
- Page 15 Deleting Palm ID User Manager After delete the Palm ID, the pop up will display as "Deleted". Select Save button. After deleting the Palm ID, the pop up will display as "Employee information saved successfully". | ULTIMA Series2 Admin UI USER GUIDE | V:1.0...
- Page 16 Badge Enrollment User Manager Heads Up Ideally, all the badge number updates are done in Workday, then Select the User Manager icon the DCS will load it and update the latest badge number on time clock accordingly. The option to update it in DCS or Time clock is provided as an alternative way to help the badge user, however, please keep in mind that Workday data always have the highest priority.
- Page 17 Badge Enrollment User Manager Badge enrollment screen will display. Your badge is scanned and card number is assigned. It is ready to scan your badge. Swipe to scan your badge. Select Save The password has been updated As an alternative, you may enter the badge number manually Select the badge number filed and enter the badge number.
- Page 18 Deleting Badge User Manager Select the User Manager icon Select a name. Select Edit Employee Select Delete Select YES to confirm or NO to cancel | ULTIMA Series2 Admin UI USER GUIDE | V:1.0...
- Page 19 Deleting Badge User Manager Admin After deleting the badge, the pop up will display as "Deleted" Select Save After deleting the badge successfully, the pop up will display as "Employee information saved successfully". | ULTIMA Series2 Admin UI USER GUIDE | V:1.0...
- Page 20 Change update password User Manager Select the User Manager icon Select a name. Select Edit Select Show Select verify type field, for instance PIN & Fingerprint | ULTIMA Series2 Admin UI USER GUIDE | V:1.0...
- Page 21 Change update password User Manager Enter new password and select Enter button Select Edit The password has been updated | ULTIMA Series2 Admin UI USER GUIDE | V:1.0...
- Page 22 Changing user privilege User Manager Select the User Manager icon Select a name. Select Edit Select privilege type field, for instance Admin Select the dropdown menu. Verify mode Admin: All the "Menu" Access. Enrollee: Accessible to Enrolled-User Manager, Device Info and Communication Menu's.
- Page 23 Changing user privilege User Manager Verify mode has been changed. Changing user privilege is complete Select Save | ULTIMA Series2 Admin UI USER GUIDE | V:1.0...
- Page 24 Changing user verify mode User Manager Select the User Manager icon Select a name. Select Edit PIN & Password Select verify type field, for instance PIN & Fingerprint Select the dropdown menu. Verify mode V E R I F Y T Y P E C O M B I N AT I O N S Badge &...
- Page 25 Changing user verify mode User Manager Verify mode has been changed After verify mode is added, the pop up will display as Select Save "Employee information saved successfully". Changing user verify mode is complete | ULTIMA Series2 Admin UI USER GUIDE | V:1.0...
- Page 26 Enroll Face ID User Manager Select the User Manager icon Select a name. Select Edit Select Enroll Face Select Start and put face inside the black box | ULTIMA Series2 Admin UI USER GUIDE | V:1.0...
- Page 27 Enroll Face ID User Manager Select the User Manager icon | ULTIMA Series2 Admin UI USER GUIDE | V:1.0...
- Page 28 Delete Face ID User Manager Select the User Manager icon Select a name. Select Edit Select Delete Face ID Select YES to confirm or NO to cancel | ULTIMA Series2 Admin UI USER GUIDE | V:1.0...
- Page 29 Delete Face ID User Manager After Face is deleted successfully, the pop up will display as Select Save "Deleted ". After face is deleted, the pop up will display as "Employee information saved successfully". | ULTIMA Series2 Admin UI USER GUIDE | V:1.0...
- Page 30 Position Tracking Code Select the Tracking Code icon Job and labor codes assigned to employees. (This is just a reference page) Note: If applicable to customer | ULTIMA Series2 Admin UI USER GUIDE | V:1.0...
-
Page 31: Device Setup
Badge Setup Wiegand Setup Device Setup Smart Card Setup Barcode Setup Select the Device Setup icon Select the Wiegand Setup tab Select the Smart Card Setup tab Select the Barcode Card Setup tab | ULTIMA Series2 Admin UI USER GUIDE | V:1.0... - Page 32 Palm Detection Setup Select the Magnetic Card Setup tab. Select the Fingerprint Setup tab Note: Threshold should not be lowered unless a ZKTeco repre- sentative authorizes to do so. Select the Facial Detection Setup tab Select the Palm Detection Setup tab | ULTIMA Series2 Admin UI USER GUIDE | V:1.0...
- Page 33 Device Setup Select the Thermal Module Setup tab Select the Bell Schedule tab Note: Threshold should not be lowered unless a ZKTeco repre- Select the existing bell schedule and Edit or select New sentative authorizes to do so. Select the Event Label field and Input a name for the schedule Input the time by selecting the hours and then using the keypad name.
- Page 34 Bell Setup Device Setup Select the days this schedule should reoccur Select from the drop down if Internal/External bell. Internal will set off the clock speaker, External will require a Relay Board and connection to a 12v Bell or Siren Select from the drop down what internal sound (Ring-Horn- Select the Volume level - Duration(seconds) and Repeat Times Siren)
- Page 35 Access Control Setup Camera Setup Device Setup Voice Command Setup Select the Access Control Setup tab Select the Camera Setup tab Select the Event Label field and Input a name for the schedule name. For instance: Morning Shift, Lunch, Break etc. Select the Voice Commands Setup tab | ULTIMA Series2 Admin UI USER GUIDE | V:1.0...
-
Page 36: General Settings
Display & Brightness Sound General Settings Date & Time Select the General Settings icon Adjust the brightness of the screen. Adjust the amount of time before the screen goes back to the home screen. Show Notification Bar if you want messages to appear on screen Adjust the volume that the buttons/and responses will ring Date and Time settings. -
Page 37: Device Info
About Device System Device Info Communication Select the Device Info icon Select About Device to view Device Name, Device Serial Number and APP Version installed on Time-clocks Select System to view CPU Model, CPU Frequency, Memory Select Communication to view Ethernet Mac, IP and Wi-Fi Set- etc. - Page 38 Storage Device Info Select Storage to view information about internal storage | ULTIMA Series2 Admin UI USER GUIDE | V:1.0...
- Page 39 Look and Feel Internationalization Preferences Quick Menu Select the Preferences icon Select Look and Feel to modify; 1- Home screen scroll direction Horizontal or Vertical 2- Prompt voice female/male Select Internationalization to include language(s) on home Select Quick Menu and Select a function from the drop downs. screen by checking Selected function will be placed on admin home screen Languages on home represented by language abbreviations;...
- Page 40 Clock Running Mode Accessibility Preferences Select the Clock Running Mode to choose Select the Accessibility to choose Production (is used while clock is in Normal Service) Demo (will not send punches to DCS) therefore onto workday Debug Mode (is for F/D) | ULTIMA Series2 Admin UI USER GUIDE | V:1.0...
- Page 41 Ethernet Communication Select the Communication icon Select Ethernet to switch it ON If you set DHCP = ON, then it will automatically grab IP Address If you set DHCP = OFF, then you need to enter IP Address, Sub- from the network net Mask, Gateway, DNS Server 1 and DNS Server 2.
- Page 42 WiFi Communication Select the WiFi tab and turn WiFi switch ON Select a network under “Choose A Network” Enter Password for the selected network and Select “Enter” Select Join button button. | ULTIMA Series2 Admin UI USER GUIDE | V:1.0...
- Page 43 WiFi Web Server Communication Network Diagnostics Connected Network Connected Network will be displayed under WiFi Switch Network details To view details select double arrow button. Enter correct URL for Server, also Heartbeat Interval =15 and Select the Network Diagnostic Time Sync Interval =300 Note: Customer’s Organization will have custom URL pointing to their individual tenet..
- Page 44 Enable Global Lockout Override, Override Start Date/Time Over- ride End Date/Time, Enable Meal/Break Lockout, Accept Meal/ Note: This will be configured prior by a ZKTeco representative Break locked punches, Meal lockout with attestation, Meal/ and should only be for reference if a clock needs to be reconfig- Break Lockout Periodic (minutes).
- Page 45 Attendance Rule Verification Rules Attendance Setup General Attestation, Accept Attestation Rejected Punch, Show Visitor Attestation Profile, Enable Visitor Photo Capture Attestation Only Once Per Day, Accept Mask Failure Punches, Accept Thermal Failure Punches, Record Temperature, Enable Visitor Attestation Module Select the Verification Rules tab Enable 1:1 verification mode and enable clock level verification | ULTIMA Series2 Admin UI USER GUIDE | V:1.0...
-
Page 46: Data Manager
Attendance Data Export Data Data Manager Clean Data Select the Data Manager icon Select the Attendance Data tab Look up Attendance logs directly on the clock. Select the Export Data tab Select the Export Data tab Attendance logs to a USB drive Select the item to be deleted Select “start to delete”... - Page 47 User Enrollment Data Manager Select the User Enrollment Mode tab Turns offline enrollment Note: Not recommended unless ZK representative advises | ULTIMA Series2 Admin UI USER GUIDE | V:1.0...
-
Page 48: Maintenance
Upgrade from USB Upgrade from Server Maintenance Clock Back Up Select the Maintenance icon Select the Upgrade from USB tab. Select the Upgrade from Server tab. Select the Clock Back Up tab | ULTIMA Series2 Admin UI USER GUIDE | V:1.0... - Page 49 1 Week, 2 Weeks, 3 Months data block. 1 Week, 2 Weeks, 3 Months data block. Select Save Select Clean-Up Note: All Upgrades will be sent by ZKTeco representative and should never be done without ZKTeco suggestion/supervision | ULTIMA Series2 Admin UI USER GUIDE | V:1.0...
-
Page 50: Support Desk
Support Desk Initial Configurations Select the Support Desk icon Select the Support Contact tab. These are methods on how to contact ZKTeco. Please use the ticketing system first. Select the Troubleshooting tab. Select the Initial Configurations tab Note: All changes will be sent by a ZKTeco representative and should never be done without ZKTeco suggestion/supervision. - Page 51 Confirmation Prompt Provision Select the Support Desk icon Provision Confirmation prompt Pulls all settings from DCS manually. No need to do this as set- tings are pushed from DCS frequently. | ULTIMA Series2 Admin UI USER GUIDE | V:1.0...
- Page 52 Test Barcode Test Control Relay Diagnostic Test Display & Touch Select the Diagnostic icon Select the Test Barcode tab. Select the Test Control Relay tab. Select the Test Display & Touch tab | ULTIMA Series2 Admin UI USER GUIDE | V:1.0...
- Page 53 Test Biometric Sensor Test Keypad Diagnostic Test Clock Health Test MagStrip Select the Test Biometric Sensor icon Select the Test Keypad tab. Select the clock Health tab. Select the Test Magnetic Stripe tab | ULTIMA Series2 Admin UI USER GUIDE | V:1.0...
- Page 54 Test Voice Test Wiegand Diagnostic Test LED Test Proximity Select the Test Voice tab Select the Test Wiegand tab. Select the Test LED tab. Select the Test Proximity tab | ULTIMA Series2 Admin UI USER GUIDE | V:1.0...
- Page 55 Test Camera Test Ethernet Diagnostic Test Wifi Test Thermal & Face Select the Test Camera tab Select the Test Ethernet tab. Select the Test WiFi tab. Select the Test Thermal & Face tab. Note: These are all tools to be used in conjunction with ZK tech support.
-
Page 56: Fcc Compliance Statements
FCC Compliance Statements This device complies with Part 15 of the FCC Rules. Operation is subject to the following two conditions: (1) this device may not cause harmful interference, and (2) this device must accept any interference received, including interference that may cause undesired operation. caution: Changes or modifications not expressly approved by the party responsible for compliance could void the user's authority to operate the equipment. - Page 57 Data Sheet © Copyright 2021. ZKTeco Inc. ZKTeco Logo is a registered trademark of ZKTeco or a related company. All other product and company names mentioned are used for identification purposes only and may be the trademarks of their respective owners. All specifications are subject to change without notice. All rights reserved.
Need help?
Do you have a question about the ULTIMA2 Series and is the answer not in the manual?
Questions and answers