Table of Contents
Advertisement
Quick Links
Product Name and Model Number
User Manual
F35
Date: December 2023
Doc Version: 1.1
English
Thank you for choosing our product. Please read the instructions carefully
before operation. Follow these instructions to ensure that the product is
functioning properly. The images shown in this manual are for illustrative
purposes only.
P a g e
| 1
For further details, please visit our Company's website
www.zkteco.com.
Copyright©2020 ZKTECO CO., LTD. All rights reserved.
User Manual
Advertisement
Table of Contents

Related Manuals for ZKTeco F35


Summary of Contents for ZKTeco F35
- Page 1 Follow these instructions to ensure that the product is functioning properly. The images shown in this manual are for illustrative purposes only. For further details, please visit our Company’s website www.zkteco.com. P a g e Copyright©2020 ZKTECO CO., LTD. All rights reserved.
- Page 2 Copyright © 2023 ZKTECO CO., LTD. All rights reserved. Without the prior written consent of ZKTeco, no portion of this manual can be copied or forwarded in any way or form. All parts of this manual belong to ZKTeco and its subsidiaries (hereinafter the "Company" or "ZKTeco").
- Page 3 User Manual relating to the use of the information contained in or referenced by this manual, even if ZKTeco has been advised of the possibility of such damages. This manual and the information contained therein may include technical, other inaccuracies or typographical errors.
- Page 4 User Manual About the Company ZKTeco is one of the world’s largest manufacturer of RFID and Biometric (Fingerprint, Facial, Finger-vein) readers. Product offerings include Access Control readers and panels, Near & Far-range Facial Recognition Cameras, Elevator/floor access controllers, Turnstiles, License Plate Recognition (LPR) gate controllers and Consumer products including battery-operated fingerprint and face-reader Door Locks.
- Page 5 The information which is significant. Care taken to avoid danger or mistakes. The statement or event that warns of something or that serves as a cautionary example. P a g e Copyright © 2023 ZKTECO CO., LTD. All rights reserved.
-
Page 6: Table Of Contents
CARD NUMBER ......................................27 8.1.5 PASSWORD ........................................27 8.1.6 ACCESS CONTROL ROLE .................................... 28 ........................................28 SERS 8.2.1 EDIT USER ........................................29 8.2.2 DELETE USER ......................................... 29 P a g e Copyright © 2023 ZKTECO CO., LTD. All rights reserved. - Page 7 ........................................65 OLIDAYS 14.4 ......................................66 CCESS ROUPS 14.5 ..................................... 67 OMBINED ERIFICATION 14.6 ....................................68 PASSBACK ETUP 14.7 ..................................69 URESS PTIONS ETTINGS ATTENDANCE SEARCH ........................72 P a g e Copyright © 2023 ZKTECO CO., LTD. All rights reserved.
- Page 8 ERSONNEL ON THE OFTWARE AND NLINE INGERPRINT EGISTRATION CONNECT TO ZKBIOTIME 8.0 SOFTWARE .................. 107 21.1 ............................... 107 ET THE OMMUNICATION DDRESS 21.2 ................................107 EVICE ON THE OFTWARE P a g e Copyright © 2023 ZKTECO CO., LTD. All rights reserved.
- Page 9 ONNECT THE IRELESS OORBELL 24.2 ..............................118 NBINDING THE IRELESS OORBELL 24.3 ........................................119 ETTINGS APPENDIX 1 ............................. 120 ........................................120 RIVACY OLICY ....................................123 FRIENDLY PERATION P a g e Copyright © 2023 ZKTECO CO., LTD. All rights reserved.
-
Page 10: Safety Measures
Lightning - Can install external lightning conductors to protect against electrical storms. It stops power-ups from destroying the system. Recommended installing the devices in areas with limited access. P a g e Copyright © 2023 ZKTECO CO., LTD. All rights reserved. -
Page 11: Electrical Safety
AC 24V power supply to the DC 12V input port. Make sure to connect the wires following the positive polarity and negative polarity shown on the P a g e | 10 Copyright © 2023 ZKTECO CO., LTD. All rights reserved. -
Page 12: Instruction For Use
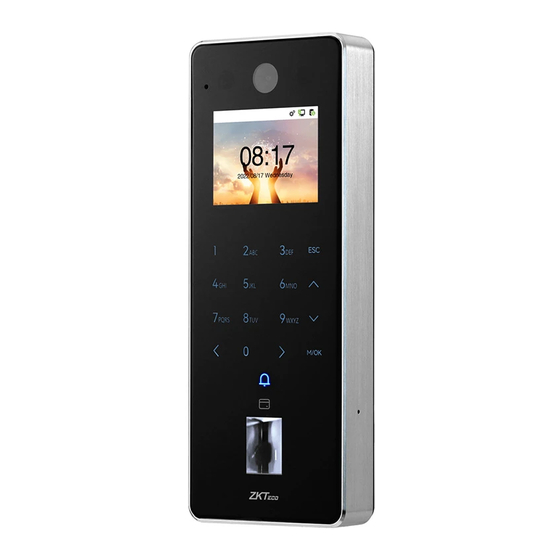
The device uses a 2.4-inch color screen, which all operations are performed through hidden touch keypad. After connecting the power supply, the following standby interface is displayed: P a g e | 11 Copyright © 2023 ZKTECO CO., LTD. All rights reserved. - Page 13 For the specific operation method, please see "Shortcut Key Mappings." P a g e | 12 Copyright © 2023 ZKTECO CO., LTD. All rights reserved.
-
Page 14: Verification Mode
In case users are unable to gain access using the 1:N authentication method, they can attempt to verify their identity using the 1:1 verification mode. Enter the user ID and tap M/OK to enter the 1:1 fingerprint verification mode. P a g e | 13 Copyright © 2023 ZKTECO CO., LTD. All rights reserved. - Page 15 If an employee registers a password and card in addition to the fingerprint, the following screen will appear. Select the fingerprint to enter fingerprint verification mode. Press the fingerprint to verify. Verification is successful: Verification is failed: P a g e | 14 Copyright © 2023 ZKTECO CO., LTD. All rights reserved.
-
Page 16: Card Verification
If an employee registers a fingerprint and password in addition to the card, the following screen will appear. Select the card to enter card verification mode. P a g e | 15 Copyright © 2023 ZKTECO CO., LTD. All rights reserved. -
Page 17: Password Verification
Select the password to enter card verification mode. Below are the display screens after entering a correct password and a wrong password, respectively. Verification is successful: Verification is failed: P a g e | 16 Copyright © 2023 ZKTECO CO., LTD. All rights reserved. -
Page 18: Combined Verification
But, since the employee has only registered their password and not their card, the verification process will not be successful, and the device will display the "Verification Failed." P a g e | 17 Copyright © 2023 ZKTECO CO., LTD. All rights reserved. -
Page 19: Overview
Appearance Description Microphone Camera Near-infrared Flash 2.4-inch Color Screen Hidden Touch Keypad Doorbell Button Card Reading Area Fingerprint Sensor Speaker Restart Button Magnetic Tamper Switch P a g e | 18 Copyright © 2023 ZKTECO CO., LTD. All rights reserved. -
Page 20: Terminal And Wiring Description
Sensor / Exit Button / Auxiliary Input Lock INWD0 INWD1 Wiegand In 12VOUT RX232 485A RS232 / RS485 TX232 485B WD1-OUT Wiegand Out WD0-OUT 12V Power in Network Interface P a g e | 19 Copyright © 2023 ZKTECO CO., LTD. All rights reserved. -
Page 21: Wiring Description
To share the device’s power with other devices, use a power supply with higher current ratings. 5.3.2 Door Sensor, Exit Button, Alarm and Auxiliary Connection P a g e | 20 Copyright © 2023 ZKTECO CO., LTD. All rights reserved. -
Page 22: Lock Relay Connection
‘NC1’ and ‘COM1’ terminals. The power can be shared with the lock or can be used separately for the lock, as shown in the example with NC Lock below: 5.3.4 Wiegand Connection P a g e | 21 Copyright © 2023 ZKTECO CO., LTD. All rights reserved. -
Page 23: Rs485, Rs232 And Dm10★ Connection
5.3.5 RS485, RS232 and DM10★ Connection 5.3.6 Ethernet Connection Connect the device to the computer software using an Ethernet cable. An example is shown below: P a g e | 22 Copyright © 2023 ZKTECO CO., LTD. All rights reserved. -
Page 24: Installation
Fix the backplate on the wall using wall mounting screws. Attach the device to the backplate. Attach the device to the backplate with a security screw. P a g e | 23 Copyright © 2023 ZKTECO CO., LTD. All rights reserved. -
Page 25: Main Menu
Screen, Audio, Microphone, Keyboard, fingerprint sensor, camera and Real-Time Clock. To view Privacy Policy, Data Capacity and Device and Firmware information of the System Info current device. P a g e | 24 Copyright © 2023 ZKTECO CO., LTD. All rights reserved. -
Page 26: User Management
During the initial registration, you can modify your ID, but not after registration. If the message "Duplicated!" appears, you must choose a different User ID because the one you entered already exists. P a g e | 25 Copyright © 2023 ZKTECO CO., LTD. All rights reserved. -
Page 27: User Role
Select the finger to be enrolled. Press the same finger on the fingerprint reader three times. Green indicates that the fingerprint was enrolled successfully. P a g e | 26 Copyright © 2023 ZKTECO CO., LTD. All rights reserved. -
Page 28: Card Number
"Password not match!", where the user needs to re-confirm the password again. The password may contain 6 to 8 digits by default. P a g e | 27 Copyright © 2023 ZKTECO CO., LTD. All rights reserved. -
Page 29: Access Control Role
On the All-Users interface, tap on the search bar on the user’s list to enter the required retrieval keyword (where the keyword may be the user ID, surname, or full name) and the system will search for the related user information. P a g e | 28 Copyright © 2023 ZKTECO CO., LTD. All rights reserved. -
Page 30: Edit User
Delete Password Only: Deletes the password information of the selected user. Delete Card Number Only: Deletes the card information of the selected user. P a g e | 29 Copyright © 2023 ZKTECO CO., LTD. All rights reserved. -
Page 31: Display Style
When the device is on the initial interface, press [M/OK] button > User Mgt. > Display Style. All the Display Styles are shown as below: Multiple Line: Mixed Line: P a g e | 30 Copyright © 2023 ZKTECO CO., LTD. All rights reserved. -
Page 32: User Role
First tap on the required Main Menu function name, and then select its required sub-menus from the list. P a g e | 31 Copyright © 2023 ZKTECO CO., LTD. All rights reserved. - Page 33 But if there is no super administrator registered in the Device, then the device will prompt "Please enroll super admin first!" when enabling the User Role function. P a g e | 32 Copyright © 2023 ZKTECO CO., LTD. All rights reserved.
-
Page 34: Communication
The default Subnet Mask is 255.255.255.0. It can be modified according to Subnet Mask the network availability. The Default Gateway address is 0.0.0.0. It can be modified according to the Gateway network availability. P a g e | 33 Copyright © 2023 ZKTECO CO., LTD. All rights reserved. -
Page 35: Serial Comm
Hence, a higher baudrate can be used when the communication distance is short; when the communication distance is long, choosing a lower baudrate is more reliable. P a g e | 34 Copyright © 2023 ZKTECO CO., LTD. All rights reserved. -
Page 36: Pc Connection
Tap on the required Wi-Fi name from the available list and input the correct password in the password interface, and then tap M/OK. P a g e | 35 Copyright © 2023 ZKTECO CO., LTD. All rights reserved. - Page 37 Note: After successfully adding the Wi-Fi manually, follow the same process to search for the added Wi- Fi name. Advanced Setting On the Wi-Fi Settings interface, tap on Advanced to set the relevant parameters as required. P a g e | 36 Copyright © 2023 ZKTECO CO., LTD. All rights reserved.
-
Page 38: Cloud Server Settings
The IP address and the port number of the proxy server is set manually Enable Proxy Server when the proxy is enabled. Based on HTTP, transmission encryption and identity authentication HTTPS ensure the security of the transmission process. P a g e | 37 Copyright © 2023 ZKTECO CO., LTD. All rights reserved. -
Page 39: Wiegand Setup
The default value is 1000 microseconds and can be adjusted within Pulse Interval(us) the range of 200 to 20000 microseconds. ID Type Select between the User ID and card number. P a g e | 38 Copyright © 2023 ZKTECO CO., LTD. All rights reserved. - Page 40 14 bits is the device codes, and15 to 20 bits are the site codes, and the 21 to 36 bits are the card numbers. P a g e | 39 Copyright © 2023 ZKTECO CO., LTD. All rights reserved.
-
Page 41: Wiegand Output
Pulse Interval(us) The time interval between pulses. ID Type Select the ID types as either User ID or card number. P a g e | 40 Copyright © 2023 ZKTECO CO., LTD. All rights reserved. -
Page 42: Network Diagnosis
Tap Network Diagnosis on the COMM. Settings interface. Enter the IP address that needs to be diagnosed and tap Start the Diagnostic Test to check whether the network can connect to the device. P a g e | 41 Copyright © 2023 ZKTECO CO., LTD. All rights reserved. -
Page 43: System Settings
Tap NTP Server to enable automatic time synchronization based on the service address you enter. Tap Manual Date and Time to manually set the date and time and then tap Confirm and save. P a g e | 42 Copyright © 2023 ZKTECO CO., LTD. All rights reserved. -
Page 44: Access Logs Settings / Attendance
January 1, 2021. After restoring the factory settings, the time of the device will remain at 18:30 on January 1, 2021. 11.2 Access Logs Settings / Attendance Tap Access Logs Settings / Attendance on the System interface. Access Control Terminal: P a g e | 43 Copyright © 2023 ZKTECO CO., LTD. All rights reserved. - Page 45 Within a set time period (unit: minutes), the duplicated attendance Duplicate Punch Period(m) record will not be reserved (value ranges from 1 to 999999 minutes). Alphanumeric User ID Enable/Disable the alphanumeric as User ID. P a g e | 44 Copyright © 2023 ZKTECO CO., LTD. All rights reserved.
-
Page 46: Fingerprint
1:N Threshold Value data and the fingerprint templates enrolled in the device is greater than the set value. P a g e | 45 Copyright © 2023 ZKTECO CO., LTD. All rights reserved. -
Page 47: Video Intercom Parameters
If the call is not answered within a specified time, it exits to the main Calling Timeout (s) interface. For more details, please refer to 22. Connecting to ZSmart App. P a g e | 46 Copyright © 2023 ZKTECO CO., LTD. All rights reserved. -
Page 48: Onvif Settings
On the NVR system, click on [Start] > [Menu], then the main menu will pop up. Click [Channel Manage] > [Add Channel] > [Refresh] to search for the device. P a g e | 47 Copyright © 2023 ZKTECO CO., LTD. All rights reserved. - Page 49 Note: The User Name and Password is set in the ONVIF Settings of the device. After adding successfully, the video image obtaining from the device can be viewed in real-time. P a g e | 48 Copyright © 2023 ZKTECO CO., LTD. All rights reserved.
-
Page 50: Device Type Settings
Set the device as an access control terminal or attendance terminal. Note: After changing the device type, the device will delete all the data and restart, and some functions will be adjusted accordingly. P a g e | 49 Copyright © 2023 ZKTECO CO., LTD. All rights reserved. -
Page 51: Security Settings
Set whether to display the username in the verification result Display Verification Name interface. Set whether to display the verification mode in the verification Display Verification Mode result interface. P a g e | 50 Copyright © 2023 ZKTECO CO., LTD. All rights reserved. -
Page 52: Factory Reset
(this function does not clear registered user data). Tap Reset on the System interface and then tap OK to restore the default factory settings. P a g e | 51 Copyright © 2023 ZKTECO CO., LTD. All rights reserved. -
Page 53: Personalize Settings
Idle Time to Slide Show (s) slide show is displayed. The function can be disabled, or you may set the value between 3 and 999 seconds. P a g e | 52 Copyright © 2023 ZKTECO CO., LTD. All rights reserved. -
Page 54: Voice
Keyboard Prompt Toggle to enable or disable the keypad sounds. Volume Adjust the volume of the device which can be set between 0 to 100. P a g e | 53 Copyright © 2023 ZKTECO CO., LTD. All rights reserved. -
Page 55: Bell Schedules
999 seconds. All Bell Schedules: Once the bell is scheduled, on the Bell Schedules interface, tap All Bell Schedules to view the newly scheduled bell. P a g e | 54 Copyright © 2023 ZKTECO CO., LTD. All rights reserved. -
Page 56: Punch States Options
Users cannot change the status by taping any other keys. It is the time for which the punch state displays. The value ranges Punch State Timeout(s) from 5 to 999 seconds. P a g e | 55 Copyright © 2023 ZKTECO CO., LTD. All rights reserved. -
Page 57: Shortcut Key Mappings
If the Shortcut key is set as a punch state key (such as check in, check out, etc.), then it is required to set the punch state value (valid value 0 to 250), name. P a g e | 56 Copyright © 2023 ZKTECO CO., LTD. All rights reserved. - Page 58 Once the Switch cycle is selected, set the switch time for each day, and tap OK to confirm, as shown in the image below. Note: When the function is set to Undefined, the device will not enable the punch state key. P a g e | 57 Copyright © 2023 ZKTECO CO., LTD. All rights reserved.
-
Page 59: Data Management
To delete all the wallpapers in the device. Delete Screen Savers To delete all the screen savers in the device. Delete Backup Data To delete all the backup data in the device. P a g e | 58 Copyright © 2023 ZKTECO CO., LTD. All rights reserved. - Page 60 The user may select Delete All or Delete by Time Range when deleting the access records / attendance data, to Delete by Time Range, you need to set a specific time range to delete all data within a specific period. P a g e | 59 Copyright © 2023 ZKTECO CO., LTD. All rights reserved.
-
Page 61: Access Control
In default settings, new users are allocated into the first group with the default group time zone, where the access combo is "1" and is set in unlock state by default. P a g e | 60 Copyright © 2023 ZKTECO CO., LTD. All rights reserved. -
Page 62: Access Control Options
If the door is not locked and is left open for a certain duration (Door Sensor Delay), an alarm will be triggered. Door Sensor Delay (s) The valid value of Door Sensor Delay ranges from 1 to 255 seconds. P a g e | 61 Copyright © 2023 ZKTECO CO., LTD. All rights reserved. - Page 63 It transmits a sound alarm or disassembly alarm from the local. Speaker Alarm When the door is closed or the verification is successful, the system cancels the alarm from the local. P a g e | 62 Copyright © 2023 ZKTECO CO., LTD. All rights reserved.
- Page 64 Sets the door unlock time period and auxiliary output type of the Auxiliary Input Configuration auxiliary terminal device. Auxiliary output types include None, Trigger door open, Trigger Alarm, Trigger door open and Alarm. P a g e | 63 Copyright © 2023 ZKTECO CO., LTD. All rights reserved.
-
Page 65: Time Rule Settings / Time Schedule
(maximum up to 50 zones). On the selected Time Zone number interface, tap on the required day (that is Monday, Tuesday, etc.) to set the time. P a g e | 64 Copyright © 2023 ZKTECO CO., LTD. All rights reserved. -
Page 66: Holidays
Tap Holidays on the Access Control interface to set the holiday access. Add a New Holiday: Tap Add Holiday on the Holidays interface and set the holiday parameters. P a g e | 65 Copyright © 2023 ZKTECO CO., LTD. All rights reserved. -
Page 67: Access Groups
Tap Access Groups on the Access Control interface. Add a New Holiday: Tap New Group on the Access Group interface. P a g e | 66 Copyright © 2023 ZKTECO CO., LTD. All rights reserved. -
Page 68: Combined Verification
N may all belong to one access group or may belong to five different access groups. Tap Combined Verification on the Access Control interface to configure the combined verification setting. P a g e | 67 Copyright © 2023 ZKTECO CO., LTD. All rights reserved. -
Page 69: Anti-Passback Setup
(the slave device). The two devices communicate via the Wiegand signal. The Wiegand format and Output type (User ID/Card Number) adopted by the master device and slave device must be consistent. P a g e | 68 Copyright © 2023 ZKTECO CO., LTD. All rights reserved. -
Page 70: Duress Options Settings
At the same time, a signal is sent to activate the alarm as well. On the Access Control interface, tap Duress Options to configure the duress settings. P a g e | 69 Copyright © 2023 ZKTECO CO., LTD. All rights reserved. - Page 71 The value ranges from 1 to 999 seconds. Set the 6-digit duress password. When the user enters this duress Duress Password password for verification, an alarm signal will be generated. P a g e | 70 Copyright © 2023 ZKTECO CO., LTD. All rights reserved.
- Page 72 Alarm signal will not be transmitted until the alarm delay time is elapsed. The value Alarm Delay (s) ranges from 1 to 999 seconds. P a g e | 71 Copyright © 2023 ZKTECO CO., LTD. All rights reserved.
-
Page 73: Attendance Search
ID. The figure shows the details of Once the record search completes. the selected record. Tap the record highlighted in green to view its details. P a g e | 72 Copyright © 2023 ZKTECO CO., LTD. All rights reserved. -
Page 74: Print Settings
16.2 Print Options Settings Select the Printer Options on the Print interface. Toggle button to enable or disable the Paper Cut function. P a g e | 73 Copyright © 2023 ZKTECO CO., LTD. All rights reserved. - Page 75 Remarks: To turn on the Paper Cut function, it is required to connect the device with a printer with paper cutting function, so that the printer will cut papers according to the selected printing information while printing. P a g e | 74 Copyright © 2023 ZKTECO CO., LTD. All rights reserved.
-
Page 76: Autotest
To test the RTC. The device tests whether the clock works normally Test Clock RTC and accurately with a stopwatch. Touch the screen to start counting and tap it again to stop counting. P a g e | 75 Copyright © 2023 ZKTECO CO., LTD. All rights reserved. -
Page 77: System Information
Fingerprint algorithm, Platform information, MCU Version, Manufacturer, and manufacture date. Displays the firmware version and other version information of the Firmware Info device. Privacy Policy Display the device's privacy policy. P a g e | 76 Copyright © 2023 ZKTECO CO., LTD. All rights reserved. -
Page 78: Connect To Webserver
Open a browser to enter the address to log in to the WebServer, the address is https:// Serial IP Address:1443. For example: https://192.168.1.201:1443. Enter the WebServer account and password, the default account is: admin, password: admin@123. P a g e | 77 Copyright © 2023 ZKTECO CO., LTD. All rights reserved. -
Page 79: Forgot Password
Click the icon on the login interface. On the pop-up page, enter the relevant information of the super admin user as prompted. P a g e | 78 Copyright © 2023 ZKTECO CO., LTD. All rights reserved. - Page 80 After a successful reset, enter the default account and password (account: admin, password: admin@123) on the login interface to log in. For security reasons, please change your password after successfully logging in. P a g e | 79 Copyright © 2023 ZKTECO CO., LTD. All rights reserved.
- Page 81 Click Personnel > Person > New on the ZKBio CVAccess / ZKBioTime 8.0 Server; register the super admin information and set the super admin role on the new interface as required. P a g e | 80 Copyright © 2023 ZKTECO CO., LTD. All rights reserved.
- Page 82 If the device has not registered a super admin and cannot connect to the server, please contact our after- sales technicians to help retrieve the password. P a g e | 81 Copyright © 2023 ZKTECO CO., LTD. All rights reserved.
-
Page 83: User Management
The user ID may contain 1 to 14 characters by default. A name can be up to 63 characters. Last Name A name can be up to 63 characters. First Name P a g e | 82 Copyright © 2023 ZKTECO CO., LTD. All rights reserved. - Page 84 In the current interface, behind the card number bar, click Register, and the device will display the card number registration interface in real time, swipe the card underneath the card reading area. The registration of the card will be successful. P a g e | 83 Copyright © 2023 ZKTECO CO., LTD. All rights reserved.
-
Page 85: Search For Users
Click All Users on the WebServer, click the search bar to enter the required retrieval keyword (where the keyword may be the user ID, surname or full name) and the system will search for the related user information. P a g e | 84 Copyright © 2023 ZKTECO CO., LTD. All rights reserved. -
Page 86: Edit User
Note: The process of editing the user information is the same as that of adding a new user, except that the User ID cannot be modified. The process in detail refers to 19.3.1 User Registration. P a g e | 85 Copyright © 2023 ZKTECO CO., LTD. All rights reserved. -
Page 87: Delete User
Select whether to obtain the IP Address by automatically. The default IP address is 192.168.1.201. It can be modified according to network IP Address availability. P a g e | 86 Copyright © 2023 ZKTECO CO., LTD. All rights reserved. -
Page 88: Connection Settings
Click Cloud Service Setup on the WebServer. Cloud Server Setup was used to connect to the ZKBio CVAccess and ZKBioTime 8.0 software, please refer to 12.1 Set the Communication Address. P a g e | 87 Copyright © 2023 ZKTECO CO., LTD. All rights reserved. -
Page 89: Wi-Fi Settings
Wi-Fi and establish a wireless network environment. By default, the Wi-Fi is turned off. The user needs to enable and set the related parameters on the WebServer. P a g e | 88 Copyright © 2023 ZKTECO CO., LTD. All rights reserved. -
Page 90: Date Setup
Click Manual to manually set the date and time and click Confirm to save. Select Open or Close the Daylight Saving Mode function. If opened, set the Daylight Saving Time and End of Daylight Saving. P a g e | 89 Copyright © 2023 ZKTECO CO., LTD. All rights reserved. -
Page 91: System Settings
User Manual 19.4.6 System Settings Click System on the WebServer. It helps to set related system parameters to optimize the accessibility of the device. P a g e | 90 Copyright © 2023 ZKTECO CO., LTD. All rights reserved. -
Page 92: Video Intercom
Then WebServer will not display the switched language until the device reboots and log in again. 19.4.7 Video Intercom★ Click Video Intercom on the WebServer. The video intercom function supports WAN, WAN is suitable for mobile phone. P a g e | 91 Copyright © 2023 ZKTECO CO., LTD. All rights reserved. -
Page 93: Sip Settings
22. Connecting to ZSmart App. 19.4.8 SIP Settings★ Note: This function needs to be used with the indoor station. Click SIP Settings on the WebServer. SIP Settings P a g e | 92 Copyright © 2023 ZKTECO CO., LTD. All rights reserved. - Page 94 IP Address/Subnet Mask/Gateway: Must be the same as the indoor station to be connected. Dialling Number: Customize the number of the indoor station, you can enter the value on F35 to call the indoor station quickly for video intercom.
-
Page 95: Onvif Settings
User Manual Upload Configuration Data Once the form is set up and saved, click Uploading... to upload the configuration form. Click Confirm to sync the parameters to F35. For more details, please refer to 23. Connecting to SIP. 19.4.9 ONVIF Settings★... -
Page 96: Serial Comm
Master Unit: When RS485 is used as the function of "Master Unit", it can be Serial Port connected to a reader. Print Function: The device can be connected to the printer when RS232 enables the print function. P a g e | 95 Copyright © 2023 ZKTECO CO., LTD. All rights reserved. -
Page 97: Wiegand Setup
Its value can be 26 bits, 34 bits, 36 bits, 37 bits, 50 bits and 60 bits. The number of bits of the Wiegand data. Wiegand Bits ID Type Select between the User ID and card number. P a g e | 96 Copyright © 2023 ZKTECO CO., LTD. All rights reserved. -
Page 98: Access Control Options
Out: A record of verification on the slave device is a check-out record. In: A record of verification on the slave device is a check-in record. P a g e | 97 Copyright © 2023 ZKTECO CO., LTD. All rights reserved. - Page 99 Normally Open: It means the door is always left open when electric power is on. Normally Closed: It means the door is always left closed when electric power is on. P a g e | 98 Copyright © 2023 ZKTECO CO., LTD. All rights reserved.
-
Page 100: Device Management
SSH is used to enter the background of the device for maintenance, choose whether Close SSH to close the SSH. Delete All Data To delete the information and attendance logs/access records of all registered users. P a g e | 99 Copyright © 2023 ZKTECO CO., LTD. All rights reserved. -
Page 101: Updata Firmware
Select an upgrade file and click Confirm to complete firmware upgrade operation. Note: If the upgrade file is needed, please contact our technical support. Firmware upgrade is not recommenced under normal circumstances. P a g e | 100 Copyright © 2023 ZKTECO CO., LTD. All rights reserved. -
Page 102: Change Password
Click Operation Log on the WebServer. All the user’s operation records on the device or WebServer are saved. Users can search and download these logs by time. P a g e | 101 Copyright © 2023 ZKTECO CO., LTD. All rights reserved. -
Page 103: Download Firmware Logs
User Manual 19.5.5 Download Firmware Logs Click Download Firmware Logs on the WebServer. In this interface, you can select download the main, biometric, or dev.log. P a g e | 102 Copyright © 2023 ZKTECO CO., LTD. All rights reserved. -
Page 104: System Information
Displays the current device's user storage, password, fingerprint, card storage, Device Capacity administrators, and event logs. Firmware Displays the firmware version and other version information of the device. Information P a g e | 103 Copyright © 2023 ZKTECO CO., LTD. All rights reserved. -
Page 105: Connect To Zkbio Cvaccess Software
Click Access > Device > Search > Search, to open the Search interface in the software. Click Search, and it will prompt [Searching……]. After searching, the list and total number of access controllers will be displayed. P a g e | 104 Copyright © 2023 ZKTECO CO., LTD. All rights reserved. -
Page 106: Add Personnel On The Software And Online Fingerprint Registration
Add Personnel on the Software and Online Fingerprint Registration In the device list, select the device and click Set up > Set as Registration Device. Click Personnel > Person > New: P a g e | 105 Copyright © 2023 ZKTECO CO., LTD. All rights reserved. - Page 107 Select the finger you want to register and press your finger on the fingerprint sensor of the device three times. If the fingerprint is successfully registered, the device will prompt "Enrolled successfully". P a g e | 106 Copyright © 2023 ZKTECO CO., LTD. All rights reserved.
-
Page 108: Connect To Zkbiotime 8.0 Software
[Device Module] > [Device] > [Device], click the device in the list, change the Device Name and Area. Note: The devices added automatically must be assigned to custom areas to communicate with the software. P a g e | 107 Copyright © 2023 ZKTECO CO., LTD. All rights reserved. -
Page 109: Add Personnel On The Software And Online Fingerprint Registration
Fill in all the required fields and click [Confirm] to register a new user. Click Device > Device, select the device and click Device Menu > Enroll Remotely. P a g e | 108 Copyright © 2023 ZKTECO CO., LTD. All rights reserved. - Page 110 Click Device > Device > Data Transfer > Sync Data to the Device to synchronize all the data to the device including the new users. Note: For other specific operations, please refer the ZKBioTime 8.0 User Manual. P a g e | 109 Copyright © 2023 ZKTECO CO., LTD. All rights reserved.
-
Page 111: Connecting To Zsmart App
On the device, tap on [M/OK] > System > Video Intercom Parameters > QR Code Binding to show the QR code of the device. Click the icon in the upper right corner. P a g e | 110 Copyright © 2023 ZKTECO CO., LTD. All rights reserved. -
Page 112: Video Phone Connection
The user can accept or decline the call. After the user accepts the call, it will open the video door phone interface. Enter the password to unlock the door. P a g e | 111 Copyright © 2023 ZKTECO CO., LTD. All rights reserved. -
Page 113: Connecting To Sip
On the device, tap on [M/OK] >System > Video Intercom Parameters > SIP Settings to go to the monitoring parameter settings. Note: This function needs to be used with the indoor station. P a g e | 112 Copyright © 2023 ZKTECO CO., LTD. All rights reserved. - Page 114 ROOM2. You can set a shortcut key to call the indoor station quickly without entering the IP address or room number of the indoor unit each time. The F35 and the indoor station to achieve video intercom there are two modes, respectively, the LAN and SIP server.
-
Page 115: Local Area Network Use
Call Address: It is the IP Address of the indoor station. To enable the video intercom function, tap the icon on the F35 and enter the IP address or device number of the indoor station in the provided interface. P a g e | 114 Copyright ©... - Page 116 Device Number: It is the device number that set in the Contact List Menu. IP Address: Once the device number is set, it will be automatically displayed. Then you can tap the icon on the F35 and click the calling shortcut keys to call the indoor station. Direct Calling ...
-
Page 117: Sip Server
After correctly setting up the SIP, a green dot will appear in the upper right corner of the call page, indicating that the F35 is connected to the server. You can then initiate a call to the account name of the indoor station."... - Page 118 User Manual For details on the operation and use of the indoor station, please refer to the Indoor Station User Manual. P a g e | 117 Copyright © 2023 ZKTECO CO., LTD. All rights reserved.
-
Page 119: Connecting To Wireless Doorbell
Power off the wireless doorbell first, then re-installing the batteries while pressing and holding the music button until the indicator is on, indicating that the unbinding is successful. P a g e | 118 Copyright © 2023 ZKTECO CO., LTD. All rights reserved. -
Page 120: Settings
Doorbell+Video Intercom: When the user clicks on the doorbell button, the doorbell rings and the device makes a call at the same time. P a g e | 119 Copyright © 2023 ZKTECO CO., LTD. All rights reserved. -
Page 121: Privacy Policy
Privacy Policy Notice: To help you better use the products and services of ZKTeco and its affiliates, hereinafter referred as "we", "our", or "us", the smart service provider, we consistently collect your personal information. Since we understand the importance of your personal information, we took your privacy sincerely and we have formulated this privacy policy to protect your personal information. - Page 122 Upon noticing that we have collected personal information of minors without the prior consent from verifiable parents, we will delete such information as soon as possible. P a g e | 121 Copyright © 2023 ZKTECO CO., LTD. All rights reserved.
- Page 123 Welcome to visit our official website at any time to learn our latest privacy policy. P a g e | 122 Copyright © 2023 ZKTECO CO., LTD. All rights reserved.
-
Page 124: Eco-Friendly Operation
The components which contain toxins or harmful elements are included due to the current economic or technical limitations which prevent their replacement with non-toxic materials or elements. P a g e | 123 Copyright © 2023 ZKTECO CO., LTD. All rights reserved. - Page 125 ZKTeco Industrial Park, No. 32, Industrial Road, Tangxia Town, Dongguan, China. Phone : +86 769 - 82109991 : +86 755 - 89602394 www.zkteco.com Copyright © 2023 ZKTECO CO., LTD. All Rights Reserved.
Need help?
Do you have a question about the F35 and is the answer not in the manual?
Questions and answers