Table of Contents
Advertisement
Quick Links
CD-3604 (U/R)
2D Image Scanner
Quick Setup Guide
Package Contents
CD-3604U
2D image scanner
USB cable
Quick setup guide
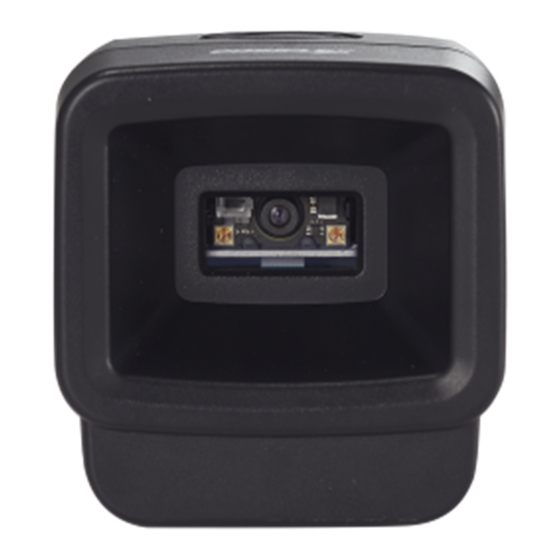
Parts of the 2D Image Scanner
Trigger Button
Default Settings
Scanning the following barcode can restore the engine to the factory defaults.
Before setting, please scan the Enter Setup barcode on P.3. If your CD-
3604U/R is planned to be installed into our Posiflex kiosk model, please scan
the barcode on the right side. After setting, please scan the Exit Setup barcode
on P.3.
Restore All Factory Defaults
$>:S010186.<
$
CD-3604U/R Ver. A0
1
Scan Window
w/ Object Detector
Beeper Hole
1
CD-3604R
2D image scanner
RS-232 cable
Quick setup guide
Mounting Screw Hole
Interface Cable Connector
Restore Kiosk Trigger Default
(For Kiosk Model)
Advertisement
Table of Contents

Subscribe to Our Youtube Channel
Related Manuals for POSIFLEX CD-3604U


Summary of Contents for POSIFLEX CD-3604U
- Page 1 Before setting, please scan the Enter Setup barcode on P.3. If your CD- 3604U/R is planned to be installed into our Posiflex kiosk model, please scan the barcode on the right side. After setting, please scan the Exit Setup barcode on P.3.
-
Page 2: Scanner Maintenance
Scanner Maintenance The scanner is designed for long-term trouble-free operation and rarely requires any maintenance. Only an occasional cleaning of the scanner window is necessary in order to remove dirt and fingerprints. Wipe the scan window with a soft lint-free cloth and a non-abrasive cleaner to avoid the scan window from being scratched and damaged. -
Page 3: Programming Codes
Problem Diagnostic Tips The scanner cannot send the data to the POS system. Make sure that the scanner is installed well and your host POS system is ready to receive data. A barcode is read by the scanner The communication settings of the system port but not accepted by the POS and the scanner do not match. -
Page 4: Firmware Version
Firmware Version Scan the below barcode to retrieve the current firmware version. USB/RS-232 Interface There are four options for USB connection: USB HID-KBW: In keyboard mode, place the mouse cursor on the notepad, etc., and the data will be entered into the notepad after successful decoding. ... -
Page 5: Trigger Mode
USB Virtual COM $>: S0F0216.<$ RS232 $>: S0F0016.<$ Trigger Mode Manual Mode: Press the button to trigger the reading, and release the button to end the reading. If the reading is successful or the reading time exceeds the single reading time, the reading will end. ... - Page 6 Continuous Mode (Button+Command) $>: S03021A.<$ Illumination A couple of illumination options are provided to improve the lighting conditions during every image capture: Before setting, please scan the Enter Setup barcode on P.3. After setting, please scan the Exit Setup barcode on P.3. $>:S0C0000.<$ Reading On (default) $>:S0C0400.<$...
-
Page 7: Good Read Beep Frequency
$>:S300000.<$ Reading On (Lit when reading, default) $>:S301000.<$ Always On $>:S302000.<$ Good Read Beep Frequency Before setting, please scan the Enter Setup barcode on P.3. After setting, please scan the Exit Setup barcode on P.3. $>:SFFDA27.<$ Medium $>:SFF4B27.<$ Loud (default) $>:SFF2527.<$ Prompt Tone Duration Before setting, please scan the Enter Setup barcode on P.3. - Page 8 After setting, please scan the Exit Setup barcode on P.3. 40ms (Short) $>:SFF1F28.<$ 80ms (Middle) (default) $>:SFF3E28.<$ 120ms (Long) $>:SFF5D28.<$ Good Read Tone Sound Before setting, please scan the Enter Setup barcode on P.3. After setting, please scan the Exit Setup barcode on P.3. $>:S030018.<$ Medium $>:S030118.<$...
- Page 9 Enabling/Disabling of readable codes Before setting, please scan the Enter Setup barcode on P.3. After setting, please scan the Exit Setup barcode on P.3. Enable All Barcodes $>:S010187.<$ Disable All Barcodes $>:S010087.<$ Enable All 1D Codes $>:S020287.<$ Disable All 1D Codes $>:S020087.<$ Enable All 2D Codes $>:S040487.<$...
- Page 10 Enable Code128/AIM128/EAN128/NL128 (default) $>:S010188.<$ Disable Code128/AIM128/EAN128/NL128 $>:S010088.<$ Enable UPC/EAN/ISSN/ISBN (default) $>:S010189.<$ Disable UPS/EAN/ISSN/ISBN $>:S010089.<$ Enable Codabar $>:S01018C.<$ Disable Codabar (default) $>:S01008C.<$ Enable Code 39 (default) $>:S01018A.<$...
- Page 11 Disable Code 39 $>:S01008A.<$ Enable Code 32 (default) $>:S0101AB.<$ Disable Code 32 $>:S0100AB.<$ Enable Code 93 (default) $>:S01018D.<$ Disable Code 93 $>:S01008D.<$ Enable Code 11 $>:S01018F.<$ Disable Code 11 (default) $>:S01008F.<$...
- Page 12 Enable ITF-25/ITF-14/ITF-6/Deutsche12/Deutsche14 (default) $>:S01018B.<$ Disable ITF-25/ITF-14/ITF-6/Deutsche12/Deutsche14 $>:S01008B.<$ Enable Industrial 25 $>:S010193.<$ Disable Industrial 25 (default) $>:S010093.<$ Enable Matrix 25 $>:S01018E.<$ Disable Matrix 25 (default) $>:S01008E.<$ Enable NEC 25/Japan Matrix 25 $>:S01019E.<$...
- Page 13 Disable NEC 25/Japan Matrix 25 (default) $>:S01009E.<$ Enable Standard 25 $>:S010192.<$ Disable Standard 25 (default) $>:S010092.<$ Enable Data Logic 25 $>:S01019F.<$ Disable Data Logic 25 (default) $>:S01009F.<$ Enable MSI-Plessey $>:S010191.<$ Disable MSI-Plessey (default) $>:S010091.<$...
- Page 14 Enable Plessey $>:S0101A0.<$ Disable Plessey (default) $>:S0100A0.<$ Enable RSS-EXP/RSS_14/GS1 Data $>:S010190.<$ Disable RSS-EXP/RSS_14/GS1 Data (default) $>:S010090.<$ Enable Telepen $>:S010194.<$ Disable Telepen (default) $>:S010094.<$ Enable Pharma Code One-Track $>:S0101A1.<$...
- Page 15 Disable Pharma Code One-Track (default) $>:S0100A1.<$ Enable Pharma Code Two-Track $>:S0101A2.<$ Disable Pharma Code Two-Track (default) $>:S0100A2.<$ Enable AZTEC $>:S01019A.<$ Disable AZTEC (default) $>:S01009A.<$ Enable CODABLOCK A $>:S01019C.<$ Disable CODABLOCK A (default) $>:S01009C.<$...
- Page 16 Enable CODABLOCK F $>:S01019D.<$ Disable CODABLOCK F (default) $>:S01009D.<$ Enable Data Matrix (default) $>:S010197.<$ Disable Data Matrix $>:S010097.<$ Enable MaxiCode $>:S010199.<$ Disable MaxiCode (default) $>:S010099.<$ Enable PDF417 (default) $>:S010195.<$...
- Page 17 Disable PDF417 $>:S010095.<$ Enable Micro PDF $>:S0101A3.<$ Disable Micro PDF (default) $>:S0100A3.<$ Enable Micro QR $>:S010198.<$ Disable Micro QR (default) $>:S010098.<$ Enable Han Xin Code $>:S01019B.<$ Disable Han Xin Code (default) $>:S01009B.<$...
- Page 18 Enable DOTCODE $>:S0101AE.<$ Disable DOTCODE (default) $>:S0100AE.<$ Allow ID Card Reading $>:S0101AC.<$ Prohibit ID Card Reading (default) $>:S0100AC.<$ Allow Passport Reading $>:S0202AC.<$ Prohibit Passport Reading $>:S0200AC.<$ Baud rate settings (Only for CD-3604R) Baud rate is the number of bits of data transmitted per second. Set the baud rate to match the host requirements.
- Page 19 1200bps $>:S0F0047.<$ 2400bps $>:S0F0147.<$ 4800bps $>:S0F0247.<$ 9600bps (default) $>:S0F0347.<$ 19200bps $>:S0F0547.<$ 38400bps $>:S0F0647.<$ 57600bps $>:S0F0747.<$...
-
Page 20: Specifications
115200bps $>:S0F0847.<$ Specifications Item Characteristics Performance Image Sensor 1280*800 CMOS Illumination White LED Aiming Red LED Symbologies QR, Micro QR, PD417, Micro PDF, Data Matrix, Aztex, Maxicode, Han Xin, etc. Code 128, EAN-13, EAN-8, Code 39, UPC-A, UPC-E, Codabar, Interleaved 2 of 5, ITF-6, ITF-14, ISBN, Code 93, UCC/EAN-128, GS1 Databar, Matrix 2 of 5, Standard 2 of 5,... - Page 21 Outline Dimension ※ The product information and specifications are subject to change without prior notice. To get the detailed information of the CD-3604U/R, please check this model from Posiflex Global Website. (https://download.posiflex.com/en- global/Download/index/manualUinstall_guide/Barcode-Scanner/CD- 3604U). Or download the advanced manual for more detailed settings.
Need help?
Do you have a question about the CD-3604U and is the answer not in the manual?
Questions and answers