
Related Manuals for VEVOR KF-16C-48


Summary of Contents for VEVOR KF-16C-48
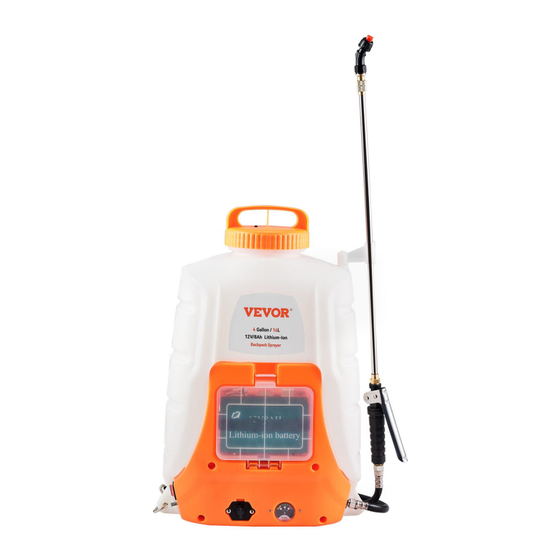
- Page 1 User Manual of Product 1: VEVOR Battery Powered Backpack Sprayer, 0-90 PSI Adjustable Pressure, 4 Gallon Tank, Back Pack Sprayer with 8 Nozzles and 2 Wands, 12V 8Ah Battery, Wide Mouth Lid for Weeding, Spraying, Cleaning...
- Page 2 Technical Support and E-Warranty Certificate www.vevor.com/support ELECTRIC SPRAYER MODEL: KF-16C-48 We continue to be committed to provide you tools with competitive price. "Save Half", "Half Price" or any other similar expressions used by us only represents an estimate of savings you might benefit from buying certain tools with us compared to the major top brands and doses not necessarily mean to cover all categories of tools offered by us.
- Page 3 CustomerService@vevor.com This is the original instruction, please read all manual instructions carefully before operating. VEVOR reserves a clear interpretation of our user manual. The appearance of the product shall be subject to the product you received. Please forgive us that we won't inform you again if there are any technology or software updates on our product.
-
Page 4: Safety Instructions
SAFETY INSTRUCTIONS ! For your safety and the safety of others, the following precautions must be observed when operating the sprayer: 1. During spraying operation, the personnel shall wear clothes in strict accordance with the regulations, wear masks, glasses, hats, gloves, or protective clothing against pesticide penetration, and shall not work naked. - Page 5 The use of chemical liquids and special working fluids is prohibited. When the liquor spraying is completed, turn off the power switch or regulating switch first, and then release the injection switch after the pump stops working. MODEL AND PARAMETERS Model KF-16C-48 Capacity 4 Gallons(16L) Pump Membrane mini-pump...
-
Page 6: Structure Diagram
STRUCTURE DIAGRAM Parts Name Spraying Nozzle Spray Bar Spray Bar Storage Parts Handle Hose Voltmeter Charger Socket Switch Pressure Regulating Knob Straps Battery Compartment Tank Carrying Handle - 4 -... -
Page 7: Assembly And Use
ASSEMBLY AND USE Step 1: Installation of spray bar kit GREEN SEAL RING 9X13X2 (Need to install) GREEN SEAL RING 9X13X2 (Already have) Connect one end of the hose (hexagon nut, attached with a sealing ring) to the water outlet of the barrel,and the other end to the handle end. (Pay attention to installing the seal ring during installation ! ) After this end is inserted into the (A+)end, lock it with (A-). - Page 8 GREEN SEAL RING11X17X3 (Already have) NOTE: After installation according to the figure, the remaining sealing rings are used for spare ! SEALING GASKET (Already have) BLACK SEAL RING 11X17X3 (Already have) Plastic Spray Rod BLACK SEAL RING 11X17X3 (Need to install) Assemble the separated spray bar and connect it to the handle (Adjustable fastener retractable spray bar), and finally select the appropriate nozzle to install it.
- Page 9 Step 3: Installation of straps Connect the chest fastener of the strap. - 7 -...
-
Page 10: Pressure Regulation
Step 4: After filling the barrel with solution, cover it and start to use it. NOTE: Add the sealing ring and then tighten it to prevent water leakage! A. Turn on the switch. ("1" means to turn on the power, and "0"means to turn off the power.) B. - Page 11 Step 5: Please clean the spray with clean water, and finally turn off the governor and power supply after use. Step 6: The red indicator of the charger indicates charging; The green light indicates that the battery is fully charged. NOTE: When charging, please turn off the switch ! Installation of The Battery Compartment Cover:...
- Page 12 INTRODUCTION AND APPLICATION OF NOZZLE Model Picture Function Introduction Note The pressure knob must be adjusted to avoid Single-head Copper Nozzle: intermittent operation of Provide a small amount of spray, or the motor pump when KF-01D linear spray (15-20ft), only for the using.
- Page 13 F-type Double Nozzle: KF-06E Provide medium spray effect. Y-type Double Nozzle: KF-56E Provide medium spray effect. The pressure knob must be adjusted to avoid Fan-shaped Nozzle: intermittent operation of Provide 90 °~110 ° plane the motor pump when KF-23E fan-shaped spray, which is mostly using.
- Page 14 Water inlet/outlet pipe of Open base, check water pump is loose whether the internal water Water leakage of substructure. and cracked. pipe is loose or broken, and tighten or replace it. Replace the nozzle. Spray bar shakes Overpressure/The Reduce the pressure. nozzle is too small.
- Page 15 Dismantle the water pump Water pump blocked. cover and remove foreign matters. Water pump does not work. Wiring problem/water After eliminating pump damaged. problems of electric wires and waterways, contact the merchant to purchase a new water pump, and replace the water pump under the guidance of the merchant.
-
Page 16: Storage Rules
CLEAN,CARE AND STORAGE RULES Cleaning and care: After operating the sprayer, remove the working solution from the tank completely and rinse the tank, hose, pump, and spray tube with clean water. Finally, spray with clean water for 3 minutes to eliminate the possibility of a chemical reaction when other chemicals are used in the next spraying. - Page 17 Technical Support and E-Warranty Certificate www.vevor.com/support...
Need help?
Do you have a question about the KF-16C-48 and is the answer not in the manual?
Questions and answers
My switch handle kf59A has a hole in it. Can I get s replacement
@Daniel Cheek
I need a new handle switch for this unit (KF-16C-48). Where can I get it?