Table of Contents
Advertisement
Quick Links
Support and E-Warranty Certificate https://www.vevor.com/support
STEERING TROLLING MOTOR
USR MANUAL
MODEL:BHS223
We continue to be committed to provide you tools with competitive price.
"Save Half", "Half Price" or any other similar expressions used by us only represents an
estimate of savings you might benefit from buying certain tools with us compared to the major
top brands and doses not necessarily mean to cover all categories of tools offered by us. You
are kindly reminded to verify carefully when you are placing an order with us if you are
actually saving half in comparison with the top major brands.
Advertisement
Table of Contents

Related Manuals for VEVOR BHS223


Summary of Contents for VEVOR BHS223
- Page 1 Support and E-Warranty Certificate https://www.vevor.com/support STEERING TROLLING MOTOR USR MANUAL MODEL:BHS223 We continue to be committed to provide you tools with competitive price. "Save Half", "Half Price" or any other similar expressions used by us only represents an estimate of savings you might benefit from buying certain tools with us compared to the major top brands and doses not necessarily mean to cover all categories of tools offered by us.
- Page 2 CustomerService@vevor.com This is the original instruction, please read all manual instructions carefully before operating. VEVOR reserves a clear interpretation of our user manual. The appearance of the product shall be subject to the product you received. Please forgive us that we won't inform you again if there are any technology or software updates on our product.
-
Page 3: Safety Considerations
MAKOSHARK advantage that can truly take you "Anywhere.Anytime."We don' tbelieve inshortcuts. We are MAKOSHARK.And we are never done helping you catch morefish. MOTOR INFORMATION(For Consumer Reference Only) Model BHS223 Maximum current No load speed 1800RPM Maximum thrust... - Page 4 WARNING You are responsible for the safe and prudent operation of your vessel. We have designed your MAKOSHARK product to be an accurate and reliable tool that will enhance boat operation and improve your ability to catch fish. This product does not relieve you from the responsibility for safe operation of your boat.
- Page 5 WARNING Take care that neitheryou nor other persons approach the turning propeller too closely,neither with body parts nor with objects. The motor is powerfuland may endanger or injure you or others.While the motoris running watch out for persons swimming and for floating objects. Persons who lack the ability to run the motor or whose reactions are impaired by alcohol,drugs,medication,or other substances are not permitted to use this motor.This motor is not suitable for use in strong currents.The constant noise...
-
Page 6: Warranty
WARRANTY WARRANTY ON MAKOSHARK SALTWATER TROLLING MOTORS Makoshark extends the following limited warranty to the original retail purchaser only.Warranty coverage is not transferable. MAKOSHARK Limited One-Year Warranty on the Entire Product Makoshark warrants to the original retail purchaser only that the purchaser's new MAKOSHARK saltwater trolling motor will be materilly free from defects in materials and workmanship appearing within One(1)years after the date of purchase.Makoshark will(at its option)either... - Page 7 normal wear and tear,blemishes that do not affect the operation of the product,or damage caused by accidents, abuse, alteration, modification, shipping damages,negligenceoftheuserormisuse,improper or insufficient care or maintenance. DAMAGE CAUSED BY THE USE OF OTHER REPLACEMENT PARTS NOT MEETING THE DESIGN SPECIFICATIONS OF THE ORIGINAL PARTS WILL NOT BE COVERED BY THIS LIMITED WARRANTY.The cost of normal maintenance or replacement parts which are not in breach of the limited warranty are the responsibility of the purchaser.Prior tousing...
- Page 8 be warranted forthe remainderof theoriginal warranty period lorfor 90 days from the date of repair or replacement,whichever is longer].For any product that is returned forwarranty service that Makoshark finds tobe not covered by or not inbreach of this limited warranty,there will bea biling for services rendered at the prevailing posted labor rate andfor a minimum of at least one hour.
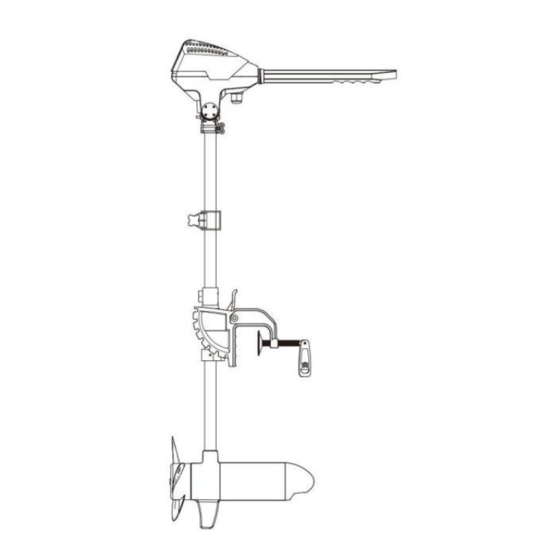
- Page 9 KNOW YOUR BOAT - 8 -...
- Page 10 FEATURES NOTICE: Specifications subject to change without notice. This diagram is for reference only and may differ from youractual motor. - 9 -...
-
Page 11: Installation
INSTALLATION Motor Installation a. Find a transom area of the boat that is free from obstructions. b. Open the Transom Clamp Screws on the bracket enough so that it will fit over the top of the boat transom. c. Place the Lever Lock Mounting Bracket over the top of the boat transom so that the bracket is resting on top of the transom. - Page 12 CAUTION Over-tightening the Transom Clamp Screws can damage the bracket. Damage to the bracket will prevent the motor from being securely mounted to the transom. Prevent damage to the bracket by not over-tightening it.Only tighten by hand. INSTALLATION f.We recommend the tilt angle of the motorto be adjusted so that the motor shaft is perpendicular to the water surface when the motor is in use.
- Page 13 NOTICE: This motor weighs approximately 30 lbs.We recommend having a second person help with the installation. WARNING When the motoris being transported, on water orland,it is important to place the motor completely out of water. The motor should be positioned up close to the Lever Lock Mounting Bracket Always secure the Steering Tension Knob and slide the Adjustable Depth Collar down to the top of the Steering Tension Knob for added security during transport.
-
Page 14: Battery&Wiring Installation
BATTERY&WIRING INSTALLATION BOAT RIGGING&PRODUCT INSTALLATION For safety and compliance reasons,we recommend that you follow Boat and Yacht Council(ABYC)standards when rigging your boat.Altering boat wiring should be completed by a qualified marine technician.The following specifications are for general guidelines only: CAUTION These guidelines apply to general rigging to support your MAKOSHARK motor.Powering multiple motors or additional electrical devices from the same power circuit may impact the recommended conductor gauge and circuit... -
Page 15: Selecting The Correct Batteries
3. No more than 5%voltage drop allowed at full motor power based on published product power requirements. Wire Extension Length Motor Circuit Breaker 5 feet 10 feet 15 feet 20 feet 25 feet Thrust/Model Draw 30 lb. 10AWG 10AWG 8 AWG 6 AWG 4AWG 50 Amp@12VDC... -
Page 16: Additional Considerations
improve the battery life.Failure to recharge lead-acid batteries(within 12-24 hours)is the leading cause of premature battery failure.Use a multi-stage charger to avoid overcharging.We offer a wide selection of chargers to fit your charging needs.If you are using a crank battery to start a gasoline outboard,we recommend that you use a separate deep cycle marine battery/batteries for your MAKOSHARK trolling motor.For more information on battery selection and rigging,please check with related departments. -
Page 17: Connecting The Batteries
wire to reduce sonar interference.Most alternator charging systems do not account for this bonding wire,and connect the negative posts of the trolling motor batteries to the negative posts of the crank/starting battery.These external connections can damage connected electronics and the electrical system of your trolling motor,voiding your warranty.Review yourcharger's manualcarefully or consult the manufacturer prior to use to ensure your charger is compatible. -
Page 18: Motor Wiring Diagram
Automatic Jump Start Systems and Selector Switches Automatic jump start systems and selector switches tie the negatives of the connected batteries together.Connecting these systems to the"High Side"Battery or"Middle"Battery in the diagrams below and will cause significant damage to your trolling motor and electronics.The only trolling motor battery that is safe toconnect to one of these systems is the"Low Side"Battery. -
Page 19: Stowing The Motor
USING & ADJUSTING THE M0TOR STOWING THE MOTOR WARNING When stowing or deploying the motor, keep fingers clear of all - 18 -... - Page 20 hingeand pivot points and all moving parts. Practice proper ergonomics when stowing and deploying the motor to prevent injury. WARNING Moving the motor creates a variety of pinch points. The motor headwill create a pinch point if the Steering Tension Knob is loosened and the motor head slides to the top of the Adjustable Depth Collar.
-
Page 21: Adjusting The Depth Of The Motor
d. Fortransport always tilt the motorinto the boat such that the motor and prop assembly are completely out of the water and the motor is positioned up close to the Lever Lock Mounting Bracket. ADJUSTING THE DEPTH OF THE MOTOR ADDITIONAL ADJUSTMENTS - 20 -... - Page 22 Adjusting the Depth of the Motor When setting the depth be sure the top of the motoris submerged at least 12”to avoid churning or agitation of surface water.The propeller must be completely submerged. a. Firmly grasp the composite Shaft and hold it steady. Loosen the Steering Tension Knob and the Adjustable Depth Collar until the Shaft slides freely.
- Page 23 - 22 -...
-
Page 24: Adjusting The Steering
Adjusting the Steering Adjust the Steering Tension Knob to provide enough tension to allow the motorto turn freely,yet remain in any position without being held or tighten the knob to place the motor in a preset position to leave your hands free for fishing. - Page 25 WARNING When the motor is not in use, always turn the Tiller handle to "OFF".If the handle is set or accidentally engaged or bumped and is not positioned to "OFF"the prop will turn on unexpectedly. The prop may also turn on unexpectedly if the control board or5 position switch fails.Prevent injury from a turning propeller and always know how to quickly disengage the poweror correct the Tillerto turn the prop off.
- Page 26 WARNING Be alert forunexpected boat movement when operating the Riptide Transom.The boat may encounter sharp turns and jolts if the steering is changed sharply or if broad changes in speed are made while operating.Maintain balance and observe safe motor operation THE STEERING ADJUSTING Adjusting the Bracket You can lock your motor in a vertical position, angle itfor shallow water or...
- Page 27 LED LIGHTS SHOW THE BATTERY CAPACITY · The LED light provides an accurate display of the remaining charge in the battery. · 2-3 lights will have deep warning, and then i will have around 10mins to come back(Refer to battery 24V 60AH) - 26 -...
- Page 28 - 27 -...
-
Page 29: Service And Maintenance
SERVICE& MAINTENANCE PROPELLER REPLACEMENT TOOLS AND RESOURCES REQUIRED · 1/2”Open End Wrench · Flat Blade Screwdriver INSTALLATION a. Disconnect the motor from all sources of power prior to changing the propeller. b. Hold the propeller and loosen the Prop Nut with a pliers or a wrench. c. - Page 30 CAUTION If the prop does not readily slide off, take care to not bend the Armature Shaft while removing the prop by pulling the prop evenly offthe Armature Shaft. e. Put on the new Propeller. f. Install the Prop Nut. g.
-
Page 31: General Maintenance
GENERAL MAINTENANCE GENERAL MAINTENANCE ·After every use,the entire motor should be rinsed with freshwater,then wiped down with a cloth dampened with an aqueous based silicone spray.Do notspray water into the ventilation openings in the head of the motor. ·The composite shaft requires periodic deaning and lubrication for proper retraction and deployment.A coating of an aqueous based silicone spray willimprove operation. -
Page 32: Environmental Compliance Statement
emery cloth to clean terminals. ·Check battery water level.Add water if needed. 2.Motorloses power after a short running time: ·Check battery charge.If low,restore to full charge. 3.Motor is difficult to steer: ·Loosen the steering tension knob on the bracket ·Lubricate the composite shaft. 4.You experience prop vibration during normal operation: ·Remove and rotate the prop 180°.See removalinstructions in the Propeller Replacement section. - Page 33 not be required in yourlocation for electrical&electronic equipment(EEE), nor may it be required for EEE designed and intended as fixed or temporary installation in transportation vehidles such as automobiles, aircraft and boats.In some European Union member states,these vehicles are considered outside of the scope of the Directive,and EEE for those applications can be considered excluded from the WEEE Directive requirement.
-
Page 34: Fcc Compliance
FCC COMPLIANCE This device complies with Part 15 of the FCC rules Operation is subject to the following two conditions: 1.This device may not cause harmful interference. 2.This device must accept any interference that may be received,including interference that may cause undesired operation.Changes or modifications not expressly approved by MAKOSHARK could void the user's authority to operate this equipment. -
Page 35: Environmental Ratings
Changes or modiications not expressly approved by Johnson Outdoors Marine Electronics,Inc.could void the user's authority to operate this equipment. ENVIRONMENTAL RATINGS Ambient operating temperature range:-10C to 50C Ambient operating humidity range:5%to 95% Maximum operating altitude:10,000 feet PARTS DIAGRAM& PARTSLIST MAKOSHARKTRANSOMBE-CS230/250-55/86 LBS THRUST-24VOLT-30/34SHAFT This page provides MAKOSHARK@WEEE compliance disassembly instructions.For more information about where you should dispose of your... - Page 36 - 35 -...
- Page 37 PARTS DIAGRAM & PARTS LIST MAKOSHARK Transom BE-CS230/250 Parts List - 36 -...
- Page 38 Importer: WAITCHX Address: 250 bis boulevard Saint-Germain 75007 Paris Importer: FREE MOOD LTD Address: 2 Holywell Lane, London, England, EC2A 3ET Manufacturer: Wenling Whachinebrothers Machinery Ltd Address:Building #7,Incubation Zone, East District,Wenling City,Zhejiang Province 317511, China Made In China EUREP UK LTD UNIT 2264, 100 OCK STREET, ABINGDON OXFORDSHIRE ENGLAND OX14 5DH EUREP GmbH...
- Page 40 Support and E-Warranty Certificate https://www.vevor.com/support...
Need help?
Do you have a question about the BHS223 and is the answer not in the manual?
Questions and answers