Nilfisk-Advance MH 7P Instructions For Use Manual
Hide thumbs
Also See for MH 7P:
- Instructions for use manual (152 pages) ,
- Instructions for use manual (32 pages) ,
- Instructions for use manual (32 pages)
Table of Contents
Advertisement
Quick Links
Advertisement
Table of Contents

Subscribe to Our Youtube Channel
Related Manuals for Nilfisk-Advance MH 7P


Summary of Contents for Nilfisk-Advance MH 7P
- Page 1 MH 5M - MH 7P - MH 8P - Instructions for use 301002099 D (09. 2015)
-
Page 3: Table Of Contents
english Contents Safety instructions ........................2 Description ..........................2 2.1 Purpose ..........................2 2.2 Operating elements ......................3 Before starting the cleaner .......................3 3.1 Transport and assembly .......................3 3.2 Set the brake ........................3 3.3 Install Crank handle for high pressure hose reel/cord reel ..........4 3.4 Fill up detergent tanks......................4 3.5 Fill up tank for Nilfisk AntiStone (Anti-Scale) indicator ............4 3.6 Adjusting the Nilfisk AntiStone (Anti-Scale) device ..............4... -
Page 4: Safety Instructions
Safety instructions english Symbols used to mark T h i s i n d i - in these operating c a t e s t i p s instructions instructions which and instructions must be observed to simplify work to prevent risks a n d to ensure safe opera- to persons are marked with this... -
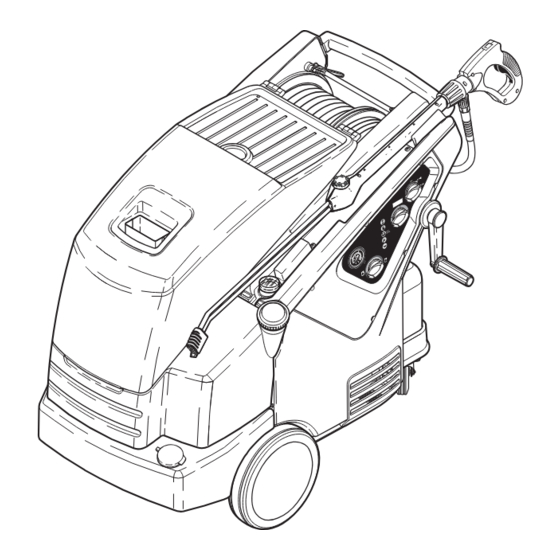
Page 5: Operating Elements
Operating elements See fold-out page at front of these 13 Display (Temperature or english operating instructions. Codes) 14 Temperature control 1 Spray lance 15 Low fuel indicator 16 Low Nilfi sk AntiStone (Anti- 2 Spray lance storage Scale) indicator 3 Control panel 4 Crank handle for 17 Service interval due/expired High pressure hose reel... -
Page 6: Install Crank Handle For High Pressure Hose Reel/Cord Reel
english 1. Pull cap of crank in arrow direc- Install Crank handle tion. for high pressure hose 2. Align tabs on crank with slot in reel/cord reel axle. 3. Put crank on axle of high pres- sure hose reel/cord reel. 4. -
Page 7: Fill Up Fuel Tank
english Fill up fuel tank With the machine cold, turned off and disconnected from power supply: 1. Fill fuel tank from a clean con- tainer with a fresh fuel, heat- ing oil, DIN 51603-1 (without bio diesel) or Diesel EN 590 (Diesel with bio diesel content up to 7%). -
Page 8: Connecting The Water Supply
english 1. Attach quick connect adapter Connecting the water found with Owners Manual to supply the water supply hose. 2. Rinse the water supply hose briefl y in order to prevent sand an other dirt particles entering into the machine. 3. -
Page 9: Control / Operation
english 4 Control / Operation Connections 1. Pull the blue quick-release 4.1.1 Connecting the spray grip (A) of the spray gun for- wards and lock it by turning it lance to the spray gun to the left. 2. Insert the nipple of the spray lance (C) into the quick-re- lease connection and turn the blue quick-release grip to the... -
Page 10: Pressure Regulation (Tornado Lance)
english 4.2.2 Steam operation (over 1. Open cabinet (and service door 100°C (212°F)) if desired - see chapter 3.6, Step 1+2). 2. Turn the twist grip on the safety control block all the way to the left (counter- clock wise-direction). 3. -
Page 11: Applications And Methods
english 5 Applications and methods Techniques Effi cient high pressure cleaning is achieved by following a few guide- lines, combined with your own personal experience of specifi c clean- ing tasks. Accessories and detergents, when correctly chosen, can increase the effi ciency of your pressure washer. Here is some basic information about cleaning. -
Page 12: Some Typical Cleaning Tasks
english Some typical cleaning tasks 5.2.1 Agriculture Task Accessories Method Stables Chemical Foam Injec- 1. Soaking – apply foam to all surfaces (bottom to top) Pig Pens, Sties tors and wait for approx. 30 minutes. Foam lance 2. Remove the dirt from surfaces with the high pressure Cleaning of walls, Powerspeed lance lance or chosen accessory. - Page 13 5.2.3 Buildings and Equipment english Task Accessories Method General surfaces Foam injectors Stand- 1. Apply thick foam over the surfaces to be cleaned. Apply ard lance on dry surfaces. Apply from top to bottom on vertical Metallic equipment Curved lances surfaces.
-
Page 14: After Using The Cleaner
english 6 After using the cleaner Switching off the 1. Turn the main switch to posi- cleaner tion „OFF“. 2. Turn off water supply at faucet. 3. Squeeze the spray gun trigger until the pressure has bled off. 4. Slide trigger lock to the locked position. -
Page 15: Maintenance
english 7 Maintenance Maintenance Schedule Every six MH 5/8 only: months or Weekly After the fi rst 50 500 operating required operating hours hours 7.2.1 Water fi lters 7.2.2 Oil fi lter 7.2.3 Checking the pump oil quality ... - Page 16 english 7.2.3 Checking the pump oil 1. Check color of pump oil. If the oil has a grey or white quality shade, change the oil (see chapter 7.2.4) 2. Top off oil level with fresh oil if necessary. Oil type see chapter 9.3 Tech- nical Data.
-
Page 17: Troubleshooting
english 8 Troubleshooting Indications on Display Indication Cause Remedy on Display Contact Nilfi sk Service > Flow sensor fault Cold water operation possible > Water supply turned off or inadequate supply • Required volume fl ow and pressure see to machine chapter 9.3 Technical Data >... -
Page 18: Indication Lights On Control Panel
english Indication lights on control panel Indication light Cause Remedy see FLO see FLO > • fl ashing > Low fuel level • Fill fuel tank Cold water operation possible > Low Nilfi sk AntiStone (Anti-Scale) • Fill Nilfi sk AntiStone (Anti-Scale) level tank >... -
Page 19: Technical Data
US only: or tampered with by unauthor- will cover labor by an author- english This warranty is in effect from the first ized person(s). ized Nilfisk CSI Dealer for a day of purchase by the end user. 12-month period after the date The use of parts other Each machine will have one (1) of purchase of the machine by... -
Page 20: Eu Declaration Of Conformity
english EU Declaration of Conformity EU Declaration of Conformity Product: High Pressure Cleaner Type: MH 5-7-8 The design of the unit corre sponds to the following EC Machine Directive 2006/42/EC pertinent regulations: EC EMC Directive 2004/108/EC RoHS Directive 2011/65/EC EC PED Directive 97/23/EC Noise Emission Directive 2000/14/EC... - Page 21 PERU HEAD QUARTER GERMANY TURKEY Nilfi sk S.A.C. Nilfi sk GmbH Nilfi sk A.S. DENMARK Calle Boulevard 162, Of. 703, Lima 33- Guido-Oberdorfer-Straße 2-10 Serifali Mh. Bayraktar Bulv. Sehit Sk. No:7 Nilfi sk A/S Perú 89287 Bellenberg Ümraniye, 34775 Istanbul Kornmarksvej 1 Lima Tel.: +90 216 466 94 94...
Need help?
Do you have a question about the MH 7P and is the answer not in the manual?
Questions and answers