Table of Contents
Advertisement
Quick Links
Advertisement
Table of Contents

Related Manuals for Sunny Health & Fitness SF-T722062


Summary of Contents for Sunny Health & Fitness SF-T722062
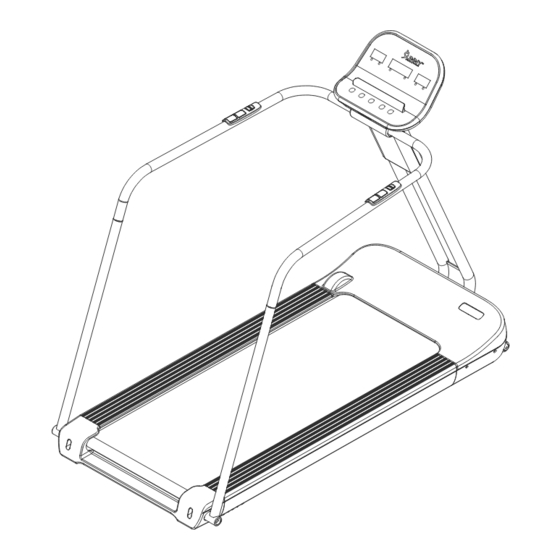
- Page 1 RUNNING TREADMILL WITH HANDRAILS SF-T722062 USER MANUAL IMPORTANT! Please retain owner’s manual for maintenance and adjustment instructions. Your satisfaction is very important to us, PLEASE DO NOT RETURN UNTIL YOU HAVE CONTACTED US: support@sunnyhealthfitness.com or 1- 877-90SUNNY (877-907-8669).
-
Page 2: Important Safety Instruction
IMPORTANT SAFETY INSTRUCTION When using an electrical appliance, basic precautions should always be followed, including the following: Read all instructions before using this treadmill. DANGER – To reduce the risk of electrical shock: 1. Always unplug this appliance from the electrical outlet immediately after using and before cleaning. WARNING –... -
Page 3: Important Safety Information
IMPORTANT SAFETY INFORMATION We thank you for choosing our product. To ensure your safety and health, please use this equipment correctly. It is important to read this entire manual before assembling and using the equipment. Safe and effective use can only be achieved if the equipment is assembled, maintained, and used properly. - Page 4 IMPORTANT OPERATING INSTRUCTION 1. Insert the power plug directly into the socket. 2. Read the manual before operating the treadmill. 3. Changes in speed do not occur immediately. Set your desired speed using the adjustment keys on the main console. The speed will increase gradually. 4.
-
Page 5: Pre-Assembly Check List
PRE-ASSEMBLY CHECK LIST Before you start to assemble, please make sure all parts are included. Description Spec. Qty. Description Spec. Qty. Main Frame Computer Stand Upright Tube Safety Lock Left Handrail Silicone Oil Connecting Tube Right Handrail Manual Connecting Tube Left Handrail Thank You Card Tube... -
Page 6: Hardware Package
HARDWARE PACKAGE SF-T722062 HARDWARE PACKAGE STEP 4 STEP 2 STEP 1 #82 M8*15, 4PCS #82 M8*15, 4PCS #82 M8*15, 2PCS #84 M10*75,1PC #83 M8*45 1PC STEP 3 Φ Φ 8.4*t1.6, 3PCS #82 M8*15, 4PCS #85 5#+6# 1PC #84 M10*75,1PC Ordering Replacement Parts (U.S. and Canadian Customers only) Please provide the following information in order for us to accurately identify the part(s) needed: ... - Page 7 ASSEMBLY INSTRUCTIONS We value your experience using Sunny Health and Fitness products. For assistance with parts or troubleshooting, please contact us at support@sunnyhealthfitness.com or 1-877-90 SUNNY (877 -907-8669). STEP 1: #82 M8*15, 2PCS #70 Φ16*Φ8.4*t1.6, 3PCS Put the Upright Tube (No. 2) near the front of the #83 M8*45 1PC Main Frame (No.
- Page 8 We value your experience using Sunny Health and Fitness products. For assistance with parts or troubleshooting, please contact us at support@sunnyhealthfitness.com or 1-877-90 SUNNY (877 -907-8669). STEP 2: #82 M8*15, 4PCS #84 M10*75, 1PC #85 5#+6# 1PC Insert the Left Handrail Connecting Tube (No. 3) into the Left Handrail Tube (No.
- Page 9 We value your experience using Sunny Health and Fitness products. For assistance with parts or troubleshooting, please contact us at support@sunnyhealthfitness.com or 1-877-90 SUNNY (877 -907-8669). STEP 3: #82 M8*15, 4PCS #84 M10*75, 1PC #85 5#+6# 1PC Insert the Right Handrail Connecting Tube (No. 4) into the Right Handrail Tube (No.
- Page 10 We value your experience using Sunny Health and Fitness products. For assistance with parts or troubleshooting, please contact us at support@sunnyhealthfitness.com or 1-877-90 SUNNY (877 -907-8669). STEP 4: #82 M8*15, 4PCS #85 5#+6# 1PC Connecting the 2 Hand Pulse Wires (No. 54) with Hand Pulse Connecting Wire 1 (No.
- Page 11 We value your experience using Sunny Health and Fitness products. For assistance with parts or troubleshooting, please contact us at support@sunnyhealthfitness.com or 1-877-90 SUNNY (877 -907-8669). STEP 5: Insert the Safety Lock (No. 46) into the Computer Top Cover (No. 33). The assembly is complete! NOTE: Before plug in the power, it is necessary to confirm all the installation is completed according to...
-
Page 12: Maintenance And Care
MAINTENANCE & CARE General cleaning will help prolong the life and performance of your treadmill. Keep the treadmill clean and maintained by dusting the components on a regular basis. Clean the two exposed sides of the Running Belt (No. 14) will prevent dust from accumulating underneath. Keep your running shoes clean so the dirt from the shoes does not damage the Running Board (No. -
Page 13: Lubricating The Treadmill
LUBRICATING THE TREADMILL IMPORTANT NOTE: This treadmill does come pre-lubricated, but it is recommended to lubricate your treadmill before the first use. RUNNING BELT & TREADMILL LUBRICANT: Lubricating the Running Board (No. 13) and Running Belt (No. 14) is essential as the friction affects the lifespan and operations of the treadmill. -
Page 14: How To Move The Treadmill
HOW TO MOVE THE TREADMILL 1. After stopping the running, stand at the rear end of the treadmill and hold the iron tube at the rear of the main frame with both hands, as shown in the figure on the left side, to lift the tail end of the treadmill. -
Page 15: Important Electrical Information
IMPORTANT ELECTRICAL INFORMATION WARNING: This treadmill requires a power source of 10 amps (100-120V) in order to properly operate. For your safety, as well as the safety of others, please verify that the power source is correct before powering the treadmill. Any power source above or below this level could cause significant damage to the equipment and/or user. -
Page 16: The Display Console
THE DISPLAY CONSOLE PULSE MODALITIES TIME STEPS CALORIES DISTANCE SPEED WARNING! Heart rate monitoring systems may be inaccurate.Over execising may result in serious injury or death. If you feel faint stop execising immediately. SPEED PROGRAM START/PAUSE STOP I. BUTTON INSTRUCTIONS 1. - Page 17 II. THE SAFETY KEY FUNCTION: When the motor is running, pull off the safety lock and the motor stops, and the treadmill is forbidden to start. III. PULSE MEASUREMENT FUNCTION: When the treadmill is powered on, hold the steel plate of the left and right handrails with both hands. In order to obtain accurate heartbeat value, please stand on the treadmill and measure when stopping, and hold the hand for at least 30 seconds.
- Page 18 VII. Power off: The treadmill can be turned off at any time by turning off the power switch without damaging it. VIII: Meaning of error message code: PROBLEM AND CODE POSSIBLE CAUSE SUGGESTED ACTION A. Electronic watch and lower control Reconnect the Communication failure communication line contact is bad...
-
Page 19: App Connection
APP CONNECTION: 1. Scan the QR code below to download the SunnyFit app onto your mobile device. 2. If this is your first time using the SunnyFit app, follow the in-app instructions to register for your free SunnyFit account and log in. 3. -
Page 20: Troubleshooting
TROUBLESHOOTING TROUBLE CAUSE SOLUTION The electric run will not 1. Plug in the power socket or start 1. Not plugged in or switched on turn on the power switch 2. Electric treadmill overcurrent 2. Replace the power supply protector is disconnected insurance (or press the 3. -
Page 21: Exploded Diagram
EXPLODED DIAGRAM 73 73... -
Page 22: Parts List
PARTS LIST Description Spec. Qty. Description Spec. Qty. Main Frame Multi-hook Belt 165-J7Elastic belt Φ25*t23.5*M6, Upright Tube Bumper 65degree Φ25*t23.5*M6, Left Handrail Bumper Connecting Tube 35degree Right Handrail Φ8.1*Φ37*21.5 Handling Wheel Connecting Tube Left Handrail Tube Motor Top Cover 694.6*313.7*103.8 Right Handrail Tube Plastic Drop Mark 100*30... - Page 23 Back Brace 141.1*25.9*25 Bolt M8*40 Screen Ornament 335.1*289.3*0.4 Bolt M8*95 Decal Φ31*Φ19*t13 Magnetic Ring Bolt M8*35 Φ36*Φ23*t15 Magnetic Ring Bolt M8*20 Φ30*Φ20*t10 Magnetic Ring Bolt M6*50 Filter YB35D5-16A-Q Bolt M6*50 EMC Magnetic snap 31*30*27 Screw M6*25 Φ16*Φ8.4*t1.6 Safety Lock Flat Washer wire length Safety Lock Seat Screw...
Need help?
Do you have a question about the SF-T722062 and is the answer not in the manual?
Questions and answers