
Related Manuals for NCR 7357-K912


Summary of Contents for NCR 7357-K912
- Page 1 Kit Instructions Remote Scale Display Mount (NCR 7895 Scanner/Scale) 7357-K912 Issue A...
- Page 2 NCR, therefore, reserves the right to change specifications without prior notice. All features, functions, and operations described herein may not be marketed by NCR in all parts of the world. In some instances, photographs are of equipment prototypes. Software screen images are representative, and in some cases, may not match a customer’s installed software exactly.
-
Page 3: Revision Record
Revision Record Issue Date Remarks July 2021 First Issue... -
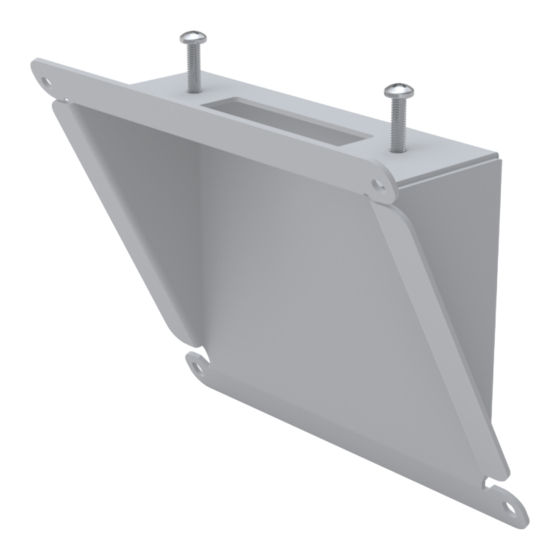
Page 5: Kit Contents
Remote Scale Display Mount (NCR 7895 Scanner/Scale) This publication provides the procedure for installing a Remote Scale Display Mount (NCR 7895 Scanner/Scale) to the NCR FastLane SelfServ™ Checkout (7357) R6LN Plus. Kit Contents Part Number Description 497-0529324 SSCO R6LN+ (7895 Scanner) Remote Scale Display Mount Kit 497-0529325 SCCO R6C Remote Scale Display Mount Bracket 006-8622923 M4x20mm Pan Head Phillips SS Machine Screw (2 pcs) -
Page 6: Installation Procedure
Remote Scale Display Mount (NCR 7895 Scanner/Scale) Installation Procedure To install the Remote Scale Display Mount (NCR 7895 Scanner/Scale), follow these steps: 1. Shut down the NCR FastLane SelfServ™ Checkout software and hardware systems. 2. Remove the Terminal Display by doing the following: a. - Page 7 Remote Scale Display Mount (NCR 7895 Scanner/Scale) c. Lift and tilt the Display forward, as shown in the image below. d. Disconnect the Display cables. 3. Open the Core Door. 4. Remove the Scanner Top by sliding it forward, as shown in the image below.
- Page 8 Remote Scale Display Mount (NCR 7895 Scanner/Scale) 5. Detach the Blank Plate from the back of the Tower Frame by removing four (4) nuts. Note: Remove the nuts from the inside of the Tower Frame and discard the Blank Plate properly. Retain the four (4) nuts for installing the Remote Scale Display Mount.
- Page 9 Remote Scale Display Mount (NCR 7895 Scanner/Scale) 7. Insert the Remote Scanner Display Cable into the Cable Access Hole of the Remote Scale Display Mount and route it to the hole going down the back of the Core Cabinet, as shown in the image below.
- Page 10 Remote Scale Display Mount (NCR 7895 Scanner/Scale) 9. Route the Remote Scale Display Cable to the Scanner Bucket. Note: Secure the Remote Scale Display Cable with the 7895 Scanner/Scale Cable and the Color Camera Cable to the air vent using a cable tie.
- Page 11 Remote Scale Display Mount (NCR 7895 Scanner/Scale) 10. Install the NCR 7895 Scanner/Scale by doing the following: a. Connect all the cables on the designated ports on the NCR 7895 Scanner/Scale.
- Page 12 Remote Scale Display Mount (NCR 7895 Scanner/Scale) b. Place the Scanner/Scale in the Scanner bucket. c. Lower the Scale Plate.
- Page 13 Remote Scale Display Mount (NCR 7895 Scanner/Scale) d. Install the Scanner Top by sliding it toward the Tower Frame. e. Connect cables to designated ports on the Display. 11. Install the Terminal Display to the Tower Frame, by doing the following: a.
- Page 14 Remote Scale Display Mount (NCR 7895 Scanner/Scale) 12. Secure the Terminal Display to the Tower Frame using two (2) screws. 13. Ensure that the devices are working properly by powering up the NCR FastLane SelfServ™ Checkout software and hardware systems.
Need help?
Do you have a question about the 7357-K912 and is the answer not in the manual?
Questions and answers