Advertisement
Quick Links
Advertisement

Related Manuals for NCR 7350-K978


Summary of Contents for NCR 7350-K978
- Page 1 Kit Instructions R6L Upgrade, Narrow Size Core 7350-K978 Issue B...
- Page 2 NCR, therefore, reserves the right to change specifications without prior notice. All features, functions, and operations described herein may not be marketed by NCR in all parts of the world. In some instances, photographs are of equipment prototypes. Therefore, before using this document, consult with your NCR representative or NCR office for information that is applicable and current.
- Page 3 RevisionRecordK978 Revision Record Issue Date Remarks Apr 2018 First issue Nov 2020 • Updated Kit Contents. • Modified Installation Procedures page 4. • Installing 7350 R6 Lite Product Identification (PID) Upgrade Label page 39.
- Page 5 This publication provides procedures for upgrading an existing 7350 SelfServ Checkout Narrow Core unit to 7350 R6 Lite Narrow Core with the following components: • 7360 I/O Box • 7360 Power Supply • Display Bracket for NCR RealPOS XR7 (7702)
-
Page 6: Kit Contents
7350-K978 R6L Upgrade, Narrow Size Core Kit Contents The R6L Upgrade, Narrow Size Core Installation Kit contains the following: Part Number Description 497-0528741 7350-K978 Kit - R6 Lite Upgrade, Narrow Size Core 009-0006593 Screws M4 x 10 (4 pcs) 009-0007087 Serrated Nut - Self Locking (M4, 4.2) - Page 7 7350-K978 R6L Upgrade, Narrow Size Core Part Number Description 497-0526717 Complete IO Assembly (CAD0892) with Firmware and New CP2105 497-0519936 I/O and Power Supply Mounting Bracket - R6L Narrow Core 497-0524643 Display Bracket - R6L Narrow Core (Cg1) 497-0474154 Cable - 7702 Power, 24 V, 3500 mm...
-
Page 8: Installation Procedures
Installing the Display Mounting Bracket on page 26. Installing the NCR 7702 Terminal Display on page 27. Note: To purchase an NCR 7702 Terminal Display, contact an NCR Customer Representative. Installing the System Power Supply on Bracket on page 30 Installing the I/O Box on Bracket on page 33... - Page 9 Upgrading 7350 Narrow Core to the R6 Lite version replaces the Touch Display with the 7702 Display Terminal. To remove the Touch Display from the 7350 Narrow Core unit, follow these steps: 1. Turn off the NCR SelfServ Checkout software and hardware systems. 2. Open the Core Door.
- Page 10 7350-K978 R6L Upgrade, Narrow Size Core 3. Remove the two screws securing the Display mount to the tower frame. 4. Slide up the Display to disengage the mount hooks from the core.
- Page 11 7350-K978 R6L Upgrade, Narrow Size Core 5. Lift and tilt the Display forward to disconnect the Display cables. 6. Remove the cables from the Core Door. For more information, refer to Removing and Sorting Cables on page 17. 7. Remove other 7350 Narrow Core components that must be replaced with R6 Lite Narrow Core components.
- Page 12 7350-K978 R6L Upgrade, Narrow Size Core Removing the Tri-Light /Lane Light Assembly and Pole To remove the Tri-Light/Lane Light assembly, follow these steps: 1. Remove the Display from unit. For more information, refer to Removing the Touch Display on page 5.
- Page 13 7350-K978 R6L Upgrade, Narrow Size Core 5. Disconnect the cables from the Tri-Light/Lane Light assembly, as shown in the image below. Note: Do not remove cables from pole. 6. Remove the two screws to dismantle the Tri-Light/Lane Light assembly from the Tri- Light pole.
- Page 14 7350-K978 R6L Upgrade, Narrow Size Core 8. Remove the two screws from Tri-Light pole base. 9. Remove the back panel cover from the unit. 10. Pull out the power cable from the bagwell and the communication cable from the core cabinet in order to easily remove the Tri–Light/Lane Light pole.
- Page 15 7350-K978 R6L Upgrade, Narrow Size Core 11. Lift Tri-Light pole out of the unit. 12. Remove other 7350 Narrow Core components that must be replaced with R6 Lite Narrow Core components. For more information, refer to the Installation Procedures on page 4.
- Page 16 7350-K978 R6L Upgrade, Narrow Size Core Removing the Supervisor Switch To remove the Supervisor Switch, follow these steps: 1. Remove the two nuts securing the Supervisor Switch mount to the core as shown in the image below. Note: To access the Supervisor Switch mount, remove the Display. For more...
- Page 17 7350-K978 R6L Upgrade, Narrow Size Core 4. Lift the switch bracket off the PEM studs. 5. Disconnect Supervisor Button Assembly cable from the E-Box. 6. Remove other 7350 Narrow Core components that must be replaced with R6 Lite Narrow Core components. For more information, refer t o the Installation Procedures on page 4.
- Page 18 7350-K978 R6L Upgrade, Narrow Size Core Removing the E-Box To remove the E-Box from the NCR SelfServ Checkout Narrow Core unit, follow these steps: 1. Loosen the two screws securing the E-Box locking bracket and rotate bracket so that it no longer blocks the E-Box.
- Page 19 7350-K978 R6L Upgrade, Narrow Size Core Removing the E-Box Bracket To remove the E-Box bracket from the NCR SelfServ Checkout Narrow Core unit, follow these steps: 1. Remove the E-Box. For more information, refer to Removing the E-Box on the previous page.
- Page 20 7350-K978 R6L Upgrade, Narrow Size Core 4. Slide the bracket forward to disengage the bracket from the clips and lift the bracket out of the unit. 5. Remove the cables from the Core Door. For more information, refer to Removing and Sorting Cables on the facing page.
- Page 21 7350-K978 R6L Upgrade, Narrow Size Core Removing and Sorting Cables To remove and sort cables from the existing NCR SelfServ Checkout Narrow Core unit in order to prepare it for the R6 Lite Narrow Core components, follow these steps: 1. Remove 7350 Narrow Core components that must be replaced with R6 Lite Narrow Core components.
- Page 22 7350-K978 R6L Upgrade, Narrow Size Core 5. Pull out the cables from the back panel. 6. Remove all cable ties securing the cables. 7. Remove and discard the following cables from the bundle: • Tri-Light Power Cable • Tri-Light Communication Cable •...
- Page 23 7350-K978 R6L Upgrade, Narrow Size Core Installing the 7360 Tri–Light/Lane Light Assembly (Optional) To install the Tri–Light/Lane Light assembly, follow these steps: Note: Complete this procedure if replacing the R5 Tri–Light/Lane Light assembly with the R6 Tri–Light/Lane Light assembly. 1. Remove the existing Tri–Light/Lane Light assembly, if necessary. For more...
- Page 24 7350-K978 R6L Upgrade, Narrow Size Core c. Secure the pole to the core using two screws.
- Page 25 7350-K978 R6L Upgrade, Narrow Size Core 3. Install the Tri–Light/Lane Light assembly by doing the following: a. Connect the Tri–Light/Lane Light assembly cable with the cable extender in the pole. b. Orient the Tri–Light/Lane Light assembly so that the Lane Light faces the front...
- Page 26 7350-K978 R6L Upgrade, Narrow Size Core c. Insert the Tri–Light/Lane Light assembly into the Tri–Light/Lane Light pole. Ensure that the pole holes are aligned.
- Page 27 7350-K978 R6L Upgrade, Narrow Size Core d. Secure the Tri–Light/Lane Light assembly to the pole with a screw. 4. Connect and route the Tri–Light/Lane Light cable extender to the I/O Box. For more information, refer to following procedures: • Installing the I/O Box on Bracket on page 33.
- Page 28 7350-K978 R6L Upgrade, Narrow Size Core Installing the Supervisor Switch To install the Supervisor Switch, follow these steps: 1. Remove 7350 components that must be replaced with R6 Lite Narrow Core components. 2. Open the Core Door. 3. Attach switch assembly cable to the Supervisor Switch port of the IO Box.
- Page 29 7350-K978 R6L Upgrade, Narrow Size Core 7. Secure switch assembly in place with black screw cap. 8. Install other R6 Lite Narrow Core components. For more information, refer to the Installation Procedures on page 4.
- Page 30 To install the mounting bracket to the Display, follow these steps: 1. Place the NCR 7702 Terminal Display on a flat surface with the back facing up. 2. Attach the mounting bracket to the back of the Display using four screws, as shown below.
- Page 31 7350-K978 R6L Upgrade, Narrow Size Core Installing the NCR 7702 Terminal Display Upgrading the NCR SelfServ™ Checkout (7350) Narrow Core to R6 Lite Narrow Core replaces the existing Display with the NCR 7702 Terminal Display. To install the NCR 7702 Terminal Display, follow these steps: 1.
- Page 32 7350-K978 R6L Upgrade, Narrow Size Core 5. Align hooks in mounting bracket to the holes in the tower frame and slide down the Display to lock in place. 6. Secure the Display with mounting bracket to the tower using two screws.
- Page 33 7350-K978 R6L Upgrade, Narrow Size Core Routing NCR 7702 Terminal Display Cables To route the Display cables in the NCR SelfServ Checkout unit, follow these steps: 1. Install the Terminal Display. For more information, refer to Installing the NCR 7702 Terminal Display on page 27.
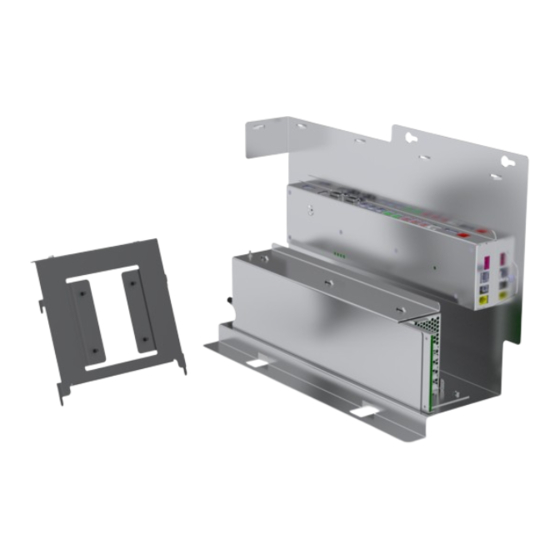
- Page 34 7350-K978 R6L Upgrade, Narrow Size Core Installing the System Power Supply on Bracket To install the System Power Supply, follow these steps: 1. Remove the existing 7350 Narrow Core components that must be replaced. For more information, refer to Installation Procedures on page 4.
- Page 35 7350-K978 R6L Upgrade, Narrow Size Core 4. Align the hooks of the power supply assembly to the I/O Box-PSU bracket to lock the assembly in place and secure using one screw. 5. At the back of the System Power Supply, connect the power cable. Ensure the cable is secured to the Retainer Clip.
- Page 36 7350-K978 R6L Upgrade, Narrow Size Core 7. Do the following: • Install the I/O Box, if not yet installed. For more information, refer to Installing the I/O Box on Bracket on the facing page. • Install the I/O Box – PSU bracket to the core wall. For more information, refer to Installing the I/O Box and Power Supply Bracket on page 34.
- Page 37 7350-K978 R6L Upgrade, Narrow Size Core Installing the I/O Box on Bracket Upgrading the NCR SelfServ™ Checkout (7350) Narrow Core to R6 Lite replaces the Pocono E-Box with the 7360 I/O Box. To install the I/O Box, follow these steps: 1. Remove the existing 7350 components that need to be replaced. For more...
- Page 38 7350-K978 R6L Upgrade, Narrow Size Core Installing the I/O Box and Power Supply Bracket To install the I/O Box and Power Supply Bracket (I/O Box-PSU Bracket) to the NCR SelfServ Checkout Narrow Core unit, follow these steps: 1. Do the following: •...
- Page 39 Routing System Power Supply Cables To route the System Power Supply cables, follow these steps: 1. Install the I/O Box and Power Supply Bracket to the NCR SelfServ Checkout Narrow Core unit. For more information, refer to Installing the I/O Box and Power Supply Bracket on the previous page.
- Page 40 Routing I/O Box Cables To route the I/O Box cables in the NCR SelfServ Checkout unit, follow these steps: 1. Install the I/O Box and Power Supply Bracket to the NCR SelfServ Checkout Narrow Core unit. For more information, refer to...
- Page 41 7350-K978 R6L Upgrade, Narrow Size Core Routing and Sorting Cables To route the cables in the NCR SelfServ Checkout Narrow Core unit, follow these steps: 1. Install all R6 Lite Narrow Core components. For more information, refer to Installation Procedures on page 4.
- Page 42 7350-K978 R6L Upgrade, Narrow Size Core 5. Place excess cables that cannot be bundled properly in the lower section of the cabinet as shown in the image below. 6. Install the back panel cover to the R6 Lite Narrow Core unit.
- Page 43 1. Peel off the protective film from the PID Upgrade label and then attach the label on the location shown in the image below. 2. Update the DMI (Desktop Management Interface). For more information, refer to the "Terminal Display SPI/BIOS" section of the NCR SelfServ™ Checkout (7350) R6 Lite Hardware Service Guide (BCC5-0000-5212).
Need help?
Do you have a question about the 7350-K978 and is the answer not in the manual?
Questions and answers