Advertisement
Quick Links
Advertisement

Related Manuals for NCR 7364-K426


Summary of Contents for NCR 7364-K426
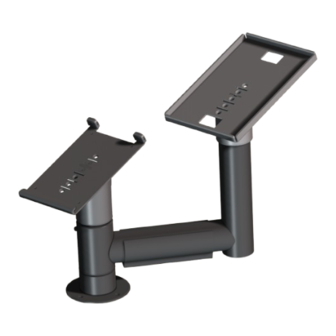
- Page 1 Kit Instructions Ingenico Lane 5000 and Axiohm TPOS 58mm Mount 7364-K426 Issue A...
- Page 2 NCR, therefore, reserves the right to change specifications without prior notice. All features, functions, and operations described herein may not be marketed by NCR in all parts of the world. In some instances, photographs are of equipment prototypes. Therefore, before using this document, consult with your NCR representative or NCR office for information that is applicable and current.
-
Page 3: Revision Record
Revision Record Issue Date Remarks Dec 2018 First Issue... - Page 4 Ingenico Lane 5000 and Axiohm TPOS 58mm Mount This publication provides procedures for installing a Ingenico Lane 5000 and Axiohm TPOS 58mm Mount on an NCR FastLane SelfServ™ Checkout (7364) R6-G unit.
-
Page 5: Kit Contents
7364-K426 Ingenico Lane 5000 and Axiohm TPOS 58mm Mount Kit Contents Part Number Description 497–0522550 7364-K426 Ingenico Lane 5000 and Axiohm TPOS 58mm Mount 497–0519576 Axiohm Printer Tray 497–0522429 SP2 Non-Tilting Top Pole Connection 497–0522427 Swing Arm SP2 497–0522430 Cable Clip 497–0522428... -
Page 6: Installation Procedure
7364-K426 Ingenico Lane 5000 and Axiohm TPOS 58mm Mount Installation Procedure Installing the Ingenico Lane 5000 and Axiohm TPOS 58mm Mount on an R6-G unit involves the following procedures: A. Installing the Ingenico Lane 5000 and Axiohm TPOS 58mm mount on the Core Cabinet. - Page 7 7364-K426 Ingenico Lane 5000 and Axiohm TPOS 58mm Mount Installing the Ingenico Lane 5000 and Axiohm TPOS 58mm Mount To install the Ingenico Lane 5000 and Axiohm TPOS 58mm Mount to the Core Cabinet, follow these steps: 1. Remove four M4 flat head screws securing the PIN Pad Blank.
- Page 8 7364-K426 Ingenico Lane 5000 and Axiohm TPOS 58mm Mount 3. Attach the Swing Arm into the Mounting Pole as shown in the image below. 4. Using an allen key, loosen each screw on the SP2 Duratilt and SP2 NonTilting Top...
- Page 9 7364-K426 Ingenico Lane 5000 and Axiohm TPOS 58mm Mount 5. Attach the SP2 Duratilt to the Mounting Pole by aligning the hex screw with the slotted cutout as shown in the image below. 6. Attach the SP2 NonTilting Top Pole Connection to the Swing Arm by aligning the...
- Page 10 7364-K426 Ingenico Lane 5000 and Axiohm TPOS 58mm Mount 7. Turn the SP2 Duratilt and SP2 Nontilting Top Pole Connection to the desired position and then tighten the corresponding hex screws using an allen key. 8. Install the MultiGrip Plate for Ingenico Lane-5000 to the SP2 Duratilt using two hex...
- Page 11 7364-K426 Ingenico Lane 5000 and Axiohm TPOS 58mm Mount 9. Install the Axiohm Printer Plate to the SP2 NonTilting Top Pole Connection using two hex screws. 10. Attach the Cable Clip into the Swing Arm as shown in the image below.
- Page 12 7364-K426 Ingenico Lane 5000 and Axiohm TPOS 58mm Mount 11. Place the Ingenico Lane 5000 into the MultiGrip Plate by inserting the Ingenico Lane 5000 device slot into the MultiGrip Plate tab as shown in the image below. 12. Place the Axiohm Printer into the Axiohm Printer Plate.
- Page 13 7364-K426 Ingenico Lane 5000 and Axiohm TPOS 58mm Mount Routing Ground Strap Cable To route the Ground Strap Cable into the Core Cabinet, follow these steps: 1. Install the Ingenico Lane 5000 and Axiohm TPOS 58mm mount on the Core Cabinet.
- Page 14 7364-K426 Ingenico Lane 5000 and Axiohm TPOS 58mm Mount b. Route the Ground Strap Cable inside the Swing Arm, through the cable clip and into the bottom opening of the Mounting Pole. c. Inside the Core Cabinet, route the Ground Strap Cable into the back wall and secure it with one nut as shown in the image below..
- Page 15 7364-K426 Ingenico Lane 5000 and Axiohm TPOS 58mm Mount Routing Ingenico Lane 5000 and Axiohm TPOS 58mm Cables To route the Ingenico Lane 5000 and Axiohm TPOS 58mm cables, follow these steps: 1. Install the Ingenico Lane 5000 and Axiohm TPOS 58mm Mount into the Core Cabinet.
- Page 16 7364-K426 Ingenico Lane 5000 and Axiohm TPOS 58mm Mount • Route the Ingenico Lane 5000 cable through the Mouting Pole and into the Core Cabinet. Note: The Ingenico Lane 5000 cable have two connectors on the other end.
- Page 17 7364-K426 Ingenico Lane 5000 and Axiohm TPOS 58mm Mount 3. Inside the Core Cabinet,do the following: a. Route the Ingenico Lane 5000 RS232 cable up and into the Tower Cabinet and then connect to the Terminal Display RS232/A Port. Note: Secure cables using cable ties.
- Page 18 7364-K426 Ingenico Lane 5000 and Axiohm TPOS 58mm Mount b. Route the Ingenico Lane 5000 and Axiohm printer LAN cables. Depending on the Bagwell orientation, refer to the labels on the image below. Note: Secure cables using cable ties.
Need help?
Do you have a question about the 7364-K426 and is the answer not in the manual?
Questions and answers