
Related Manuals for NCR 7360-K429


Summary of Contents for NCR 7360-K429
- Page 1 Kit Instructions No Handle PIN Pad Mount (Equinox Luxe 8000i/8500i) 7360-K429 Issue A...
- Page 2 NCR, therefore, reserves the right to change specifications without prior notice. All features, functions, and operations described herein may not be marketed by NCR in all parts of the world. In some instances, photographs are of equipment prototypes. Software screen images are representative, and in some cases, may not match a customer’s installed software exactly.
-
Page 3: Revision Record
Revision Record Issue Date Remarks Feb 2020 First Issue... -
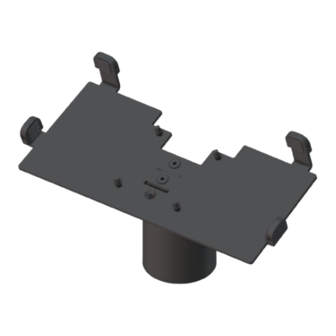
Page 4: Kit Contents
Luxe 8000i/8500i) This publication provides procedures for installing a No Handle PIN Pad Mount for an Equinox Luxe 8000i/8500i device on an NCR FastLane SelfServ™ Checkout (7360) unit. Note: The Equinox Luxe 8000i/8500i PIN Pad is supplied by the customer. Kit Contents... -
Page 5: Installation Procedures
Installing No Handle PIN Pad Mount on a Credit/Debit Only Unit on page 6. • Installing Equinox Luxe 8000i/8500i PIN Pad on page 10. Note: The Equinox Luxe 8000i/8500i PIN Pad is not included in the 7360-K429 No Handle PIN Pad Kit. For more information, contact an NCR Customer Service Representative. - Page 6 7360-K429 No Handle PIN Pad Mount (Equinox Luxe 8000i/8500i) Removing Existing PIN Pad Mount To remove the existing PIN Pad Mount, follow these steps: 1. Remove the Allen key securing the PIN Pad Mount to the PIN Pad Arm. 2. Lift the PIN Pad Mount to remove the mount from the PIN Pad Arm as shown in...
- Page 7 7360-K429 No Handle PIN Pad Mount (Equinox Luxe 8000i/8500i) Installing No Handle PIN Pad Mount on Standard and Convertible Con- figuration Units To install the PIN Pad Mount on a Standard or Convertible unit, follow these steps: 1. Mount the PIN Pad Mount onto the PIN Pad Arm.
- Page 8 7360-K429 No Handle PIN Pad Mount (Equinox Luxe 8000i/8500i) 3. Fasten the PIN Pad Mount to the PIN Pad Arm using the Allen key.
- Page 9 7360-K429 No Handle PIN Pad Mount (Equinox Luxe 8000i/8500i) Installing No Handle PIN Pad Mount on a Credit/Debit Only Unit To install the No Handle PIN Pad Mount on a Credit/Debit Only configuration unit, follow these steps: 1. Using an Allen key, remove two (2) Allen head screws securing the PIN Pad Plate to the Tilt Arm.
- Page 10 7360-K429 No Handle PIN Pad Mount (Equinox Luxe 8000i/8500i) 3. Install the PIN Pad Plate on the Tilt Arm using two (2) Allen head screws. 4. Mount the PIN Pad Mount onto the PIN Pad Arm.
- Page 11 7360-K429 No Handle PIN Pad Mount (Equinox Luxe 8000i/8500i) 5. Position the PIN Pad Mount so that its edge is approximately parallel with the Pivot Arm Surface.
- Page 12 7360-K429 No Handle PIN Pad Mount (Equinox Luxe 8000i/8500i) 6. Fasten the PIN Pad Mount to the PIN Pad Arm using the Allen key.
- Page 13 Note: For the purpose of illustration only, this procedure shows images using a Standard Configuration unit. Note: The Equinox Luxe 8000i/8500i PIN Pad is not included in the 7360-K429 No Handle PIN Pad Kit. For more information, contact an NCR Customer Service Representative.
- Page 14 7360-K429 No Handle PIN Pad Mount (Equinox Luxe 8000i/8500i) 3. Turn the PIN Pad over and then connect the cable to the PIN Pad port by pushing the cable at an angle, as shown in the image below. 4. Press the cable to lock in place and then secure the cable to the PIN Pad using a...
- Page 15 7360-K429 No Handle PIN Pad Mount (Equinox Luxe 8000i/8500i) 5. Mount the PIN Pad to the four (4) studs at the back of the PIN Pad Mount, as shown in the image below. Note: The maximum vertical tilt is 80° and the minimum vertical tilt is 20° as shown...
Need help?
Do you have a question about the 7360-K429 and is the answer not in the manual?
Questions and answers