
Related Manuals for saro DA 388 GWS


Summary of Contents for saro DA 388 GWS
- Page 1 Seite 1 von 32 Betriebsanleitung Dry-Aging Reifeschrank Modell DA 388 GWS mit Schublade Art.-Nr.: 446-2013 09/23 SvN...
-
Page 2: Table Of Contents
Seite 2 von 32 INHALT Lieferumfang ..............................3 Normen und Richtlinien ..........................3 Technische Übersicht ..........................3/4 Symbolerklärungen ............................4 Allgemeine Hinweise............................... 5 Sicherheitshinweise ............................... 6 Geräteaufstellung ..............................7 Geräteanschluss ............................7/8 Struktur und Teile ............................9 Erste Inbetriebnahme ............................. 9 Bedienung –... -
Page 3: Lieferumfang
Seite 3 von 32 Sehr geehrter Kunde, wir gratulieren Ihnen zu Ihrem neuen SARO-Dry Ager Modell DA 388 GWS. Der von Ihnen erworbene Artikel wurde für die gewerbliche Nutzung in Restaurants, Hotels, Cafés, Kantinen und Supermärkten entwickelt. Besonders eignet sich der Dry Ager um verschiedene Fleischsorten und auch Wurstwaren oder Schinken unter optimalen Bedingungen nachzureifen. -
Page 4: Symbolerklärungen
Seite 4 von 32 Anschlussvorbereitung Steckerfertig mit Schukostecker Temperatureinstellung/-kontrolle Digital Heizung Geräuschentwicklung 46-51 dB Füße 4, justierbar Geeignet für Klimaklasse 3 Temperaturbereich 1 - 25 °C Luftfeuchtigkeit 60-85 % Inhalt brutto / netto 396 / 352 L Kältemittelart/Menge R600a / 50 g Anschluss 220-240 V / 50-60 Hz / 0,17 kW Abmessungen innen... -
Page 5: Allgemeine Hinweise
Seite 5 von 32 ALLGEMEINE HINWEISE • Bewahren Sie diese Betriebsanleitung griffbereit in der Nähe des Gerätes auf. • Der Hersteller/Händler kann nicht verantwortlich gemacht werden für Schäden, die durch Nichtbeachtung dieser Bedienungsanleitung entstehen. • Bei Nichtbeachtung dieser Bedienungsanleitung ist die Sicherheit des Gerätes nicht mehr gewährleistet. •... -
Page 6: Sicherheitshinweise
Seite 6 von 32 SICHERHEITSHINWEISE • Falsche Bedienung und unsachgemäße Behandlung können zu Störungen am Gerät und zu Verletzungen des Benutzers führen. • Das Gerät ist weder geeignet noch vorgesehen für die Lagerung von Medikamenten oder leicht entzündlichen, brenn- baren oder explosiven Stoffen. •... -
Page 7: Geräteaufstellung
Seite 7 von 32 GERÄTEAUFSTELLUNG Stellen Sie das Gerät in einem trockenen und ausreichend belüfteten Raum auf. Sorgen Sie dabei für einen sicheren Stand auf einem trockenen und rutschfesten Untergrund. Stellen Sie das Gerät mit der Rückseite mindestens 10 cm von der Wand entfernt auf, um jederzeit für genügend Luftzirkulation zu sorgen. - Page 8 Seite 8 von 32 Kurzanleitung zur Griffinstallation: Entnehmen Sie den Griff und die beiden Schrauben aus der Verpackung. Ziehen Sie die Türdichtung an der Seite der Tür zurück, setzen Sie die Schrauben in die Grifflöcher ein und ziehen Sie sie mit einem Kreuzschlitzschraubendreher fest.
-
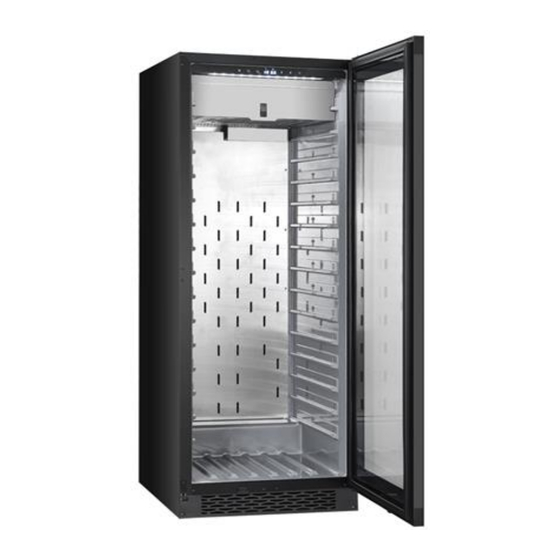
Page 9: Struktur Und Teile
Seite 9 von 32 STRUKTUR UND TEILE ERSTE INBETRIEBNAHME Vor der ersten Nutzung: Packen Sie das Gerät aus, überprüfen es auf Vollständigkeit und stellen Sie es auf (Siehe Geräteaufstellung). Säubern Sie das Gerät (siehe Reinigung). Schließen Sie das gesäuberte Gerät (Siehe Geräteanschluss) an eine 230 V Steckdose an. Erst wenn die gewünschte Temperatur erreicht ist, legen Sie Ihre Ware in das Gerät ein. -
Page 10: Bedienung - Einstellungen (Display)
Seite 10 von 32 BEDIENUNG - EINSTELLUNGEN Digitaler Temperaturregler Einschalten Netzschalter: Halten Sie den Netzschalter (1) gedrückt, und im Fenster (11) wird von 3-2-1 heruntergezählt. Zum Ausschalten drücken Sie den Netzschalter (1) erneut, um das gesamte Gerät auszuschalten. Standby-Zustand: Drücken Sie den Netzschalter (1) 3 Sekunden lang ununterbrochen, um das Gerät einzuschalten. Funktionstaste/Schaltknopf: Drücken Sie Taste (2), um zwischen den Anzeigefenstern zu wechseln. - Page 11 Seite 11 von 32 Luftbefeuchtungssystem: Diese Anzeige (7) zeigt an, dass die Befeuchtungsfunktion aktiviert ist. Entfeuchtungsanlage: Diese Anzeige (8) zeigt an, dass die Entfeuchtungsfunktion aktiviert ist. Das Fehlersystem: Diese Anzeige (9) zeigt an, dass die Störmeldefunktion aktiviert ist. Einstellung der Temperaturanzeige: "Anzeige der eingestellten Temperatur"...
-
Page 12: Reinigung
Seite 12 von 32 Ziehen Sie den Wassertank vorsichtig von unten nach außen aus dem Gerät heraus. Gießen Sie destilliertes Wasser oder Wasser ohne Verunreinigungen in die Wasserschale im Wassertank. Stellen Sie sicher, dass Sie nicht über die maximale Fülllinie hinausgehen, um einen Überlauf zu vermeiden. Schieben Sie den Wassertank nach dem Einfüllen des Wassers vorsichtig nach vorne, um ihn wieder in das Gerät einzusetzen. -
Page 13: Kühlgerät Außer Betrieb Nehmen / Lagerung /Transport
Seite 13 von 32 KÜHLGERÄT AUßER BETRIEB NEHMEN / LAGERUNG /TRANSPORT Nehmen Sie alle Lebensmittel heraus, schalten Sie das Gerät aus, ziehen Sie den Netzstecker. Reinigen Sie das Gerät innen und außen gründlich und öffnen Sie die Tür, damit das Gerät ausreichend trocknen kann. Ist es trocken und soll das Gerät für eine längere Zeit nicht benutzt werden, stellen sie es an einem trockenen, staubfreien und nicht heißen Ort ab. -
Page 14: Stromlaufplan
Seite 14 von 32 STROMLAUFPLAN Übersetzung Stromlaufplan: Compressor Kompressor Variable speed board Platine mit variabler Geschwindigkeit OUT Fan Luftauslass IN Fan 1 – 4 Lufteinlass PCB Board PCB Tafel Humidifier Luftbefeuchter Rectifier Gleichrichter Heater Heizung Door light switch Schalter für Türlicht Electronic expansion valves Elektronische Expansionsventile Display board... -
Page 15: Explosionszeichnungen Mit Legende
Seite 15 von 32 EXPLOSIONSZEICHNUNG: EXPLOSIONSZEICHNUNG – Legende Carton Karton M5 trunk nail M5 Schrauben Left hinge Linke Schraube Door stop Türstopper Display board Bedienplatine LED light LED-Beleuchtung Humidifier fan support Unterstützung für Befeuchtergebläse Fan motor for water tank Lüfter für Wassertank Humidity sensor Feuchtigkeitssensor Humidifier mounting bracket... -
Page 16: Verpackungs-Entsorgung
Seite 16 von 32 UV light with cover UV-Licht mit Abdeckung UV light mounting box Montagebox für UV Licht Heating wire Heizelement Evaporator Verdampfer Suction tube Saugrohr Kick plate Blende mit Lüftungsgitter Door lock Türschloss M10 Foot M10 Fuß Magnetic switch box on housing Magnetischer Schalter am Gehäuse Condenser Kondensator... - Page 17 Seite 17 von 32 Diese Tabelle können Sie für Ihren eigenen, eventuell späteren Bedarf ausfüllen und nutzen. Gerätebezeichnung Dry Ager Modellname: DA 388 GWS Bestell-Nummer Seriennummer 446-2013 vom Typenschild vom Typenschild Wenn zutreffend Wenn separat ausgewiesen R600a / 50 g Kältemittel...
- Page 18 Seite 18 von 32 Operating instructions Dry-Aging Maturing Cabinet Model DA 388 GWS with drawer Item no.: 446-2013 09/23 SvN...
- Page 19 Seite 19 von 32 CONTENTS Scope of delivery ............................20 Standards and guidelines ..........................20 Technical overview ..........................20/21 General notes ............................... 22 Safety instructions ............................22/23 Installation ............................... 23/24 Connection .............................. 24/25 Structure and parts ............................25 First commissioning ............................26 Operation –...
-
Page 20: Scope Of Delivery
Seite 20 von 32 Dear Customer, Congratulations on your new SARO Dry-Ager model DA 388 GWS. The item you have purchased was developed for commercial use in restaurants, hotels, cafés, canteens and supermarkets. The Dry Ager is particularly suitable for curing different types of meat and also sausages or hams under optimal conditions. - Page 21 Seite 21 von 32 Load capacity per grate Max. 20 kg Meat hook Salt pan Connection preparation Ready to plug in with safety plug Temperature setting/control Digital Heating Noise generation 46-51 dB Feet 4, adjustable Suitable for Climate class 3 Temperature range 1 - 25 °C Humidity...
-
Page 22: General Notes
Seite 22 von 32 GENERAL NOTES • Keep these operating instructions within easy reach near the unit. • The manufacturer/dealer cannot be held responsible for damage caused by failure to observe these operating instructions. • If these operating instructions are not observed, the safety of the appliance is no longer guaranteed. •... -
Page 23: Installation
Seite 23 von 32 • Do not store highly flammable or explosive substances near the unit. Do not carry out any work with highly flammable substances in the vicinity of the unit (no spray paint or similar). It could otherwise lead to a fire or explosion. •... -
Page 24: Connection
Seite 24 von 32 The mains cable is 2 m long and is located at the back on the right-hand side when viewed from the front. After delivery or transport of the unit, connect it only after the unit has been at rest for at least 24 hours. This is absolutely necessary so that the refrigerant can collect in the compressor. -
Page 25: Structure And Parts
Seite 25 von 32 Quick guide to handle installation: Remove the handle and the two screws from the packaging. Pull back the door seal on the side of the door, insert the screws into the handle holes and tighten them with a Phillips screwdriver. Squeeze the door seal to make sure it is tight. -
Page 26: First Commissioning
Seite 26 von 32 FIRST COMMISSIONING Before the first use: Unpack the appliance, check that it is complete and set it up (see Setting up the appliance). Clean the appliance (see Cleaning). Connect the cleaned appliance (see appliance connection) to a 230 V socket. Only when the desired temperature has been reached do you place your goods in the appliance. - Page 27 Seite 27 von 32 Function button/switch button: Press key (2) to switch between the display windows. Use buttons (4) and (5) to set the upper and lower temperature and the humidity. Light/Fahrenheit/Celsius switch: Press the light button (3) to switch the light on or off. Press the button for 3 seconds to switch between degrees Celsius and Fahrenheit.
- Page 28 Seite 28 von 32 Refill water: If the water level in the water tank is lower than the lowest water level scale, it is necessary to refill water. Replacing the absorbent cotton: Regular checking of the water level and absorbent cotton, as well as timely refilling and replacement, are crucial to ensure that the humidification system works efficiently and maintains the desired humidity.
-
Page 29: Cleaning
Seite 29 von 32 CLEANING Wipe the outside and inside with a damp, soft cloth. A mild washing-up liquid can be used for this purpose. Wipe again without cleaning additive, then rub dry well. Do not use abrasive, bleaching, corrosive or scratching cleaning agents/cleaning aids, as this could damage/scratch the surfaces. It is recommended to clean the water tank regularly, or when necessary, to avoid contamination of the food. -
Page 30: Circuit Diagram
Seite 30 von 32 The following problems are not a malfunction: The hissing of the refrigerant can be heard when the cooling unit is working. This is normal because the refrigerant is circulating in the system. In the wet season, condensation may form on the outside of the unit. This is not a malfunction, the cause is excessive humidity. Simply use a cloth to wipe off the condensation. -
Page 31: Packaging Disposal
Seite 31 von 32 EXPLOSION MARK - Legend Carton Shelf M5 trunk nail Left hinge UV light with cover Door stop UV light mounting box Display board Heating wire light Evaporator Humidifier fan support Suction tube Fan motor for water tank Kick plate Humidity sensor Door lock... -
Page 32: Equipment Disposal
Thank you! You can fill in and use this table for your own, possibly later needs. Unit designation Dry Ager Model name: DA 388 GWS Order number Serial number 446-2013 from the type plate...
Need help?
Do you have a question about the DA 388 GWS and is the answer not in the manual?
Questions and answers