SilverCrest SLE 420 A1, 89301 - DEHUMIDIFIER Manual
- Operating instructions manual (100 pages) ,
- Operating instructions manual (74 pages)
Advertisement
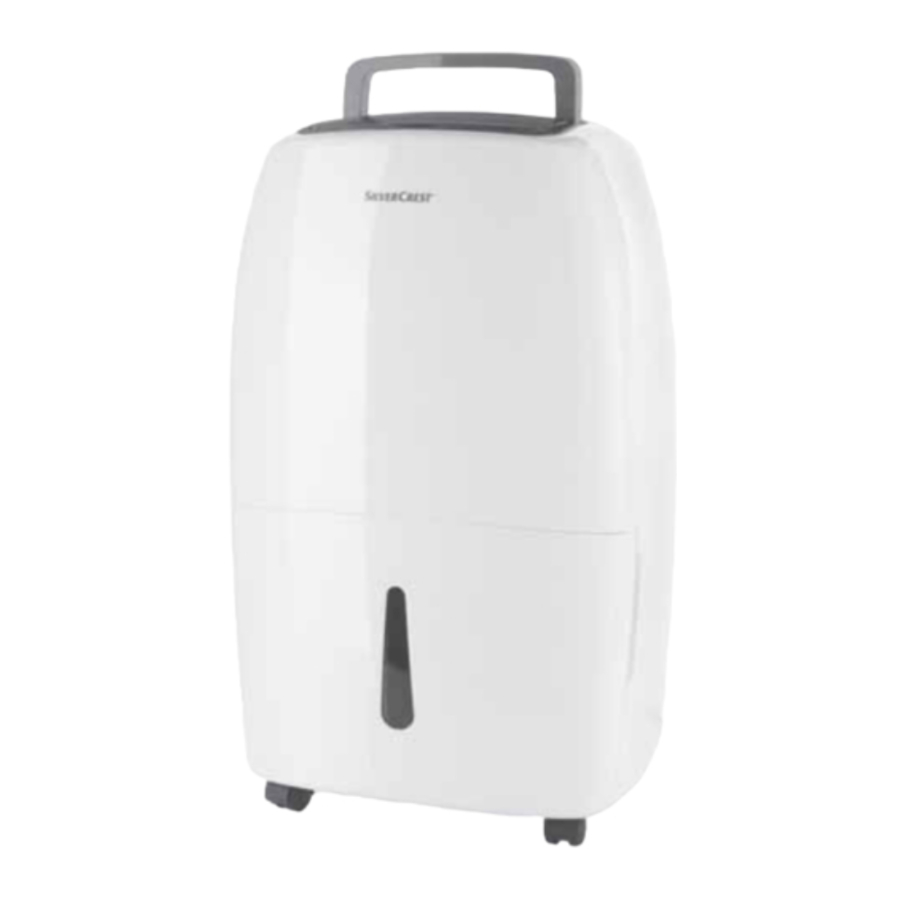
Overview

- Mobile flap valve for air outlet
- Operating panel
- Handle
- Recessed grip for water tank
- Water tank (5 L)
- Rollers
- Inspection window for checking water level
- Grid for air inlet (removable)
- Hook for coiling up the power cable
- Power cable with safety plug
- Rating plate

- TANK FULL
LED illuminates when water tank is full - HIGH/MID/LOW
Display for the selected humidity and switch-off time - Modes of operation
LEDs display the active mode - OPERATION
LED illuminates during operation - STAND-BY
Switch the device on and off - MODE
Switch between the 4 modes - RH%HR/SETTING
Set humidity and timer - TIMER
Switch the timer on and off - TIMER
LED illuminates when timer is active
Intended purpose
The dehumidifier is intended exclusively for dehumidifying residential, cellar and storage rooms with a temperature of between 5°C and 35°C.
The device must only be used indoors. This device must not be used for commercial purposes.
Foreseeable misuse

Risk of illness!
The water collected is not suitable for drinking or for watering plants.
There is a risk of illness.

Risk of electric shock!
Do not place the device in water / also do not place in pools or puddles of water.

Risk of material damage!
- Do not use the device in swimming pools, washrooms, or any similar rooms.
- The device is not intended for drying insulation material. If lagging or insulating material has become damp after a water pipe has broken, always consult a specialist.
- Never expose the device to temperatures of 0°C or lower. Residual water in the piping could freeze and damage the system.
- Do not use the device in environments that are dusty or which contain chlorine.
Items supplied
1 Dehumidifier with water tank 5
1 Hose 22
1 Set of operating instructions
How to use
- Remove all packing material.
- Remove all transport packing material.
- Strip off the foil from the operating panel.
- Check to ensure that all parts are present and undamaged.
- Place the device on a level, dry and solid surface.
- Let the device rest in its working position for about 30 minutes, so that the coolant fluid can settle.
- Make sure that the float at the left-hand side of the water tank 5 can move freely.
- Check that the water tank 5 is inserted correctly. If it is installed incorrectly, or if the water tank has been removed, the LED 12 TANK FULL will illuminate.
- Connect the mains plug 10 to a grounded power socket.
Notes on operation
- If the relative humidity in residential rooms is continuously excessive, the cause should be found and rectified. (Continuous ventilation - i.e. for several years - is generally not reasonable.)
- The optimum ambient temperature for removing humidity from the air is 5°C to 35°C. Below 5°C, the use of a dehumidifier is not helpful, as there is only relatively little humidity in the air.
- During operation, the room temperature may rise by between 1°C and 4°C, depending on room size. This is normal.
Automatic defrosting
In order to prevent the device from freezing over while in continuous operation, it defrosts itself automatically. To do this, the dehumidification process is interrupted, and the motor switches to its highest setting.
The intervals at which this happens vary.
| Conditions | Defrosting |
| Temperature: over 20°C | no defrosting |
| Temperature: 12°C to 20°C | after 40 minutes dehumidification, 8 minutes defrosting |
| Temperature: 5°C to 12°C | after 25 minutes dehumidification, 10 minutes defrosting |
| Temperature: under 5°C | operation not possible |
Operation
Switching on and off
- By pressing the button 16 STAND-BY, you can switch the device on and off. The corresponding LEDs illuminate or go out.
- The device will start with the setting last selected.
- If the device has failed due to a power outage, has been disconnected from the mains power or stopped by the overheating protection system, it will start in the AUTOMATIC mode.
- If a timer has been set, the device will shut down after the time has run out (112 hours).
- If a value has been set for relative humidity in the CONTINUOUS mode, the device will stop when the value has been reached, and re-start when the value is exceeded again.
- The device switches off when the water tank is full or has been removed.
Air outlet flap valve
Irrespective of which mode the device is being operated in, open the top flap valve 1. It clicks into place in four positions.
If the flap valve is not opened, the overheating protection will switch the device off after a while for approx. 3 minutes.

Displays
The mode of operation LEDs 14 and the display 13 show the selected functions and the humidity range.
| Mode of operation LEDs | |
| LED illuminated | Meaning |
| TANK FULL | The water tank is full or has not been inserted. |
| TIMER | A switch-off time is activated. |
| AIR CLEAN DRY CLOTHES CONTINUOUS AUTOMATIC | Selected mode |
| OPERATION | The device is switched on. |
| Display | |
| Display | Meaning |
 | This display can be seen continuously during operation. It shows the humidity range in the room: LOW: under 65% MID: 65% to 75% HIGH: over 75% |
| 1 - 12 flash for 5 sec. | Timer for all modes: These values (1 - 12 hours) will flash for 5 seconds when you use the arrow keys to select a switch-off time. |
| 30 - 80 or CO flash for 5 sec. | Set relative humidity in continuous operation. Values between 30 and 80 or CO will flash for 5seconds when selected. CO: The device dehumidifies continuously. |
Modes of operation
NOTE: the values selected for relative humidity (RH%) are recognised with an upwards or downwards deviation of approx. 3%. This is necessary so that the device does not constantly switch on and off.
- The device has 4 different modes available.
- By pressing the button 17 MODE, you can switch between the modes.
- The mode of operation LED 14 next to the active mode illuminates.
AUTOMATIC
The setting for the target relative humidity (RH) is fixed at 55%. The compressor dehumidifies until this value has been reached, and will then switch off. When the relative humidity rises again, the compressor switches on again.
In this mode, the device operates in 3 different stages:
- RH over 70%: the device dehumidifies at its highest setting.
- RH between 55% and 70%: the device dehumidifies at its normal setting.
- RH under 55%: no dehumidification, only the fan is running.
NOTE: the relative humidity values of the automatic system are not identical to the values HIGH/MID./LOW on the display 13.
Select this mode for continuous dehumidification to a pleasant relative humidity of 55%.
CONTINUOUS
In the CONTINUOUS mode, you can set the relative humidity in 5% increments to between 30% and 80%. The device dehumidifies at a low level until the set value has been reached, and then deactivates itself. When the relative humidity rises again, the device switches on again.
- 30 - 80%: setting for the desired relative humidity in the room.
- CO: the device dehumidifies continuously.
Select this mode for continuous dehumidification, or for dehumidification to a value that you have set.
DRY CLOTHES
You can use this mode in order to dry damp clothes or shoes faster. The device dehumidifies at its highest setting. Shift the flap valve 1 of the air outlet in such a way that the jet of air is directed towards the items of clothing to be dried.
AIR CLEAN
No dehumidification takes place with this mode. The room air is drawn in through the filter in front of the air inlet, and is cleaned there.
Water tank
- The water tank 5 has a holding capacity of 5 litres.
- The water level can be checked using the inspection window 7 in the front.
- The device can only be operated with the water tank in place.
- When the water tank 5 is full, the TANK FULL LED 12 starts flashing. The device switches off after a few seconds. An alarm sounds for approx. 20 seconds. The TANK FULL LED 12 flashes until the tank has been emptied.
- In order to empty the water tank 5, pull it out slightly on the left and right-hand sides, and then carry it by the handle 3.
![]()
- Pour the water out and place the tank back in the device.
![]()


Timer
- The timer can be combined with all 4modes.
- There are 12 switch-off times that can be selected, from 1 to 12 hours.
- After the expiry of the time that has been set, the device is shut down and the timer function is terminated.
- During operation, press the TIMER 19 button. The TIMER LED 20 will flash.
- Use the arrow keys 18 to select a switchoff time of between 1 to 12hours. The selected time flashes in the display 13 for 5 seconds and is then saved.
- If you want to end the timer earlier than the set time, press TIMER 19 twice or switch the device off by pressing STAND-BY 16.
Hose drainage
In the case of very damp rooms, it is often more reasonable for the water not to be collected in the water tank, but to be discharged directly through a hose.
During hose drainage, the device runs in continuous mode. This means that the water collected must be able to drain reliably, otherwise puddles will form on the floor.
- Use a screwdriver to remove the fastener 21 on the rear.
![]()
- Remove the plug 23.
![]()
- Place the hose 22 included in the box over the opening.
- Place the device in a position where the end of the hose is over a drain. It is essential here that the open end of the hose is lower down than the drain outlet on the device (i.e. the hose must run at a downward angle).
- Switch the device on as described above and select a mode.
- If you wish to drain into the water tank 5 again, switch the device off, remove the hose 22, and replace the plug 23 firmly over the opening.


Cleaning and replacing the filter
The performance of the device also depends on the cleanliness of the filter.
- The carbon filter 25 should be cleaned every 2 weeks and replaced every 6months. Clean the filter by brushing or vacuum suction.
- The normal plastic filter 24 should be washed every 2 weeks.
- Switch the device off and pull out the mains plug 10.
- Reach into the upper opening of the grid 8 and pull it off.
![]()
- Rotate grid 8 and press, if necessary with both thumbs, in the middle of the grid.
![]()
- The plastic filter 24 and the carbon filter 25 come loose from the grid. Remove them from the grid 8.
![]()
- Rinse out both filters with lukewarm water. (The carbon filter 25 should be replaced after approx. 6 months.)
- Allow both filters to dry completely.
- Place the filters into the grid 8.
- Place the grid onto the device.


NOTE: new carbon filters are available in almost all household goods shops. The pads just need to be cut to size.
Cleaning
Clean the device prior to its first use!
Risk of electric shock!
- Pull the mains plug 10 out of the grounded power socket before you clean the device.
- The device, the power cable and the mains plug 10 must not be immersed in water or any other liquids.
Risk of material damage! Do not use any astringent or abrasive cleaning agents.
- Wipe the housing and the power cable 10 with a damp cloth if necessary.
- Remove the water tank 5, pour out the water, and dry the tank well inside and outside before re-inserting it into the device.
Protection against overheating
The device has an overheating protection system.
- The overheating protection system will switch the device off automatically if there is a risk of overheating.
- It is then impossible to switch the device on again for 3 minutes.
- After approx. 3 minutes, the device starts automatically.
- Check whether external conditions could have triggered the overheating protection system, e.g. temperature above 35°C or a closed flap valve 1 over the air outlet.
Storage
DANGER for children! Keep the device out of the reach of children.
- Always store the device in an upright position.
- Select a location where neither high temperatures nor moisture can affect the device.
Trouble-shooting
If your device fails to function as required, please try this checklist first. Perhaps there is only a minor problem, and you can solve it yourself.
Risk of electric shock! Do not attempt to repair the device yourself under any circumstances.
| Fault | Possible causes/Action |
No function |
|
| The dehumidification does not seem to be working very well. |
|
Excessive noise |
|
Occasionally the device stops working |
|
| Damp clothing is not drying, or is only drying very slowly. |
|
Technical specifications
| Model: | SLE 420 A1 |
| Mains voltage: | - 240 V~ 50 Hz |
| Protection class: | I  |
| Input power: | 320 W (27°C 60%) |
| Power rating max.: | 420 W (35°C 90%) |
| Nominal current: | 1,39 A (27°C 60%) |
| Power consumption: | max.1.82 A (35°C 90%) |
| Dehumidification capacity: | 20 L /day (30°C 80%) 11 L /day (27°C 60%) |
| Air flow: | m3/h |
| Coolant / Volume: | R134a/190g |
| Coolant group: | L1 |
| Water tank: | 5 l |
| Room size: | 20m2‚ (Rh. 2.3m) |
| Room temperature: | - 35°C |
| Weight: | 12.5 kg |
| Dimensions: | 360 x 230 x 610 WxDxH |
| Noise level: | 48 dB(A) |
| Intake pressure: | 0,5 MPa |
| Exhaust pressure: | 1,5 MPa |
Safety information
Warnings
If necessary, the following warnings will be used in these operating instructions:
High risk: failure to observe this warning may result in injury to life and limb.
Moderate risk: failure to observe this warning may result in injury or serious material damage.

low risk: failure to observe this warning may result in minor injury or material damage.
NOTE: circumstances and specifics that must be observed when handling the device.
Instructions for safe operation
- This device is not designed to be used by people (including chil-dren) with limited physical, sensory or mental capabilities or people without adequate experience and/or understanding unless they are supervised by someone responsible for their safety or are instructed by them on how to use the device.
- Children must be supervised to ensure that they do not play with the device.
- Do not install the device in a narrow space. Leave a minimum clearance of approx. 20 cm at the rear and sides, 10 cm at the front, and 30 cm at the top.
- The device must only be operated in rooms with a temperature of between 5°C to 35°C.
- Only use the device in rooms with a size of max. 20 m2.
- Only connect the mains plug to a properly installed and easily ac-cessible grounded wall socket whose voltage corresponds to the specifications on the rating plate. The wall socket must continue to be easily accessible after the device is plugged in.
- The appliance shall be installed in accordance with national wiring regulations.
DANGER for children
- Packing materials are not children's toys. Children should not be allowed to play with the plastic bags. There is a risk of suffocation.
- Keep the device out of the reach of children.
DANGER of explosion

- The device must never be operated in areas with potentially aerosol-forming or explosive atmosphere.
Risk of electric shock due to moisture
- This device must never be operated close to a bathtub, shower, filled hand basin or similar.
- The device, the power cable and the mains plug must not be immersed in water or any other liquids.
- Protect the device from water drops and water spray.
- If liquid gets into the device (except in the water container), pull out the mains plug immediately. Have the device checked before reusing.
- Never touch the device with wet hands.
- If the device falls into water, disconnect the mains plug immediately. Only then is it safe to retrieve the device.
Risk of electric shock
- Ensure that the power cable cannot be damaged by sharp edges or hot points. Do not wrap the power cable around the device.
- The device is not fully disconnected from the power supply, even after it is switched off. In order to fully disconnect it, pull out the mains plug.
- When using the device, ensure that the power cable cannot be trapped or crushed.
- When removing the mains plug from the grounded power socket, always pull on the plug and never the cable.
- Pull the safety plug out of the grounded power socket,
- if there is a fault,
- when you are not using the device,
- before you clean the device, and
- during thunderstorms.
- Do not use the device if there is visible damage to the device or the power cable.
- To avoid any risk, do not make modifications to the device. You also must not replace the power cable yourself. Repairs must be carried out by a specialist workshop or the Service Centre.
Risk of material damage
- Never place objects filled with liquid on top of the device, e.g. vases.
- Heavy objects must never be placed on the device.
- Protect the device from heat.
- The device must not be covered (e.g. with newspapers, cushions or blankets).
- Never insert objects into the ventilation slit.
- Open sources of ignition, e.g. burning candles, must never be placed on or immediately next to the device.
- Place the device somewhere that it will never be exposed to direct sunlight.
- Place the device on a solid, flat surface.
- Clean the air filter before it becomes heavily contaminated.
- When draining water through the hose, ensure that the hose does not become blocked, and that the open end of the hose is lower down than the device.
- Only operate the device with the water tank installed, or the hose attached. The hose end must be placed over a drain.
- Only use the original accessories.
- Do not use any astringent or abrasive cleaning agents.
- Only clean the device with a slightly damp cloth.

Documents / ResourcesDownload manual
Here you can download full pdf version of manual, it may contain additional safety instructions, warranty information, FCC rules, etc.
Download SilverCrest SLE 420 A1, 89301 - DEHUMIDIFIER Manual
Advertisement


Need help?
Do you have a question about the SLE 420 A1 and is the answer not in the manual?
Questions and answers