Table of Contents
Advertisement
Quick Links
Advertisement
Table of Contents

Subscribe to Our Youtube Channel
Related Manuals for Pro Spot NP-3


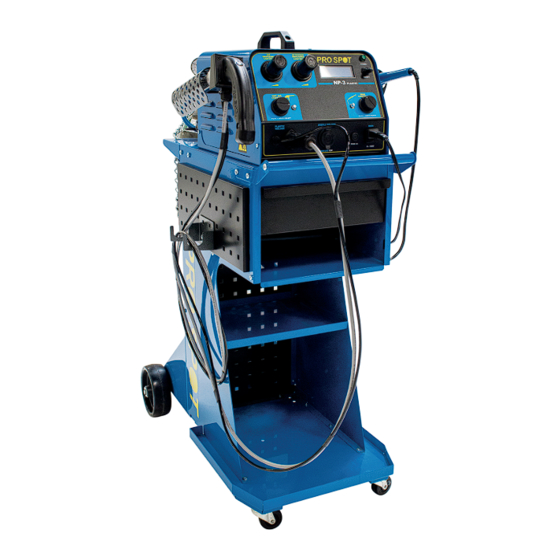
Summary of Contents for Pro Spot NP-3
- Page 1 NP-3 Nitrogen plastic welder Instruction Manual MNL-NP-3-1.4...
- Page 2 Spot owns three patents for special welding equipment and applications, and works with the largest auto manufacturers in the world. Pro Spot is a proud 'MADE IN THE USA' manufacturer in Carlsbad, CA. The turnkey facility includes Design, Engineering, Machine and Sheet Metal Shops, Powder Coating, Assembly, Training and Customer Support.
- Page 3 Come to my.prospot.com and register today! Gain access to exclusive product demonstration videos, training, important product documents, and more. My Pro Spot is a site just for you with an easy to use interface that is custom tailored based on the products you own. This means quicker troubleshooting solutions with less hassle.
-
Page 4: Table Of Contents
Table of Contents 1. Cart Assembly Instructions ....................2. Safety ............................. 3. System Setup ........................... 4. User Interface Setup ......................5. Basic Welding Instructions Identifying The Material ....................Preparing The Surface ..................... Aligning The Damage ..................... Nitrogen Plastic Welding ....................6. -
Page 5: Np-3 Cart Assembly Instructions
NP-3 CART ASSEMBLY INSTRUCTIONS 90-0530 : HANDLE BRACKET ITEM NO. DESCRIPTION QTY. 90-0508 : TOP SHELF N-33 : M4 HEX NUT 90-0509 : CART SIDE 1 S-266 : 1/4-20 X 3/4 PHMS 51-0008 : SLIDE RAIL (SET) 90-0243 : CABLE HOOK... - Page 6 STEP 1: BASE ASSEMBLY STEP 1A: ATTACH WHEELS TO AXLE WITH 1/2” FLAT WASHERS AND 1/2” EXTERNAL SNAP RING. STEP 1B: FASTEN AXLE TO TANK TROLLEY USING UBOLTS, PLATES, 1/4” LOCK WASHERS, AND 1/4-20 HEX NUTS. TIGHTEN FIRMLY BUT DO NOT OVER TIGHTEN STEP 1C: ATTACH SWIVEL CASTORS TO FRONT HALF OF BASE WITH M6 X 10 PHMS.
- Page 7 STEP 3: DRAWER ASSEMBLY STEP 3A: ATTACH NP-3 MOUNT BRACKETS WITH M4 X 8 PHMS. IF YOU DO NOT HAVE THE NP3 MOUNTING BRACKET TO ATTACH TO THE TOP SHELF. SCREW ON YOUR NP3 THROUGH THE BOTTOM OF THE TOP SHELF WITH M6 X 30 PHMS.
- Page 8 STEP 4: FINAL ASSEMBLY STEP 4A: ATTACH TOP SHELF AND HANDLE BRACKETS TO SIDE PANELS WITH M6 X 10 PHMS. STEP 4B: ATTACH BOTTLE BRACKET TO BACK PANEL WITH M5 X 10 PHMS. STEP 4C: MATE SLIDE RAILS TOGETHER AND SLIDE ALL THE WAY IN. STEP 4D: SCREW FRONT HANDLE TO HANDLE BRACKETS WITH 1/4-20 X 3/4 PHMS.
-
Page 9: Safety
Safety 1. Refer to OSHA for recommended PPE. 2. If any melted plastic comes in contact with your skin, wash with borax soap and water or alcohol. 3. Make sure you are working in a well ventilated area. 4. Keep chemicals such as gasoline, brake uids and other solvents out of the work area. 5. -
Page 10: System Setup
System Setup 1. Connect 120V power cable to the back of the unit. 2. Thread 1/4” male coupler plug to air inlet on the back of the unit. 3. Connect air to male coupler plug. Warning: Incoming Air Pressure must not exceed 130 psi. 4. -
Page 11: Basic Welding Instructions
5. Use a phillips screwdriver to unlock the Air Control dial by turning counter-clockwise until dial is loose. For machines with the push-pull type regulators, pull the Nitrogen Control dial to unlock it. 6. Hold the trigger and turn the dial until Gas Press reads 2 psi then release the trigger. 7. -
Page 12: Nitrogen Plastic Welding
Nitrogen Plastic Welding 1. Push and hold the Iron Control button. Iron The LED next to the knob turns Control green and the soldering iron begins to heat up. 2. Push and hold the Hot Air Control button. Hot Air The LED next to the knob turns green and hot air ows out of Control the gun. -
Page 13: Advanced Gun Settings
Iron Auto-Off: Control 1. Plug the iron into the outlet on the lower front panel of the NP-3. 2. To turn on the iron, press and hold the “Iron Control” button on the front panel. This can only be done from the home/status screen. -
Page 14: Appendix
Appendix A Name Location Polypropylene (PP) Bumper covers (usually bvlended with EPDM), inner fenders, radiator shrouds, interior panels, gas tanks Acrylonitrile Butadiene Styrene (ABS) Instrument panels, grilles, trim moldings, consoles, armrest supports Thermoplastic Ole n (TPO) Bumper covers, air dams, grills, interior parts, instrument panels Polyurethane (PUR) Flexible bumper covers, ller panels, rocker... -
Page 15: Notes
NOTES... - Page 16 Pro Spot International, Inc. 5932 Sea Otter Place Carlsbad, CA 92010 Toll Free: (877) PRO SPOT Phone: (760) 407-1414 Fax: (760) 407-1421 E-mail: info@prospot.com Web: www.prospot.com...
Need help?
Do you have a question about the NP-3 and is the answer not in the manual?
Questions and answers