
Related Manuals for iLoq S50


Summary of Contents for iLoq S50
- Page 1 S50 X50S Mortise Cylinder and RIM Cylinder User Guide 10/2023 Rev. 1.0 Document ID 304931 iLOQ Oy support.iloq.com...
-
Page 2: Table Of Contents
Terms of Service and Warranty ..............6 Care & maintenance ..................6 Installation ......................7 Installation of the iLOQ Mortise Cylinder ............ 7 Installation of the iLOQ RIM Cylinder ............10 Operating instructions ................... 12 Installing the ADA Adapter ................... 13 Extending the length of the Mortise Cylinder ............. -
Page 3: Safety Information
Read these instructions carefully before using products. This information is to ensure your safety and long lifetime of the products. General warning sign. Indicates the presence of a hazard which could result in personal injury, equipment damage, or loss of data. Document ID - 304931 iLOQ S50 (X50S) -
Page 4: Overview
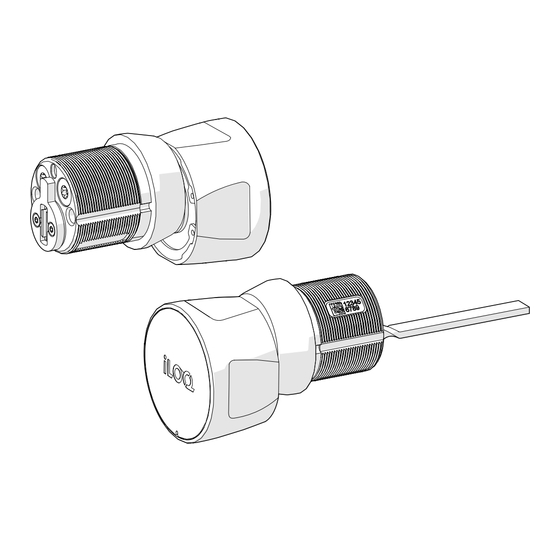
2. Overview 2.1 iLOQ X50S cylinder The iLOQ X50S cylinders are battery-free programmable NFC cylinders for the iLOQ S50 product family in the 5 Series platform. The X50S cylinder body is the same for Mortise and RIM. A Mortise cylinder can easily be converted into a RIM cylinder or vice versa by simply swapping out the cam/tailpiece. -
Page 5: Before Installation
3. Before installation The content of this manual is current at the time of publication. iLOQ reserves the right to change availability of any item in this guide, its design, construction, and/or its materials. For the most current information, please see our website at support.iloq.com. -
Page 6: Terms Of Service And Warranty
• The lock cylinder has a 24 month warranty. By purchasing or using the product, you agree to the Terms of Service found at www.iloq.com. • If you suspect that this product is broken, do not attempt to repair it. Contact iLOQ customer support for professional assistance. 3.4 Care & maintenance The product is designed to be maintenance-free. -
Page 7: Installation
• ADA adapter screw: 0.1 Nm 1. Loosen the cylinder set screw of the mortise case to clear the cylinder’s mounting hole. 2. Thread the iLOQ cylinder with the security ring into the mortise lock. NOTE! The security ring could be replaced by a... - Page 8 NOTE! The iLOQ security ring includes also a 1/8” spacer ring and a wave washer. The spacer is often used for thin doors such as storefront doors. The washer is used to fill the small gab between the cylinder and the security ring for a perfect fit on the door.
- Page 9 4. Install the faceplate. 5. Insert the iLOQ cap into the front of the knob by aligning the four tabs of the cap with the four pockets in the knob. The iLOQ logo on the cap should be horizontal when the cylinder is locked.
-
Page 10: Installation Of The Iloq Rim Cylinder
4.2 Installation of the iLOQ RIM Cylinder NOTE! The following installation instructions are for illustration purposes only. The RIM cylinder may be used with various types of hardware. For precise installation guidance, please refer to the installation manual provided with your specific door hardware. - Page 11 4. Insert the iLOQ cap into the front of the knob by aligning the four tabs of the cap with the four pockets in the knob. The iLOQ logo on the cap should be horizontal when the cylinder is locked.
-
Page 12: Operating Instructions
5. Operating instructions Read and follow the instructions in this manual and any other instructions provided by iLOQ. Failure to do so may result in injury, malfunction, damage or a safety hazard.. WARNING! This product contains small magnets: • Medical devices, such as implanted pacemakers and defibrillators may contain sensors that respond to magnets and radios when in close contact. -
Page 13: Installing The Ada Adapter
1. Insert the cap removal tool into the hole of the cap to remove the front cap from the knob. 2. Insert the knob removal tool into the front of the knob. While holding the back of the knob, press firmly on the tool until it clicks. Document ID - 304931 iLOQ S50 (X50S) - Page 14 NOTE! The screw side should be facing the door and the upper lip of the adapter should sit on top of the upper lip of the knob NOTE! The ADA adapter can be installed in four different orientations (0º, 90º, 180º and 270º angles). Document ID - 304931 iLOQ S50 (X50S)
- Page 15 6. Close the ADA-adapter. Document ID - 304931 iLOQ S50 (X50S)
- Page 16 9. While pressing on the tool, slide the knob onto the cylinder until it stops. NOTE! Make sure that the knob is inserted the correct way around so that the straight edges of the cylinder and knob align horizontally. Document ID - 304931 iLOQ S50 (X50S)
- Page 17 11. Insert the front cap into the knob by aligning the four tabs of the cap with the four pockets in the knob. The iLOQ logo on the cap should be horizontal when the cylinder is locked. NOTE! The front cap can be installed in four different orientations (0º, 90º, 180º and 270º...
-
Page 18: Extending The Length Of The Mortise Cylinder
7. Extending the length of the Mortise Cylinder The iLOQ ¼” extension kit can be used to produce an extended mortise cylinder. Use up to three extension pieces and screw them to the back of the cylinder. Parts needed: • AX50.X.G.02 - 1/4” Extension Kit for Mortise Cylinder: 1. - Page 19 2. Insert the extension plug. 3. Insert the ¼” extension. NOTE! If using more than one extension kit, repeat steps 2 and 3 as needed. 4. Tighten the extension with two T20 screws. Document ID - 304931 iLOQ S50 (X50S)
- Page 20 5. Attach the mortise cam to the cylinder using two T6 screws (Max. 0.5 Nm of torque). Document ID - 304931 iLOQ S50 (X50S)
-
Page 21: Replacing The Knob
1. Insert the cap removal tool into the hole of the cap to remove the front cap from the knob. 2. Insert the knob removal tool into the front of the knob. While holding the back of the knob, press firmly on the tool until it clicks. Document ID - 304931 iLOQ S50 (X50S) - Page 22 5. While pressing on the tool, slide the knob onto the cylinder until it stops. NOTE! Make sure that the knob is inserted the correct way around so that the straight edges of the cylinder and knob align horizontally. Document ID - 304931 iLOQ S50 (X50S)
- Page 23 7. Insert the front cap into the knob by aligning the four tabs of the cap with the four pockets in the knob. The iLOQ logo on the cap should be horizontal when the cylinder is locked. NOTE! The front cap can be installed in four different orientations (0º, 90º, 180º and 270º...
-
Page 24: Converting A Mortise Or Rim Cylinder To A Kik Schlage Cylinder
9. Converting a Mortise or RIM Cylinder to a KIK Schlage Cylinder NOTE! Only use an authentic iLOQ tailpiece. The use a of non-iLOQ tailpiece can compromise the built-in security features. Parts needed: • AX50.Y.G.01 - Crown Assembly for KIK: 1. - Page 25 2. Insert the knob removal tool into the front of the knob. While holding the back of the knob, press firmly on the tool until it clicks. 3. Pull the knob from the cylinder. Document ID - 304931 iLOQ S50 (X50S)
- Page 26 4. Remove the tool from the knob. 5. Take off the two T6 cam screws and remove the cam. 6. Take off the two T20 screws holding the cylinder housing. Document ID - 304931 iLOQ S50 (X50S)
- Page 27 7. Remove the cylinder housing, adapter plug and the front frame. 8. Install the plunger onto the cylinder. 9. Insert the tailpiece and place the spacer in its position. Document ID - 304931 iLOQ S50 (X50S)
- Page 28 10. Place the crown in its position. 11. Insert the crown installation tool and turn it clockwise until it bottoms out. 12. Turn the crown installation tool slightly counterclockwise until it stops. Document ID - 304931 iLOQ S50 (X50S)
- Page 29 14. While pressing on the tool, slide the knob onto the cylinder until it stops. NOTE! Make sure that the knob is inserted the correct way around so that the straight edges of the cylinder and knob align horizontally. 15. Remove the tool from the knob. Document ID - 304931 iLOQ S50 (X50S)
- Page 30 16. Insert the front cap into the knob by aligning the four tabs of the cap with the four pockets in the knob. The iLOQ logo on the cap should be horizontal when the cylinder is locked. NOTE! The front cap can be installed in four different orientations (0º, 90º, 180º and 270º...
-
Page 31: Disposal Of Decommissioned Products
Never discard an electrical appliance in household waste. Follow the local laws and regulations for safe and environmentally friendly product disposal. Before discarding products, bear in mind that most iLOQ products are reusable. All programmable products can be reset to factory settings, after which they can be reused in another system. -
Page 32: Compliance
• Consult the dealer or an experienced radio/TV technician for help. ISED Innovation, Science and Economic Development Canada (ISED) The conformity was assessed in accordance the following standard: ISED - ICES 003, Issue 7: 2020 - class B Document ID - 304931 iLOQ S50 (X50S) - Page 33 Document ID - 304931 iLOQ S50 (X50S)
- Page 34 S50 X50S Mortise Cylinder and RIM Cylinder User Guide iLOQ support.iloq.com Elektroniikkatie 10 90590 Oulu Finland...
Need help?
Do you have a question about the S50 and is the answer not in the manual?
Questions and answers