
Subscribe to Our Youtube Channel
Related Manuals for iLoq S50 Z50S


Summary of Contents for iLoq S50 Z50S
- Page 1 S50 Z50S Cylindrical Leverset User Guide 03/2024 Rev. 2.1 Document ID 304933 iLOQ Oy support.iloq.com...
-
Page 2: Table Of Contents
Signal words and symbols ................4 Safety symbols used in this manual ............. 5 Important safety for installation and use ............. 6 Overview ......................... 7 iLOQ Z50S Cylindrical Leverset ..............7 Tools supplied ....................8 Before installation ....................8 General notes....................8 Care &... -
Page 3: Important Product Information
Z50S.1, Z50S.2 and the Z50S.3 cylindrical leversets. The content of this manual is current at the time of publication. iLOQ reserves the right to change availability of any item in this guide, its design, construction, and/or its materials. For the most current support.iloq.com. -
Page 4: Terms Of Service And Warranty
• The lock cylinder has a 24 month warranty. By purchasing or using the product, you agree to the Terms of Service found at www.iloq.com. • If you suspect that this product is broken, do not attempt to repair it. Contact iLOQ customer support for professional assistance. 2. Important safety information 2.1 Signal words and symbols... -
Page 5: Safety Symbols Used In This Manual
2.2 Safety symbols used in this manual Symbols for mandatory action: Read the instructions General mandatory action Symbols for prohibited action: General prohibited action Symbols for hazards: General hazard Document ID - 304933 iLOQ S50 (Z50S) -
Page 6: Important Safety For Installation And Use
• This product must be installed only by professional personnel who have received training arranged by or on behalf of iLOQ. • Only use an authentic iLOQ tailpiece. The use a of non-iLOQ tailpiece can compromise the built-in security features. -
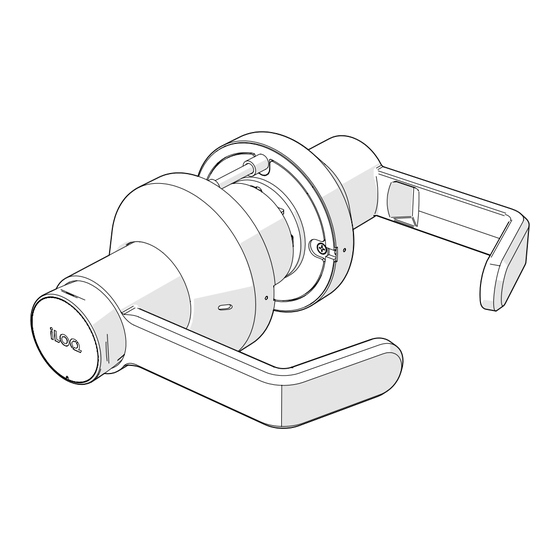
Page 7: Overview
3. Overview 3.1 iLOQ Z50S Cylindrical Leverset The iLOQ Z50S cylindrical leversets are battery-free programmable NFC leversets for the iLOQ S50 product family in the 5 Series platform. The Z50S leversets are available in three functions: • Storeroom (Z50S.1) • Classroom (Z50S.2) •... -
Page 8: Tools Supplied
• If the product is installed on a fire door, examine the fire certification to ensure conformity. If needed, contact an iLOQ sales representative for assistance. • Make sure that the operation of the product complies with the local building codes, security regulations and any other applicable regulations. -
Page 9: Preparing The Door
1. Fold and apply the template to the high edge of the door bevel at the desired height from the floor. 2. Mark the hole centers on the door and the door edge. 3. Frist, drill the two 5/16" thru-bolt holes, then drill a 2-1/8" hole. Document ID - 304933 iLOQ S50 (Z50S) -
Page 10: Drilling Hollow Metal Doors
• Use the horizontal and vertical lock and latch support provided by door manufacturer. • If a 2-1/8" hole already exists, use the Marks J295 Installation Tool (not sold by iLOQ) to make sure that the thru-bolt holes are accurately drilled. For best results, align the J295 Installation Tool to door and clamp to door before drilling. -
Page 11: Installing The Strike Plate
1. Align the strike plate to be centered to the center line of the latch and the 2-1/8" hole. 2. Trace the strike plate outline onto the door jamb and mortise the door jamb. Document ID - 304933 iLOQ S50 (Z50S) - Page 12 3. Install the strike plate with two screws. Document ID - 304933 iLOQ S50 (Z50S)
-
Page 13: Preparing The Lock
1. Depress the lever catch with the wire pin through the small hole in the inside rose assembly and pull the lever off the tube. 2. Depress lever catch again and remove the inside rose assembly and the mounting plate. Document ID - 304933 iLOQ S50 (Z50S) -
Page 14: Adjusting For Other Door Thicknesses
3. Make sure that the center of the latch retractor aligns with the mark on gauge for appropriate door thickness. – If the chassis is not on center, screw the chassis in or out to align with the mark. Document ID - 304933 iLOQ S50 (Z50S) - Page 15 1-5/8" door thickness, then install spacer rings (Product code #AX50.Z.SP. XX, not included) on each side of the door between the roses and the door. 4. Reinstall the outside lever. See section "8.2 Installing the outside lever". Document ID - 304933 iLOQ S50 (Z50S)
-
Page 16: Installation
1. Push the lock through the 2-1/8" hole from the access controlled side of the door, while making sure that the prongs engage inside the lock housing. 2. Align the outside rose so the rose posts enter the thru-bolt holes in the door. Document ID - 304933 iLOQ S50 (Z50S) -
Page 17: Installing The Inside Trim
1. Screw the inside mounting plate in place and tighten it with the wrench tool. Make sure that the mounting plate is flush with the door. NOTE! If a spacer ring is used, the spacer needs to be installed before screwing on the mounting plate. Document ID - 304933 iLOQ S50 (Z50S) - Page 18 2. Install the inside rose assembly and fasten it to the outside rose with the two long thru-bolts. 3. Align the notch in the rose cover with either of the notches on the inside rose and press together. Document ID - 304933 iLOQ S50 (Z50S)
-
Page 19: Installing The Inside Lever
1. Press the inside lever onto the lock tube, slightly wiggle and push until the lever engages the lever catch and connector. 2. Make sure that the lever is on securely. 3. Make sure that the latch retracts completely, and that the latch properly latches into the strike plate. Document ID - 304933 iLOQ S50 (Z50S) -
Page 20: Removing And Installing The Outside Lever
1. Turn and hold the knob at 60° in either direction. 60° 2. Use the wire pin to depress the outside lever catch through the small hole in the rose and pull the lever off the tube. Document ID - 304933 iLOQ S50 (Z50S) -
Page 21: Installing The Outside Lever
NOTE! If the lock is not in the door, the mounting posts must be on the vertical center line. 1. Align the lever catch to the face latch front. 2. Slide the lever onto tube until it stops at the lever catch. Document ID - 304933 iLOQ S50 (Z50S) - Page 22 3. Turn and hold the knob at 60° in either direction. 60° 4. Slightly wiggle and push the lever until the lever engages the lever catch and connector. Document ID - 304933 iLOQ S50 (Z50S)
-
Page 23: For The Classroom Function
NOTE! If the lock is not in the door, the mounting posts must be on the vertical center line. 1. Insert a screwdriver into the key cam slot and turn it fully clockwise until it stops. 2. Turn the screwdriver counter-clockwise 180° and remove it from the key cam slot. Document ID - 304933 iLOQ S50 (Z50S) - Page 24 3. Turn and hold the knob counter-clockwise at 90°. Slide the lever onto the tube with the tailpiece aligned properly. Slightly wiggle and push the lever until the lever engages the lever catch and connector. 90° 4. Make sure that the lock operates properly before closing the door. Document ID - 304933 iLOQ S50 (Z50S)
-
Page 25: Operating Instructions
9. Operating instructions 9.1 Lock functions The iLOQ Z50S Cylindrical Leverset is available in three functions: Storeroom, Classroom and Entrance. 9.1.1 Storeroom (Z50S.1) The outside lever is always locked. To unlock the outside lever, turn the knob just over 90° in either direction. -
Page 26: Operating The Leverset
5-15 seconds. Do not force the knob. NOTE! If the iLOQ ADA adapter is installed, do not use it to pull the door. The ADA adaprer is designed solely to open the lock cylinder. -
Page 27: Installing The Ada Adapter
Do not leave the knob removal tool inside the knob. Hold the knob securely during installation and removal to prevent the tool from accidentally popping off. 1. Insert the cap removal tool into the hole of the cap to remove the front cap from the knob. Document ID - 304933 iLOQ S50 (Z50S) - Page 28 2. Insert the knob removal tool into the front of the knob. While holding the knob, press firmly on the tool until it clicks. 3. Pull the knob from the cylinder. 4. Remove the tool from the knob. Document ID - 304933 iLOQ S50 (Z50S)
- Page 29 NOTE! The screw side should be facing the door and the upper lip of the adapter should sit on top of the upper lip of the knob NOTE! The ADA adapter can be installed in four different orientations (0º, 90º, 180º and 270º angles). 6. Close the ADA-adapter. Document ID - 304933 iLOQ S50 (Z50S)
- Page 30 9. While pressing on the tool, slide the knob into the cylinder. Push the knob until it stops. NOTE! Make sure that the knob is inserted the correct way around so that the straight edges of the cylinder and knob align vertically. Document ID - 304933 iLOQ S50 (Z50S)
- Page 31 11. Insert the front cap into the knob by aligning the four tabs of the cap with the four pockets in the knob. The iLOQ logo on the cap should be horizontal when the cylinder is locked. NOTE! The front cap can be installed in four different orientations (0º, 90º, 180º and 270º...
-
Page 32: Replacing The Kik Cylinder
2. Remove the front cap from the knob by inserting the cap removal tool into the hole of the cap. 3. Insert the knob removal tool into the front of the knob to remove the existing knob from the cylinder Press firmly on the tool until it clicks while holding the knob. Document ID - 304933 iLOQ S50 (Z50S) - Page 33 4. Pull the knob from the cylinder. 5. Remove the cylinder. Document ID - 304933 iLOQ S50 (Z50S)
-
Page 34: Cylinder Installation
2. Insert the knob removal tool into the front of the knob. While holding the back of the knob, press firmly on the tool until it clicks. 3. Pull the knob from the cylinder. Document ID - 304933 iLOQ S50 (Z50S) - Page 35 5. Slide the KIK cylinder into the outside lever. 6. Insert the knob removal tool into the front of the knob. While holding the back of the knob, press firmly on the tool until it clicks. Document ID - 304933 iLOQ S50 (Z50S)
- Page 36 9. Insert the front cap into the knob by aligning the four tabs of the cap with the four pockets in the knob. The iLOQ logo on the cap should be horizontal when the cylinder is locked. 10. Reinstall the outside lever. See section "8.2 Installing the outside lever".
-
Page 37: Replacing The Knob
1. Insert the cap removal tool into the hole of the cap to remove the front cap from the knob. 2. Insert the knob removal tool into the front of the knob. While holding the knob, press firmly on the tool until it clicks. Document ID - 304933 iLOQ S50 (Z50S) - Page 38 5. While pressing on the tool, slide the knob into the cylinder. NOTE! Make sure that the knob is inserted the correct way around so that the straight edges of the cylinder and knob align vertically. Document ID - 304933 iLOQ S50 (Z50S)
- Page 39 7. Insert the front cap into the knob by aligning the four tabs of the cap with the four pockets in the knob. The iLOQ logo on the cap should be horizontal when the cylinder is locked. NOTE! The front cap can be installed in four different orientations (0º, 90º, 180º and 270º...
-
Page 40: Troubleshooting
• The outside rose is located improperly. • The tailpiece installed in the incorrect orientation. Outside lever removable without • Incorrect tailpiece. See the available tailpieces from the table "iLOQ using a credential Cylindrical Leverset Tailpieces". • Incorrect retractor/latch engagement or alignment. -
Page 41: Installation Template
1" dia. (25 mm) IMPORTANT Latch Hole PLACE TEMPLATE at Center Line ON HIGH EDGE OF of Door Thickness DOOR BEVEL T-290.0402 TEST SQUARE Make sure this square is 1” 1x1” after printing 1” Document ID - 304933 iLOQ S50 (Z50S) -
Page 42: Disposal Of Decommissioned Products
NOTE! Before discarding products, bear in mind that most iLOQ products are reusable. All programmable products can be reset to factory settings, after which they can be reused in another system. -
Page 43: Compliance
• Consult the dealer or an experienced radio/TV technician for help. ISED Innovation, Science and Economic Development Canada (ISED) The conformity was assessed in accordance the following standard: ISED - ICES 003, Issue 7: 2020 - class B Document ID - 304933 iLOQ S50 (Z50S) - Page 44 S50 Z50S Cylindrical Leverset User Guide iLOQ support.iloq.com Elektroniikkatie 10 90590 Oulu Finland...
Need help?
Do you have a question about the S50 Z50S and is the answer not in the manual?
Questions and answers