
Related Manuals for Ruijie RG-S6220-H Series


Summary of Contents for Ruijie RG-S6220-H Series
- Page 1 Confidentiality Controlled Ruijie RG-S6220-H Series Data Center Switches Installation and Initialization...
- Page 2 • Hardware Installation • Switch Management • Software Upgrade...
-
Page 3: Hardware Installation
Extension Specified Position Modules Tip: Read the RG-S6220-H Series Switches Hardware Installation Manual if you install the switch for the first time. Safety Notes Do not install the switch in a wet place and keep it away from liquid. - Page 4 Extension Specified Position Modules Tip: Read the RG-S6220-H Series Switches Hardware Installation Manual if you install the switch for the first time. Make sure the following before the installation: The installation position meets the ventilation requirement, with at least 20 cm clearance around the chassis.
- Page 5 Hardware Installation Installing Power Installing the Modules or Preparations Chassis to a Grounding Checking Extension Specified Position Modules Installing the Switch in a Standard 19-inch Cabinet Using Supports (Recommended) The RG-S6220-H chassis is heavy (about 11 kg). Use either of the following methods to install the chassis: Method 1: Fix a tray on the cabinet and place the chassis on the tray.
- Page 6 Hardware Installation Installing the Installing Power Chassis to a Modules or Preparations Grounding Checking Specified Extension Position Modules Installing the Switch on a Desk (When Cabinet Mounting Cannot Be Implemented) ① Attach the four adhesive rubber pads delivered in the carton to the recessed areas at the four corners of the chassis bottom.
- Page 7 Hardware Installation Installing Power Installing the Modules or Preparations Chassis to a Grounding Checking Extension Specified Position Modules There Is a Ground Bar in the Installation Environment (Recommended) ① Remove the ground screw from the rear panel of the chassis. ②...
-
Page 8: Installing Power Modules
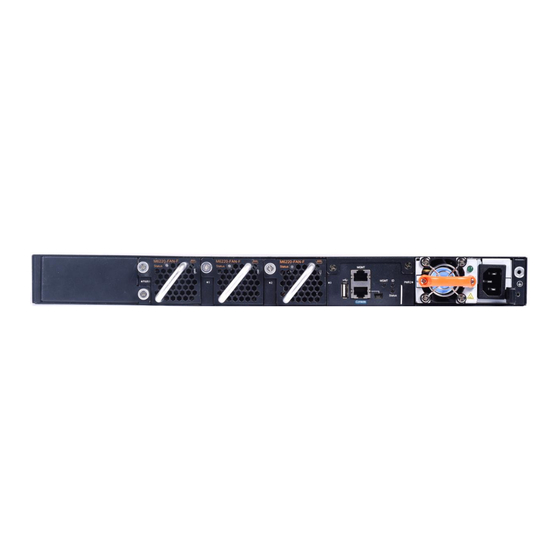
Hardware Installation Installing Power Installing the Modules or Preparations Chassis to a Grounding Checking Extension Specified Position Modules Installing Power Modules ① Wear an ESD wrist strap. Ensure that the strap is in good contact with your wrist and is reliably grounded. -
Page 9: Installing Fan Modules
Hardware Installation Installing Power Installing the Modules or Preparations Chassis to a Grounding Checking Extension Specified Position Modules Installing Fan Modules ① Wear an ESD wrist strap. Ensure that the strap is in good contact with your wrist and is reliably grounded. - Page 10 Hardware Installation Installing Power Installing the Modules or Preparations Chassis to a Grounding Checking Extension Specified Position Modules Checking the Cabinet Ensure that the external power supply system matches the power distribution panel of the cabinet. Ensure that the front and rear doors of the cabinet can be closed with the switch in the cabinet. Ensure that the cabinet is securely fixed and will not move or fall down.
- Page 11 • Hardware Installation • Switch Management • Software Upgrade...
- Page 12 Used after initial CLI configurations are completed (This management mode is recommended for remote routine maintenance.) 3. SNMP Management Used after initial CLI configurations are completed (This mode supports automatic and smart management, and implements graphical management and proactive alarm function.) www.ruijie.com.cn...
-
Page 13: Console Management
Console Management Building the configuration Starting the device Managing the device environment Upon the first login to a switch, you must use the Console port to manage the switch. One 8-pin shielded cable is required. One end of the cable is an RJ-45 connector, which is inserted to the Console port on the primary supervisor engine of the switch. - Page 14 Console Management Building the configuration Starting the device Managing the device environment Check the following items before you power on the switch: ① Power cables are correctly connected. ② The input voltage complies with the requirement of the switch. ③ The serial cable is connected correctly, the terminal (for example, a PC) has started, and parameter settings are completed.
- Page 15 Console Management Building the configuration Starting the device Managing the device environment During startup of the switch, the following information is displayed on the HyperTerminal or the CRT software: Wait around 3 minutes without performing any operation. After a successful start, the message "Press RETURN to get started"...
- Page 16 You can configure and manage the switch or display the outputs to verify the configurations by typing in text commands and pressing Enter to execute the commands. Introduction to the CLI EXEC mode: Ruijie> //User EXEC mode: Use limited commands to display related configurations.
- Page 17 Console Management Building the configuration Starting the device Managing the device environment Switching between different CLI modes User EXEC mode Ruijie#disable Ruijie>enable Privileged EXEC mode Ruijie(config)#exit Ruijie#config Global configuration mode Ruijie(config)#interface ten0/1 Interface configuration mode Ruijie(config-if-TengabitEthernet 0/1)#exit...
- Page 18 At the command prompt, you can enter a question mark (?) to list the commands available for each command mode. Common commands are listed as follows: Ruijie#show version /show version slots / show cpu /show memory /show interface status /show ip route /show arp /show fan / show power /show temperature….
- Page 19 Ruijie(config)#vlan 100 //Create a management VLAN based on your network plan. Ruijie(config-vlan)#name mgt-vlan Ruijie(config-vlan)#exit Ruijie(config)#interface vlan 100 Ruijie(config-if-VLAN 100)#ip address 10.10.10.2 255.255.255.0 //Configure an IP address for the management VLAN. Ruijie(config-if-VLAN 100)#exit Ruijie(config)#ip route 0.0.0.0 0.0.0.0 10.10.10.1 //Configure a static default route.
- Page 20 Managing the device environment The preceding contents are fundamentals for configuration of a switch. For details about function configurations and application in various scenarios, see the following documents: RG-S6220-H Series Switches RGOS 11.0(5)B4 Configuration Guide RG-S6220-H Series Switches RGOS 11.0(5)B4 Command Reference...
- Page 21 Contents • Hardware Installation • Switch Management • Software Upgrade...
- Page 22 3. The latest official release version for deployment should be used to implement a new project. Caution: You are advised to enable the logging on (global configuration mode) and terminal monitor (privileged EXEC mode) functions before a remote upgrade, so that you can view log information about the entire upgrade process. www.ruijie.com.cn...
- Page 23 Onsite Upgrade Using a USB Flash Drive Prepare Upgrade Verify Preparations: Run the show version detail command to display the current software version (system software number field in the command output). Verify the target software package for the upgrade. (View the release notes of the software. If you have any questions, call the customer service hotline.) ...
- Page 24 Prepare Upgrade Verify 1. On the CLI, run the upgrade command. Ruijie#dir usb0:Check whether the upgrade file exists on the USB flash drive. Ruijie#upgrade usb0:/xxxxx_install.bin (xxxx_install.bin is the upgrade file copied to the USB flash drive.) 2. Wait until the upgrade progress reaches 100%, or run the show upgrade status command to check the upgrade progress.
- Page 25 Onsite Upgrade Using a USB Flash Drive Prepare Upgrade Verify 1. Wait until the switch restarts successfully. 2. Run the show version detail command to display the upgrade result.
- Page 26 141.7M Mon Apr 18 10:10:12 2016 PJ16.bin 3. Run the upgrade command to upgrade the system software. Ruijie#upgrade usb0:/PJ16.bin Ruijie#*Apr 18 10:14:13:%7: *Apr 18 10:14:13:%7:[Slot 0]:Upgrade processing is 10% *Apr 18 10:22:16:%7: *Apr 18 10:22:16:%7:[Slot 0]:Upgrade processing is 60% *Apr 18 10:24:36:%7:...
- Page 27 Ruijie#reload Reload system?(Y/N)y 6. After the restart, verify the software version. The upgrade process is completed. Ruijie#show version detail System description : Ruijie Full 10G Routing Switch(S6220-48XS6QXS-H) By Ruijie Networks System start time : 2016-04-18 10:27:06 System uptime : 0:00:15:48 System hardware version : 1.19...
- Page 28 FTP Upgrade 1. Enable the FTP server on the switch, and specify the USB0 root directory as the FTP root directory. The reference commands are as follows: Ruijie(config)#ftp-server username admin Ruijie(config)#ftp-server password ruijie Ruijie(config)#ftp-server topdir usb0:/ --->> The USB flash drive must be connected to the switch in advance.
- Page 29 The complete upgrade procedure and associated logs are as follows: 1. Connect the USB flash drive to the switch. Ruijie#[ 2776.314240] sd 1:0:0:0:[sda] Assuming drive cache:write through USB-5-USB_DISK_FOUND:USB Disk [sda] has been inserted to USB port. USB-5-USB_DISK_FOUND:USB Disk [sda1] has been inserted to USB port.
- Page 30 FTP server. (Ensure that the PC can communicate properly with the S6220-H switch). 4. Use the FTP client software on the PC to upload the upgrade file to the FTP server. 5. Verify that the upgrade file has been uploaded to the switch successfully. Ruijie#dir usb0:/ Directory of usb0:/ Number Properties Size...
- Page 31 FTP Upgrade 6. Run the upgrade command to upgrade the system software. Ruijie#upgrade usb0:/PJ16-0418.bin Ruijie#*Apr 18 11:14:13:%7: *Apr 18 11:14:13:%7:[Slot 0]:Upgrade processing is 10% *Apr 18 11:22:16:%7: *Apr 18 11:22:16:%7:[Slot 0]:Upgrade processing is 60% *Apr 18 11:24:36:%7: *Apr 18 11:24:36:%7:[Slot 0]:Upgrade processing is 90%...
-
Page 32: Tftp Upgrade
(Note that file copied to the tmp directory will be lost after a reboot of the switch.) Ruijie#copy tftp://192.168.1.1/S6220_RGOS11.0(5)B4_install.bin usb0:/S6220_install.bin 3. Run the upgrade command. (The subsequent steps and methods are the same as those in the USB upgrade mode.) - Page 33 2. Configure a management IP address for the switch. Ruijie(config)#int vlan 1 Ruijie(config-if-VLAN 1)#ip add 192.168.204.151 24 Ruijie(config-if-VLAN 1)#end 3. The S6220-H switch serves as the TFTP client. Copy the upgrade file to the USB flash drive or the tmp directory.
- Page 34 FTP Upgrade 4. Run the upgrade command to upgrade the system software. Ruijie#upgrade usb0:/PJ16-0418.bin Ruijie#*Apr 18 11:34:13:%7: *Apr 18 11:34:13:%7:[Slot 0]:Upgrade processing is 10% *Apr 18 11:42:16:%7: *Apr 18 11:42:16:%7:[Slot 0]:Upgrade processing is 60% *Apr 18 11:44:36:%7: *Apr 18 11:44:36:%7:[Slot 0]:Upgrade processing is 90%...
- Page 35 THANKS Ruijie Networks Co., Ltd. Address: 11/F, East Wing, ZhongYiPengao Plaza, No. 29 Fuxing Road, Haidian District, Beijing 100036, China Office Tel:010-51715999 Fax:010-51413399 www.ruijie.com.cn...
Need help?
Do you have a question about the RG-S6220-H Series and is the answer not in the manual?
Questions and answers