Table of Contents
Advertisement
Quick Links
Advertisement
Table of Contents

Related Manuals for ClearOne Titan Plasma Cart


Summary of Contents for ClearOne Titan Plasma Cart
- Page 1 Titan™ Plasma Cart Conferencing Furniture INSTALLATION AND OPERATION MANUAL...
- Page 2 UNPACKING Carefully remove all items that ship with the Titan Plasma Cart. Ensure you have received all items shown on the following page. If you are missing any items, please contact our Furniture Service Department at 1-800-283-5936.
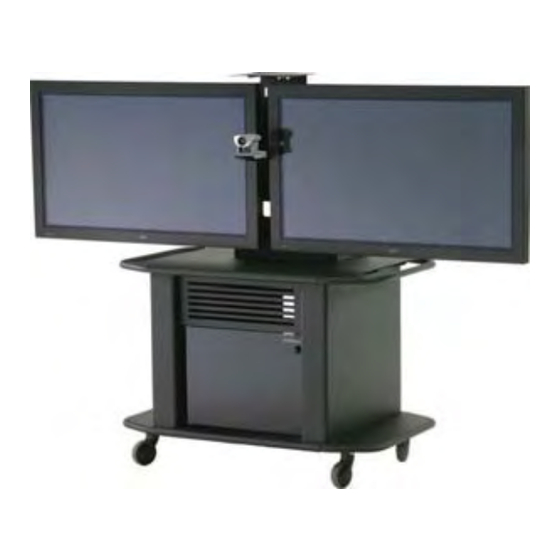
- Page 3 BEFORE YOU BEGIN TITAN SINGLE PLASMA CART Before you begin assembling your Titan Plasma Cart, be sure to have the following: • Chief PST-XXXX plasma mount (two for the dual configuration) • 5/16" wrench • Socket wrench with 5/16" socket •...
- Page 4 MOUNTING A PLASMA SCREEN Securely anchor the plasma Static Mount (not supplied) to the Vertical Support using » four 5/16 Bolts, four 5/16 Washers and four 5/16 Nuts. NOTE: Before attempting to place a plasma screen on the mount, make sure the »...
- Page 5 TITAN DUAL PLASMA CART Attach the Rail Track to the Horizontal Support using two 8-32 Pan Head Screws. ASSEMBLING THE HARDWARE Slide the Camera Bracket down over rail. » Align the Vertical Support over the Pem Nuts in the Universal Base. NOTE: Attaching the Camera Bracket is optional.
- Page 6 Using hardware supplied with the Mounting Bracket, attach bracket to the back of the Slide the plasma screen into place. plasma screen. (See Mounting Bracket instructions for more information.) Raise the Safety Flag to secure the plasma screen. » » NOTE: Titan Plasma Carts require one Chief PST-XXXX plasma mount (not supplied) NOTE: For instructions on installing the Codec Shelf, please see page 10.
- Page 7 ATTACHING THE CODEC SHELF » APPENDIX Note: The Codec Shelf supports a set-top codec or PTZ camera; using the shelf is optional. Align the Codec Shelf with the guiding holes on the Vertical Support. SPECIFICATIONS DIMENSIONS (W X H X D) Width: 45"...
- Page 8 Furniture Service Department: 800.283.5936...
Need help?
Do you have a question about the Titan Plasma Cart and is the answer not in the manual?
Questions and answers