ClearOne RAV 600 User Manual
Clearone communications user manual conferencing system rav 600, rav 900
Hide thumbs
Also See for ClearOne RAV 600:
- Quick start manual (12 pages) ,
- Supplementary manual (3 pages) ,
- Datasheet (2 pages)

Related Manuals for ClearOne ClearOne RAV 600


Summary of Contents for ClearOne ClearOne RAV 600
- Page 1 RAV 600/900 User Manual ClearOne Communications, Inc. ~ 1825 Research Way, Salt Lake City, UT 84119 ~ tel 1-800-945-7730 ~ fax 1-800-933-5107...
-
Page 2: Table Of Contents
Table of Contents Introduction ........... .1 The RAV 600/900 . -
Page 3: Introduction
Introduction... -
Page 4: Product Returns
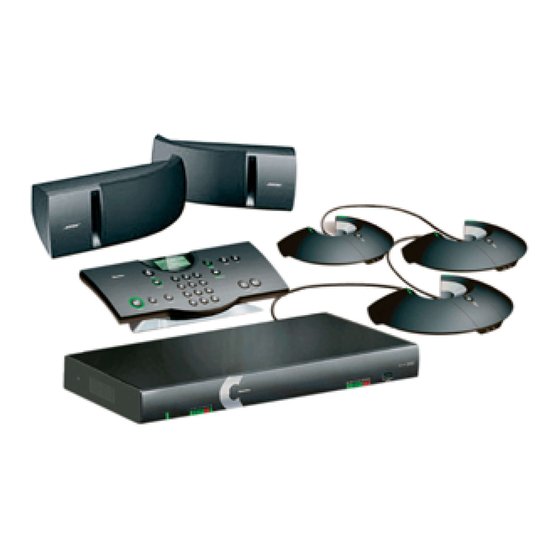
• RF (radio frequency) controller with call controls including auto-answer, flash duration adjustment, ringer adjustment and phonebook with speed dial capabilities. • Internal telephone hybrid with touch-tone dialing capability. • Microphone pods provide 360º audio pickup so every participant within the microphone pick-up range can be heard. -
Page 5: Product Overview
.This port enables USB connection to a PC. ANTENNA . RJ-11 connection to an analog telephone jack and an analog . Connect the external RF antenna to this port. . RS-232 control port for connection to a control system such as AMX or Crestron . -
Page 6: Microphone Pods
Microphone Pods Mute Button. Press to mute or unmute all microphones in the RAV system. .These two LEDs illuminate green when the microphones are not muted and LEDs illuminate red when the microphone is muted.The LEDs flash red if the microphones are not connected properly. -
Page 7: Installation Overview
Loudspeakers Ceiling-mount loudspeakers For best performance, ceiling Ceiling Speakers loudspeakers should be installed directly above the microphone pods. If you have a RAV 900 with three mic pods, install the ceiling loudspeakers above the first and third mic pods. The ceiling speakers must be set to 8 Ohms. -
Page 8: Network Information
System Requirements for RAV-Ware Component Requirement Windows 98 SE Operating System and RAM Windows 2000 Windows XP Processor 300 MHz Pentium III or better Monitor 1024 x 768 SVGA (16 bit) high color Video Card SVGA 1024 x 768 minimum Free Hard Disk Space 20 MB minimum RS-232 COM port... -
Page 9: Connecting The Rav
Connecting the RAV... -
Page 10: Basic Connections
Bose loudspeaker box. SPEAKER 5. Using the RJ-11 cable, connect an analog telephone jack to the Note: For instructions on connecting to a digital telephone line, refer to page 22. Figure 2.3. Connect additional microphones SPEAKER Figure 2.4. Connect speakers Line jack on the mixer. - Page 11 Connecting the RAV — Basic Connections 6. Using an RJ-11 cable (not supplied), connect an analog telephone set to the the mixer (optional). TELEPHONE RS-232 CONTROL 7. Using the 7' Cat. 5 cable, connect the mixer to the network. (Network settings can be changed in RAV-Ware.)
-
Page 12: Auxiliary Devices
Connecting the RAV— Auxiliary Devices Auxiliary Devices The mixer allows connection to a number of different audio and video peripherals, such as video codecs, VCRs, cameras and computers. Connecting video codecs, amplifiers and sound cards Line input/output devices such as video codecs, amplifiers and sound cards can be connected to the Line In or Line Out connectors on the RAV mixer. -
Page 13: Connecting Vcrs And Dvd Players
Figure 2.15. Connecting a camera Note: The USB drivers are installed when you install RAV-Ware. Technical Services Group ~ 1-800-283-5936 (USA) ~ 1-801-974-3760 port on the back of the mixer using a 9-pin serial cable. Control TELEPHONE CAMERA MIC POD IN RS-232 CONTROL Figure 2.16. -
Page 14: Digital Phones
Figure 2.18. Connecting the RAV mixer to digital-to-analog converter To connect to a digital phone 1. Connect one end of the telephone cable into the telephone line on the back of the mixer and the other end into the digital-to-analog converter. -
Page 15: Rav-Ware Software Configuration
RAV-Ware Software Configuration... -
Page 16: Introduction
Online/Offline Indicator: Shows connection status of RAV-Ware (online/offline) and the name of the connected unit. Status Indicators: Status for Communications (green = online, red = offline), Telephone In Use (red = not in use, green = in use) and Mic Mute (red = mute). - Page 17 RAV-Ware connections When you connect to the RAV unit, RAV-Ware automatically finds all RAV units connected serially or on the same subnetwork and lists them in the Connections pane. To connect to the RAV 1. Double-click the RAV-Ware desktop icon or select RAV-Ware from the Start menu (Start/Programs/RAV-Ware/RAV-Ware.exe).
-
Page 18: Configuring System Settings
RAV-Ware — Introduction RAV-Ware — Configuring System Settings Configuring System Settings System settings include Communication, Regional and Telephone settings. Communication Settings The Communication Settings window allows you to adjust the connectivity settings of external devices that communicate with the RAV, including the network, serial or USB connections. -
Page 19: Telephone Settings
Figure 3.11. Serial settings Telephone Settings In the Telephone Settings window you can set telephone preferences such as auto-answer, auto-disconnect, ringer melody and program the local number. You can also adjust the telco level control, country setting and the flash settings. -
Page 20: Customizing Rav Components
RAV-Ware — Configuring System Settings To change telephone preferences 1. In the Preferences tab, set the system to after Auto-Answer 2 Rings 4 Rings select if you want to manually Disabled answer calls. 2. Select Auto-Disconnect if you would like RAV to disconnect when it detects loop- drop or call progress tones. - Page 21 ClearEffect is enabled. When ClearEffect is enabled, it causes the audio coming from the telephone line to emu- late wideband audio. It does this by adding high and low frequencies to the audio signal, creat- ing a fuller sound.
-
Page 22: Line Input And Output
RAV-Ware — Configuring Auxiliary Devices Line Input and Output The RAV mixer has jacks for Line Input and Line Output that allow you to connect different auxiliary devices. You can configure audio levels for these devices through RAV-Ware. You can use devices that have preconfigured audio settings from the Device Toolbox or you can manually set the audio settings for your line in and line out devices. -
Page 23: Record And Playback
RAV-Ware — Configuring Auxiliary Devices Record and Playback Record and Playback devices include VCRs, DVD players and sound cards. However, the Playback/Record jacks are line level inputs and outputs and are not restricted to these devices. You can use devices that have preconfigured audio settings from the Device Toolbox or you can manually set the audio settings for your VCRs or DVD players. -
Page 24: Camera Controls
RAV-Ware — Configuring Auxiliary Devices Camera Controls The RAV system provides voice tracking capabilities through a VISCA control port connection to a PTZ camera. Setting camera presets The camera presets are programmed in RAV-Ware and assigned to each microphone pod. When a specific microphone is activated, the PTZ camera will move to the associated preset camera position. - Page 25 Refer to your local telephone service provider for details. button to mute all microphones.The LED on the microphones will MUTE illuminate red.
-
Page 26: Advanced Features
Advanced Features RAV-Ware has several advanced features which allow you to perform system checks and administrative functions. System Checks The System Diagnostics window allows you to check your RAV system to be sure all components of your system are connected and working properly. To open System Checks •... -
Page 27: Error Messages
Error Messages When the RAV system encounters an error, an error icon will appear in the lower left-corner of the screen. Review this log to troubleshoot problems. To view error messages • Double-click the icon in the Error lower-left corner of the RAV window. -
Page 28: Using The Rav
Using the RAV... -
Page 29: Using The Controller
Figure 4.4. Off-hook status Note: This feature is dependent on your PBX service or local phone service. Refer to your PBX vendor or local telephone to use call transfer, call waiting service for details. Note: If an external amplifier is dragged... -
Page 30: Programming Phone Preferences
Using the RAV — Programming Phone Preferences Programming Phone Preferences You can manage the Phonebook, adjust phone settings, such as ring melody and tone, and set preferences, such as country codes and language, through the menu options outlined below. You can also program these preferences in the RAV-Ware software. Refer to Chapter 3 for more information on RAV-Ware. -
Page 31: Ringer Melody
Using the RAV — Programming Phone Preferences Adjusting the Settings You can activate the auto-answer setting, activate auto-disconnect, select ringer melodies and adjust your ringer in the Settings menu. To select a Ring Melody Note: Once you select a melody, you will hear it played through the speakers. - Page 32 Using the RAV — Programming Phone Preferences To select a frequency Note: The channel frequency allows the mixer to communicate with the controller. The frequency in RAV-Ware must match 1. Press to access the menu options. the RAV controller frequency. See page 2.
- Page 33 Using the RAV — Programming Phone Preferences To view the IP address 1. Press to access the menu options. IP Address 2. Scroll to Configuration and press 191.151.147.102 Exit 3. Scroll to IP Address and press Note:The IP address for the RAV unit will display on the LCD.
-
Page 34: Web Interface
Web Interface... -
Page 35: Overview
Tip: You can also dial using the 0-9, star (*) and number (#) on your on your keyboard. Use the comma (,) key to enter a two second pause.The Enter key connects to and disconnects from the telephone line. Dial button in the left channel navigation. -
Page 36: Event Log
The phone will automatically be taken off-hook and the last dialed number will be called. To send a Flash signal • If your telephone service includes call transfer, call waiting or conference calling, you can use the Flash key. Refer to your local telephone service for details. -
Page 37: System Check
System Check The System Checks window allows you to check your RAV system to be sure all parts of your system are connected and working properly. To open the system checks • Click the button. System Checks To run system checks •... -
Page 38: Appendix
Appendix... -
Page 39: Maintenance
Line jack, not the Set jack. If you are connected to a digital line through a telephone handset, take the handset off-hook. Run a system diagnostic check through RAV- Ware to be sure all RAV components are working properly. -
Page 40: Pinouts
Speakers Neither speakers play Check that the wires are properly connected. Check the audio mixer in RAV-Ware to ensure the audio is routed to the loudspeakers. Bass and treble are weak Check the equalization for the loudspeakers in RAV-Ware. Only one speaker plays Check the equalization for the loudspeakers in RAV-Ware. -
Page 41: Specifications
AEC tail time: 128 ms Adaptive noise cancellation: (6 - 18 dB) Gating: Adaptive ambient, 1st mic priority, look ahead gating, NOM attenuation Telephone Interface Conditions: All measurements taken with ALC disabled Connection: RJ-11 (Set and Line Jacks) Tail Time: 30 ms Frequency Response: 250 Hz to 3.3 kHz (+/-1... -
Page 42: Serial Commands
Serial Commands The RAV 600 and RAV 900 accept serial commands through the telnet, RS-232 serial port or USB. The commands in this manual pertain only to the RAV 600 and RAV 900. RS-232 serial port protocol is 9,600, 19,200, 38,400, 57,600 (default) or 115,200 baud; 8 bits, 1 stop bit, no parity. - Page 43 Meter type definitions Alpha Numeric Level position Level position Level position for Mic Pods for Line Inputs for Outputs Maximum level Level after PEQ Level after PEQ of the three and gain and gain microphones on the pod after processing Echo Return Loss Echo Return Loss ERL + ERLE...
- Page 44 Command Function LABEL Selects/reports label of specified channel or unit LOCALNUM Sets/reports current value of local number Reports in, out or processor level LVLREPORT Selects/reports level status LVLREPORTEN Enables/disables level reporting MANUFACTURER Selects/reports manufacturer identification label MICCAMPRESET Associate a microphone with a camera preset MTRX Selects/reports matrix routing of an in to out MUTE...
- Page 45 ACONN - Audible Connect / Disconnect Indication This command selects/reports the status of the audible connect/disconnect indication. ARGUMENT DETAILS Name Type Size Values Channel Channel See Group and Channels Group Group 17 (R) Value Unsigned Integer 0 = Off 1 = On 2 = Toggle (Null to query in text) BINARY FORM DETAILS...
- Page 46 BATTERYLVL - Battery Level This command reports the battery level on the remote. If the batteries run low, this command will automatically be sent out reporting the low indication. ARGUMENT DETAILS Name Type Size Values Value Unsigned Integer 0 = battery level unavailable 1 = Lowest 5 = Highest (Null to query in text.)
- Page 47 CAMFLOW - Camera Control Flow Control This command selects/reports the flow control of the camera control serial port on the unit. Hardware flow control is implemented using DTR and DSR. ARGUMENT DETAILS Name Type Size Values Units Value Unsigned Integer 0 = Off 1 = On 2 = Toggle...
- Page 48 CAMPRESETSET2 - Camera Preset Setup 2 This command sets or reports the current camera preset. ARGUMENT DETAILS Name Type Size Values Preset Unsigned Integer 1 - 10 Channel Channel See Group and Channels Group Group 19 (V) Pan Angle Signed Float If Sony, -100 to 100.
- Page 49 CLEAREFFECT - Clear Effect Wide Band Telco Emulation This command enables/disables or reports the current status of the clear effect. ARGUMENT DETAILS Name Type Size Values Channel Channel See Group and Channels Group Group 17 (T) Value Unsigned Integer 0 = Off 1 = On 2 = Toggle (Null to query in text)
- Page 50 DEVICE - Device Identification Label This selects/reports the manufacturer identification label of the specific channel. ARGUMENT DETAILS Name Type Size Values Channel Channel See Group and Channels Group Group 2, 3, 7(O, M, L) Reserved Unsigned Integer Label String 1 - 32 characters CLEAR = clear the label (Null to query in text) BINARY FORM DETAILS...
- Page 51 ENETADDR - Ethernet port IP address This command selects/reports the IP address of the Ethernet port on the unit. ARGUMENT DETAILS Name Type Size Values Value IP Address (Null to query in text) BINARY FORM DETAILS COMMAND ID : TEXT FORM DETAILS COMMAND FORM : DEVICE DID [Value] NUMBER OF ARGUMENTS :...
- Page 52 EQ - Equalization This command enables/disables or reports the current status of the equalization on the input or out- put. ARGUMENT DETAILS Name Type Size Values Channel Channel See Group and Channels Group Group 2, 7 (O, L) High Gain Signed Float -12.00 - 12.00 (Null to query in text)
- Page 53 GREPORT - Gate Report This command selects/reports the mode of gate status reporting. ARGUMENT DETAILS Name Type Size Values Value Unsigned Integer 0 = Off 1 = On 2 = Toggle (Null to query in text) BINARY FORM DETAILS COMMAND ID : NUMBER OF ARGUMENTS : ARGUMENT FORM : <Value>...
- Page 54 LVL - Level This command reports the level of a channel.This command is read-only. ARGUMENT DETAILS Name Type Size Values Channel Channel See Group and Channels Group Group 2, 3, 7, 16, 17(O, M, L,T, R) Position Meter Type See MeterTypeDefinitions Value Signed Float -99.99 - 99.99...
- Page 55 MICCAMPRESET - Mic Camera Preset This command associates a mic with a camera preset for voice tracking. ARGUMENT DETAILS Name Type Size Values Channel Channel See Group and Channels Group Group 3 (M) Value Unsigned Integer 0 to Clear 1 - 10 (NULL to Query in Text) BINARY FORM DETAILS COMMAND ID :...
- Page 56 PBDIAL - Dial a PB Entry by Name This command dials a speed dial number by name.There is no query for this command. ARGUMENT DETAILS Name Type Size Values Channel Channel See Group and Channels Group Group 17 (R) Reserved Unsigned Integer Label String 1 - 16 chars...
- Page 57 REDIAL - Dial the last number again This command redials the last number.There is no query for this command. ARGUMENT DETAILS Name Type Size Values Channel Channel See Group And Channels Group Group 17 (R) Reserved BINARY FORM DETAILS COMMAND ID : NUMBER OF ARGUMENTS : ARGUMENT FORM : <Channel><Group><Reserved>...
- Page 58 RINGERLVL - Audible Ring Level This command selects/reports the audible ring level. ARGUMENT DETAILS Name Type Size Values Channel Channel See Group and Channels Group Group 17 (R) Value Signed Float -12.00 - 4.00 (dB) (Null to query in text) BINARY FORM DETAILS C OMMAND ID : NUMBER OF ARGUMENTS :...
- Page 59 Otherwise, the message will say the speakers pass. For the telephone on hook: the message will report the line voltage, the line current, other results, and if dial tone is detected.For...
- Page 60 TE - Telco Enable This command selects/reports the hook status. ARGUMENT DETAILS Name Type Size Values Channel Channel See Group and Channels Group Group 17 (R) Value Unsigned Integer 0 = Off 1 = On 2 = Toggle (Null to query in text) BINARY FORM DETAILS COMMAND ID : NUMBER OF ARGUMENTS :...
-
Page 61: Electrical Safety Advisory
US:AAAEQ##TXXXX. If requested, this information must be provided to your telephone company. The REN is used to determine the number of devices that may be connected to the telephone line. Excessive RENs on the telephone line may result in the devices not ringing in response to an incoming call. -
Page 62: European Compliance
Terminal Equipment (TE); Attachment requirements for pan- European approval for connection to the analogue Public Switched Telephone Networks (PSTNs) of TE supporting the voice telephony service in which network addressing, if provided, is by means of Dual Tone Multi Frequency (DTMF) signaling. -
Page 63: Index
29 import 29 new 29 save 29 install 26 overview 27 Regional Settings 33 date/time 33 Telephone Settings 33 configuration 34 preferences 34 Serial Commands 78 Specifications 76 Status key 53 System Checks 46 System Requirements 10 Troubleshooting 72...
Need help?
Do you have a question about the ClearOne RAV 600 and is the answer not in the manual?
Questions and answers