Advertisement
Scan for full manual
Step 1: Check what's in the box
EXT3-C-WP-XR-T
4K60 USB C Transmitter
1 Power cord and adapter
1 Multi signal USB-C cable (1m)
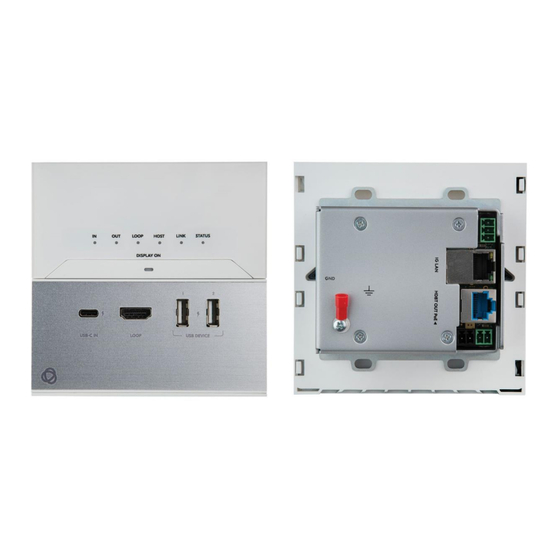
Step 2: Get to know your EXT3-C-WP-XR-T
#
Feature
1
USB-C IN Connector
2
LOOP HDMI Connector
3
USB A 2.0 Charging Connector 1
USB A 2.0 Charging Connector 2
4
IN LED
5
OUT LED
6
LOOP LED
EXT3-C-WP-XR-T Quick Start
EXT3-C-WP-XR-T Quick Start Guide
This guide helps you install and use your
Go to
www.kramerav.com/downloads/EXT3-C-WP-XR-T
firmware upgrades are available.
Function
Connect to a USB-C AV source (that supports DisplayPort Alternate Mode) for AV input,
USB host connection to local and remote connected USB devices. Charges sources (that
support USB Power Delivery 2.0) up to 60W when the device is powered via the power
adapter). While charging, the charging icon (to the right of the connector) becomes visible
and lights orange.
Connect to a local acceptor to view the AV signal coming from the USB-C IN input.
Connect to the USB local peripheral devices (for example, a keyboard & mouse). When
USB Host PC is disconnected, the USB signal and charging power for this port are
inactive.
Connect to the USB local peripheral devices (for example, a USB camera, a soundbar,
microphone and so on). When USB Host PC is disconnected, the USB charging power
for this port continues to be active.
Lights blue when an active AV input signal is detected from the source device that is
connected to the USB-C IN port.
Lights blue when an HDMI output device is detected on the receiver side.
Lights blue when an active signal is transmitted on the HDMI LOOP port.
EXT3-C-WP-XR-T
for the first time.
to download the latest user manual and check if
1 Upper front panel
1 Lower front Panel
P/N: 2 9 0 0 - 3 0 1 5 9 8 QS
1 Screw set
1 Quick start guide
Rev: 1
Advertisement
Table of Contents

Subscribe to Our Youtube Channel
Related Manuals for Kramer EXT3-C-WP-XR-T


Summary of Contents for Kramer EXT3-C-WP-XR-T
- Page 1 1 Power cord and adapter 1 Lower front Panel 1 Quick start guide 1 Multi signal USB-C cable (1m) Step 2: Get to know your EXT3-C-WP-XR-T Feature Function USB-C IN Connector Connect to a USB-C AV source (that supports DisplayPort Alternate Mode) for AV input, USB host connection to local and remote connected USB devices.
- Page 2 +20V DC 6A connector for powering the unit and charging the connected input device to USB-C. Setting the DIP-Switches DIP-Switch Settings To access the EXT3-C-WP-XR-T DIP-switches remove the top front panel. By default, DIP-Switch 2 is set to ON (up) while all the other DIP-switches are set to OFF (down) by default.
- Page 3 Step 3: Install the EXT3-C-WP-XR-T Insert the device into the in-wall box (note that first you need to connect the HDBT cable and power) and connect the parts as shown in the illustration below. When installing the device, take care not to obstruct the upper and lower ventilation holes.
- Page 4 Step 4: Connect inputs and outputs Always switch OFF the power on each device before connecting it to your EXT3-C-WP-XR-T. This section defines the HDBT pinout, using a straight pin-to-pin cable with EIA /TIA 568B RJ-45 connectors. Wire Color Orange / White...
Need help?
Do you have a question about the EXT3-C-WP-XR-T and is the answer not in the manual?
Questions and answers