
Related Manuals for Crestron TSS-470E


Summary of Contents for Crestron TSS-470E
- Page 1 TSS-470E 3.5 in. Desk Scheduling Touch Screen Product Manual Crestron Electronics, Inc.
- Page 2 Crestron disclaims any proprietary interest in the marks and names of others. Crestron is not responsible for errors in typography or photography.
-
Page 3: Table Of Contents
Contents Overview Features TSS-470E-B-T Features TSS-470E-MSMK-B-T Features TSS-470E-TTK-B-T Features TSS-470E-WMK Features Specifications TSS-470E-B-T Specifications Product Specifications Dimension Drawings TSS-470E-MSMK-B-T Specifications Product Specifications Dimension Drawings TSS-470E-TTK-B-T Specifications Product Specifications Dimension Drawings TSS-470E-WMK Specifications Product Specifications Dimension Drawings Installation TSS-470E Installation In the Box Install the Mounting Hardware Connect the Touch Screen TSS-470E-MSMK Installation... - Page 4 Local Configuration Enter an Admin PIN Wi-Fi Setup Ethernet Setup Application Selection Configure Microsoft Graph for Crestron Desk Scheduling Configure the Crestron Desk Scheduling App Connect the Scheduling App to Microsoft Graph Perform a Factory Restore Operation Crestron Desk Scheduling User Interface...
-
Page 5: Overview
The Crestron® TSS-470E Desk Touch is a touch screen designed specifically for desk scheduling applications. The TSS-470E can be installed within a hoteling space to provide a clear indication of its availability and schedule. The TSS-470E also integrates seamlessly with a variety of popular scheduling services. -
Page 6: Features
Features This section provides the following information: • TSS-470E-B-T Features • TSS-470E-MSMK-B-T Features • TSS-470E-TTK-B-T Features • TSS-470E-WMK Features 2 • TSS-470E Product Manual — Doc. 9347A... -
Page 7: Tss-470E-B-T Features
The TSS-470E can be installed within a hoteling space to provide a clear indication of its availability and schedule. The TSS-470E also integrates seamlessly with a variety of popular scheduling services. - Page 8 The desk schedule is displayed on the touch screen UI to prevent booking conflicts and to indicate when the desk is available. The Crestron Desk Scheduling App can also be configured with custom settings for no-shows, early reservation check-ins, and more.
- Page 9 Wired and Wi-Fi Connectivity An Ethernet LAN connection is all that is required to wire the TSS-470E, containing all control and power signals within a single cable. For deployments without access to Ethernet, the touch screen can also be connected to the network over Wi-Fi®...
- Page 10 Third-party apps typically run on the TSS-470E as they do on a tablet device. The TSS-470E runs only one app at a time, which is selected using the XiO Cloud® service or the web configuration interface.
-
Page 11: Tss-470E-Msmk-B-T Features
Using the multisurface mount kit, the touch screen can be mounted directly to glass, granite, marble, wood paneling, plaster, smooth masonry, or virtually any other flat surface. The TSS-470E-MSMK-B-T is ideal for mounting at the entrance to a hoteling space for desk scheduling applications. - Page 12 A security screw is also provided to prevent unauthorized removal of the touch screen from the MSMK. The TSS-470E-MSMK rear housing provides four cutout holes (on the top, bottom, and sides of the housing) for running concealed cables to the touch screen using adhesive-backed raceway (not included).
-
Page 13: Tss-470E-Ttk-B-T Features
The TSS-470E-TTK-B-T is ideal for placement within a hoteling space or on a shared desk. When installed in the enclosure, the TSS-470E sits flush with the enclosure housing and is tilted at a 45° angle. Any cables are routed through the rear of the enclosure through a strain-relieving grommet. The complete assembly may be placed on any flat, level surface for use. -
Page 14: Tss-470E-Wmk Features
The TSS-470E-WMK wall and surface mount kit provides a convenient solution for installing the TSS-470E touch screen into an existing wall or similar flat surface. It is specifically intended for postconstruction applications, providing a complete mounting assembly designed to allow quick and easy installation into drywall, paneling, or a tabletop surface. -
Page 15: Specifications
Specifications This section provides the following information: • TSS-470E-B-T Specifications • TSS-470E-MSMK-B-T Specifications • TSS-470E-TTK-B-T Specifications • TSS-470E-WMK Specifications Product Manual — Doc. 9347A TSS-470E • 11... -
Page 16: Tss-470E-B-T Specifications
TSS-470E-B-T Specifications Product specifications for the TSS-470E-B-T are provided below. Product Specifications Touch Screen Display Display Type Transflective LCD, backlit Size 3.5 in. (89 mm) diagonal Resolution 480 x 320 pixels Controls and Indicators Reset (1) Recessed push button on rear panel for hardware reset Light Bar (1) RGB LED light bar;... - Page 17 Dimensions do not include any mounting accessories Weight 5.4 oz (155 g) Compliance Regulatory Model: M202138001 FCC Part 15 Class B digital device, IC, CE, Intertek® Listed for US & Canada To search for product certificates, refer to support.crestron.com/app/certificates. Product Manual — Doc. 9347A TSS-470E • 13...
- Page 18 Third-party apps typically run on the TSS-470E as they do on a tablet device. The TSS-470E runs only one app at a time, which is selected using the XiO Cloud® service or the web configuration interface.
-
Page 19: Dimension Drawings
Dimension Drawings Product Manual — Doc. 9347A TSS-470E • 15... -
Page 20: Tss-470E-Msmk-B-T Specifications
TSS-470E-MSMK-B-T Specifications Product specifications for the TSS-470E-MSMK are provided below. Product Specifications Construction Housing Plastic, textured black finish Surface Mounting Peel-and-stick adhesive mounting to glass or other flat, smooth surface Dimensions Height 3.95 in. (100 mm) Width 3.95 in. (100 mm) Depth 1.80 in. (46 mm); 1.99 in. (51 mm) with touch screen installed Weight 2.2 oz (64 g) -
Page 21: Dimension Drawings
Dimension Drawings Product Manual — Doc. 9347A TSS-470E • 17... -
Page 22: Tss-470E-Ttk-B-T Specifications
TSS-470E-TTK-B-T Specifications Product specifications for the TSS-470E-TTK are provided below. Product Specifications Construction Plastic, enclosure, textured black, 45° fixed operating angle, for freestanding tabletop use Dimensions Height 3.47 in. (88 mm) Width 3.95 in. (100 mm) Depth 4.19 in. (107 mm) Weight 1.1 lb (500 g) 18 • TSS-470E... -
Page 23: Dimension Drawings
Dimension Drawings Product Manual — Doc. 9347A TSS-470E • 19... -
Page 24: Tss-470E-Wmk Specifications
TSS-470E-WMK Specifications Product specifications for the TSS-470E-WMK are provided below. Product Specifications Construction Metal mounting plate with zip rail mounting system Dimensions Height 3.79 in. (96 mm) Width 4.15 in. (106 mm) Depth 3.59 in. (91 mm) Weight 3.8 oz (108 g) 20 • TSS-470E Product Manual — Doc. 9347A... -
Page 25: Dimension Drawings
Dimension Drawings Product Manual — Doc. 9347A TSS-470E • 21... -
Page 26: Installation
Installation This section provides the following information: • TSS-470E Installation • TSS-470E-MSMK Installation • TSS-470E-TTK Installation • TSS-470E-WMK Installation 22 • TSS-470E Product Manual — Doc. 9347A... -
Page 27: Tss-470E Installation
TSS-470E-B-T, 3.5 in. Desk Scheduling Touch Screen Install the Mounting Hardware One of the available TSS-470E mounting accessories (not included) must be installed along with the TSS-470E. Refer to the following installation procedures depending on the chosen mounting hardware: For applications where the touch screen will be mounted directly to glass, granite, marble, wood paneling, plaster, smooth masonry, or a similar flat surface, refer to TSS-470E-MSMK Installation... - Page 28 Observe the following when connecting the touch screen: Use Crestron power supplies for Crestron equipment. The touch screen may be powered with a single Ethernet cable or via a 24VDC power supply (PW-2407WU, not included). If using PoE (Power over Ethernet), power and data connection is provided to the touch screen by the Ethernet cable.
-
Page 29: Tss-470E-Msmk Installation
TSS-470E-MSMK Installation Use the following procedures to install the TSS-470E-MSMK. In the Box Qty. Description TSS-470E-MSMK-B-T, Multisurface Mount Kit for TSS-470E Additional Items Template, Rear Housing (4535585) Grommet, Rubber (2061467) Screw, 4-40 x 3/16 in., Torx®, Black (2061048) Screw, 4-40 x 3/16 in., Phillips, Black (2007148) - Page 30 2. Create a raceway cutout by removing the appropriate perforated strip from the rear housing template. For example, if the raceway will enter the MSMK from the left side, remove the left perforated strip from the template. 26 • TSS-470E Product Manual — Doc. 9347A...
- Page 31 The end of the raceway that will enter the MSMK can also be cut to a specific shape for a finished appearance. 4. Insert all necessary cables into the raceway. 5. Remove the protective liner from the rear of the raceway. Product Manual — Doc. 9347A TSS-470E • 27...
- Page 32 To attach the MSMK rear housing to the mounting surface: 1. Remove the plastic trim ring from the MSMK rear housing. The MSMK ships with the trim ring loosely attached to the rear housing. 28 • TSS-470E Product Manual — Doc. 9347A...
- Page 33 Do not allow the adhesive to come in contact with the surface. 7. Place a level on top of the rear housing. Product Manual — Doc. 9347A TSS-470E • 29...
- Page 34 To attach the touch screen to the MSMK: 1. Cut the rear housing template off of the surface and remove any existing tape guides. 2. Connect all cables to the rear of the touch screen. 30 • TSS-470E Product Manual — Doc. 9347A...
- Page 35 3. Attach the touch screen to the rear housing, top side first, until the touch screen magnetically snaps into place against the rear housing. Product Manual — Doc. 9347A TSS-470E • 31...
- Page 36 3. Remove the protective liner from the back of the label. CAUTION: The adhesive on the back of the rear label is high-strength bond. Once the adhesive comes in contact with a surface, it cannot be removed easily. 32 • TSS-470E Product Manual — Doc. 9347A...
- Page 37 5. Once the label is level and aligned with the rear housing, press the label to the mounting surface firmly to ensure proper adhesion and to eliminate any trapped air bubbles. Product Manual — Doc. 9347A TSS-470E • 33...
-
Page 38: Tss-470E-Ttk Installation
TSS-470E-TTK Installation Use the following procedures to install the TSS-470E-TTK. In the Box Qty. Description TSS-470E-TTK-B-T, Tabletop Kit for TSS-470E Additional Items Grommet, Rubber (2061467) Screw, 4-40 x 3/16 in., Torx®, Black (2061048) Screw, 4-40 x 3/16 in., Phillips, Black (2007148) 34 •... -
Page 39: Install The Ttk
To install the TTK onto a table or a similar flat surface: 1. Route all necessary cables through the rear opening of the TTK enclosure. 2. Push the cables into the opening of the included cable grommet as shown in the following image. Product Manual — Doc. 9347A TSS-470E • 35... - Page 40 3. Attach the cable grommet to the rear opening of the TTK enclosure so that front slot of the grommet is seated firmly against the bottom rear lip of the TTK enclosure. 4. Connect all cables to the rear of the touch screen. 36 • TSS-470E Product Manual — Doc. 9347A...
- Page 41 5. Attach the touch screen to the front opening of the TTK, top side first, until the touch screen magnetically snaps into place against the rear housing. 6. Route any excess cable length out of the rear of the attached grommet to achieve the desired strain relief. Product Manual — Doc. 9347A TSS-470E • 37...
- Page 42 7. (Optional) Screw either the included 4-40 x 3/16 in. Phillips screw or the Torx® security screw into the bottom of the touch screen to secure it to the TTK. 38 • TSS-470E Product Manual — Doc. 9347A...
-
Page 43: Tss-470E-Wmk Installation
TSS-470E-WMK Installation Use the following procedures to install the TSS-470E-WMK. In the Box Qty. Description TSS-470E-WMK, Wall Mount Kit for TSS-470E Additional Items Screw, 4-40 x 3/16 in., Torx®, Black (2061048) Screw, 4-40 x 3/16 in., Phillips, Black (2007148) Install the WMK Use the following procedures to install the WMK into drywall, paneling, or a tabletop surface. - Page 44 (if they are not located there already). The spring foot position can be adjusted by pressing the release tabs on the inside of each zip rail while pulling the spring foot back. Refer to the following image for the correct spring foot locations. 40 • TSS-470E Product Manual — Doc. 9347A...
- Page 45 Gently bend the zip rails inward during installation to allow them to pass through the cutout. Product Manual — Doc. 9347A TSS-470E • 41...
- Page 46 4. Press and squeeze each spring foot, then slide it down its respective zip rail until it is firmly seated against the rear of the mounting surface. CAUTION: Do not overtighten the spring feet to the mounting surface. 42 • TSS-470E Product Manual — Doc. 9347A...
- Page 47 Attach the Touch Screen To attach the touch screen to the WMK: 1. Route all necessary cables through the opening in the mounting bracket. 2. Connect all cables to the rear of the touch screen. Product Manual — Doc. 9347A TSS-470E • 43...
- Page 48 3. Attach the touch screen to the mounting bracket, top side first, until the touch screen magnetically snaps into place against the mounting bracket. 44 • TSS-470E Product Manual — Doc. 9347A...
- Page 49 4. (Optional) Screw either the included 4-40 x 3/16 in. Phillips screw or the Torx® security screw into the bottom of the touch screen to secure it to the WMK. Product Manual — Doc. 9347A TSS-470E • 45...
-
Page 50: Configuration
Prior to configuration, ensure the device is running the latest firmware. To update the firmware, refer to Initial Setup on page This section provides the following information: • Initial Setup • Web Configuration • Local Configuration 46 • TSS-470E Product Manual — Doc. 9347A... -
Page 51: Initial Setup
If the touch screen must be set up over a wireless connection, the Wi-Fi network settings must first be configured using the local setup screens as described in Wi-Fi Setup on page This section provides the following information: Product Manual — Doc. 9347A TSS-470E • 47... -
Page 52: Setup Via Xio Cloud Service
Setup via XiO Cloud Service Use the following procedures to set up one or more TSS-470E touch screens via the XiO Cloud® service. Connect to the XiO Cloud Service The XiO Cloud® service allows supported devices across an enterprise to be managed and configured from one central, secure location in the cloud. - Page 53 6. Select Save Changes from the Action menu to restart the touch screen. The touch screen attempts to connect to the static IP address over the wired Ethernet connection after it restarts. Product Manual — Doc. 9347A TSS-470E • 49...
- Page 54 4. Turn off the DHCP Enabled toggle in the Wi-Fi subsection. 5. Enter the appropriate network information in the Domain, IP Address, Subnet Mask, and Default Gateway text fields. For more information, refer to Network on page 50 • TSS-470E Product Manual — Doc. 9347A...
- Page 55 2. Navigate to Settings > System Setup > Date/Time to display date and time settings for the touch screen. 3. Select the time zone where the touch screen will be used from the Time Zone drop-down menu. 4. Select Save Changes on the top right of the page. Product Manual — Doc. 9347A TSS-470E • 51...
- Page 56 6. When prompted, restart the touch screen. The touch screen restarts with the selected scheduling application running. Connect to a Scheduling Calendar Use the following procedures to connect the Crestron Desk Scheduling app to a supported scheduling calendar. NOTE: Certain scheduling calendar settings can be pushed to multiple touch screens at once at the group level.
- Page 57 NOTE: The Client ID (Application ID), O365 Tenant ID, and Client Secret values are generated within the Azure Active Directory portal for the Azure app. For more information, refer to Configure Microsoft Graph for Crestron Desk Scheduling on page 105. Enter the email address associated with the Office 365 scheduling calendar in the Calendar Email Address text field.
-
Page 58: Setup Via Device Configuration Interface
Setup via Device Configuration Interface Use the following procedures to set up an individual TSS-470E using its configuration interfaces. Access a Configuration Interface Device settings can be configured using the touch screen's web configuration interface. Additionally, a subset of device settings can be configured using the touch screen's local setup screens. - Page 59 To access the local setup screens, place three fingers on the touch screen display and hold for 5 seconds. The Device Settings screen is displayed. For more information on using the local setup screens, refer to Local Configuration on page Product Manual — Doc. 9347A TSS-470E • 55...
- Page 60 A similar prompt is displayed when connecting to the touch screen via the local setup pages or in Crestron Toolbox software if an admin account has not already been created. NOTE: The admin account for the touch screen is not related to an XiO Cloud admin account.
- Page 61 The touch screen ships with DHCP turned on by default. To set up an Ethernet connection with a static IP address for the touch screen: 1. Access the device configuration interface as described in Setup via Device Configuration Interface on page Product Manual — Doc. 9347A TSS-470E • 57...
- Page 62 4. Turn off the DHCP Enabled toggle in the Ethernet subsection. 5. Enter the appropriate network information in the Domain, IP Address, Subnet Mask, and Default Gateway text fields. For more information, refer to Network on page 58 • TSS-470E Product Manual — Doc. 9347A...
- Page 63 52, 56, 60, 64, 100, 104, 108, 112, 116, 120, 124, 128, 132, 136, 140, 149, 153, 157, 161, 165 1. Access the device configuration interface as described in Setup via Device Configuration Interface on page Product Manual — Doc. 9347A TSS-470E • 59...
- Page 64 4. Turn off the DHCP Enabled toggle in the Wi-Fi subsection. 5. Enter the appropriate network information in the Domain, IP Address, Subnet Mask, and Default Gateway text fields. For more information, refer to Network on page 60 • TSS-470E Product Manual — Doc. 9347A...
- Page 65 Auto Update on page To update the touch screen firmware: 1. Download the latest firmware PUF (package update file) from the TSS-470E product page www.crestron.com/Support/Resource-Library. 2. Access the web configuration interface as described in Access the Web Configuration Interface on page 3.
- Page 66 NOTE: Applications can be selected and configured from the web configuration interface at any time. For more information, refer to Applications on page To select a desk scheduling application: 1. Access the web configuration interface as described in Access the Web Configuration Interface on page 62 • TSS-470E Product Manual — Doc. 9347A...
- Page 67 7. When prompted, restart the touch screen. The touch screen restarts with the selected scheduling application running. Connect to a Scheduling Calendar Use the following procedures to connect the Crestron Desk Scheduling app to a supported scheduling calendar. Connect to Office 365 Using Microsoft Graph...
- Page 68 NOTE: The Client ID (Application ID), O365 Tenant ID, and Client Secret values are generated within the Azure Active Directory portal for the Azure app. For more information, refer to Configure Microsoft Graph for Crestron Desk Scheduling on page 105. Enter the email address associated with the Office 365 scheduling calendar in the Calendar Email Address text field.
-
Page 69: Web Configuration
Security: Select this tab to create touch screen users and groups. For more information, refer to Security on page 802.1x Configuration: Select this tab to configure IEEE 802.1X network authentication for touch screen security. For more information, refer to 802.1x Configuration on page Product Manual — Doc. 9347A TSS-470E • 65... -
Page 70: Action Menu
The Action menu provides the following selections. Save Changes Select Save Changes to save any changes made to the configuration settings. Revert Select Revert to revert the touch screen back to the last saved configuration settings. 66 • TSS-470E Product Manual — Doc. 9347A... - Page 71 Select Download Logs to download the touch screen message logs for diagnostic purposes. The message files download as a compressed .tgz file. Once the compressed file is downloaded, extract the message log files to view them. Product Manual — Doc. 9347A TSS-470E • 67...
- Page 72 Action column to delete the certificate. A dialog box is displayed asking whether the certificate should be deleted. Select Yes to delete the group or No to cancel deleting the group. 68 • TSS-470E Product Manual — Doc. 9347A...
- Page 73 App Upgrade Select App Upgrade to update the currently selected application. The update progress is shown in a pop-up window. Once the update is complete, select OK to close the pop-up window. Product Manual — Doc. 9347A TSS-470E • 69...
-
Page 74: Status
Select the Status tab on the top left of the interface to display accordions for viewing the status of the touch screen and the Crestron Desk Scheduling app (if selected). Select an accordion name to expand that accordion. If the accordion is expanded, select the accordion name again to collapse the accordion. - Page 75 IP Address: The touch screen IP address, shown only if an Ethernet connection is active Subnet Mask: The touch screen subnet mask address, shown only if an Ethernet connection is active Default Gateway: The gateway router address, shown only if an Ethernet connection is active Product Manual — Doc. 9347A TSS-470E • 71...
- Page 76 Select the Schedule accordion to view the status of the connected desk scheduling calendar and the current reservation information. NOTE: The Schedule accordion is shown only if Crestron Desk Booking is selected for Application Mode. The following Schedule information is displayed:...
-
Page 77: Settings
Select the Settings tab on the top left of the interface to display accordions for configuring settings for the touch screens and Crestron Desk Scheduling app (if selected). NOTE: Settings cannot be updated or saved in the web configuration interface if the local configuration screens are active. - Page 78 Panel PIN: Enter a six-digit PIN that must be entered to access restricted areas in the local configuration interface. Confirm Panel PIN: Confirm the value entered for Panel PIN. 74 • TSS-470E Product Manual — Doc. 9347A...
- Page 79 Use the Authentication Method drop-down menu to select the authentication method used to access the NTP server (if one exists). If an authentication method is selected, enter the key used to authenticate against the NTP server into the Authentication Key text field. Product Manual — Doc. 9347A TSS-470E • 75...
- Page 80 Date Format: Select the format that the date will display on the touch screen using the drop-down menu. Time: If Time Synchronization is turned off, select the time for the touch screen (in 24-hour format) using the pop-up menu that is displayed. 76 • TSS-470E Product Manual — Doc. 9347A...
- Page 81 Network The Network subsection is used to configure network settings for the touch screen. Product Manual — Doc. 9347A TSS-470E • 77...
- Page 82 Scan Wi-Fi Access Points: Scans the network for open Wi-Fi access points (WAPs) that are in range of the touch screen. All discovered access points are displayed in the Select Discovered Access Points menu. 78 • TSS-470E Product Manual — Doc. 9347A...
- Page 83 WAP must be removed before a new one can be added. Device Display The Device Display subsection is used to configure device display settings for the touch screen. Enter a value (1‒100%) for the LCD display brightness in the Brightness text field. Product Manual — Doc. 9347A TSS-470E • 79...
- Page 84 HTTPS Proxy Port: Enter the port number of the HTTPS proxy server. Username: Enter the username required for the HTTPS proxy server. Password: Enter the password required for the HTTPS proxy server. 80 • TSS-470E Product Manual — Doc. 9347A...
- Page 85 Custom URL: Turn on the toggle use a custom update server URL. If turned off, the server URL will default to the standard Crestron update sever. Custom URL Path: If Custom URL Path is turned on, enter the custom URL path for the update server.
- Page 86 Schedule Select Schedule to choose the scheduling calendar provider for the Crestron Desk Scheduling app and to configure scheduling integration settings. NOTE: The Schedule accordion is shown only if Crestron Desk Booking is selected for Application Mode. The following Schedule settings are provided: Polling Interval: Enter the interval (in minutes) that the scheduling application waits to poll the network for scheduling calendar data if changes are not pushed to the application.
- Page 87 Enter the client secret generated for the Azure app in the Client Secret text field. LED Accessory Select LED Accessory to customize the LED colors of the integrated light bar. NOTE: The LED Accessory accordion is shown only if Crestron Desk Booking is selected for Application Mode. Product Manual — Doc. 9347A...
- Page 88 The following LED Accessory settings are provided: Enable LEDs: Turn on the toggle to use the integrated light bar with the Crestron Desk Scheduling app. Custom LED Colors: Turn on the toggle to allow custom color mixing for the integrated light bar. Expand Custom Color Values to configure custom colors for the integrated light bar (if Custom LED colors is turned on).
- Page 89 Automation Select Automation to configure automated settings for the scheduling application. NOTE: The Automation accordion is shown only if Crestron Desk Booking is selected for Application Mode. The following Automation settings are provided: NOTE: For detailed information about check-in and decline for no show behavior, refer to...
- Page 90 Select Work Hours to configure power mode settings for the touch screen, which are controlled by a day and time range. NOTE: The Work Hours accordion is shown only if Crestron Desk Booking is selected for Application Mode. 86 • TSS-470E...
- Page 91 Off Time: Enter the time (in 24-hour format) when the connected touch screen display is turned off automatically for the chosen day of the week. The Off Time value is also used to set when all day reservations will end. Product Manual — Doc. 9347A TSS-470E • 87...
-
Page 92: Security
The following settings are displayed for the current user: Name: The chosen username Access Level: The access level granted to the user (Administrator, Programmer, Operator, User, or Connect) Groups: Lists any groups that contain the user 88 • TSS-470E Product Manual — Doc. 9347A... - Page 93 Additionally, the number of users displayed on each page may be set to 5, 10, or 20 users. An Action column is also provided for each user that allows various actions to be performed. The following selections may be selected from the Action column. Product Manual — Doc. 9347A TSS-470E • 89...
- Page 94 Groups: Add the user to one or more groups. For more information, refer to Groups on page Select OK to save any changes and close the dialog box. Select Cancel to cancel any changes. 90 • TSS-470E Product Manual — Doc. 9347A...
- Page 95 Groups: Add the user to one or more groups. For more information, refer to Groups on page Select OK to save any changes and close the dialog box. Select Cancel to cancel creating a new user. Product Manual — Doc. 9347A TSS-470E • 91...
- Page 96 Action column. Group Details Select the information button in the Action column to view information for the selected group. The Group Details dialog box is displayed. 92 • TSS-470E Product Manual — Doc. 9347A...
- Page 97 Access Level: Select an access level for the group and its users from the drop-down menu. Select OK to save any changes and close the dialog box. Select Cancel to cancel creating a new group. Product Manual — Doc. 9347A TSS-470E • 93...
-
Page 98: 802.1X Configuration
IEEE 802.1x Authentication: Turn on the toggle to use 802.1X authentication for the touch screen. Authentication Method: Select an 802.1X authentication method (EAP-TLS Certificate or EAP MSCHAP V2- password) from the drop-down menu. 94 • TSS-470E Product Manual — Doc. 9347A... - Page 99 Select the check box to the left of the search field at the top of the CA menu to select all CAs as trusted CAs. For more information on managing certificates for use with 802.1X IEEE authentication, refer to Manage Certificates on page Product Manual — Doc. 9347A TSS-470E • 95...
-
Page 100: Local Configuration
To perform a factory restore that also removes any previously-added WAPs, refer to Perform a Factory Restore on page 119. Additionally, selections for configuring a Wi-Fi® network connection or Ethernet connection are provided. Each selection is described in the following sections. 96 • TSS-470E Product Manual — Doc. 9347A... -
Page 101: Enter An Admin Pin
Tap BACK to delete the last number entered. Tap CLEAR to clear all entered numbers. Tap CANCEL to return to the Device Settings screen without entering a PIN. Product Manual — Doc. 9347A TSS-470E • 97... -
Page 102: Wi-Fi Setup
Turn on the Wi-Fi Enabled toggle to turn on the Wi-Fi adapter. If the Wi-Fi Enabled toggle is turned off, Wi-Fi will not function and an Ethernet connection can be established. Tap the Home button at the top of the screen at any time to return to the Device Settings screen. 98 • TSS-470E Product Manual — Doc. 9347A... - Page 103 WAPs can be configured using the web configuration interface. Attempting to configure a WAP using the local configuration screens will delete any additional WAPs that were previously added using the web configuration interface. Product Manual — Doc. 9347A TSS-470E • 99...
- Page 104 This information must be entered manually when adding a new WAP. 2. Tap the SSID text field to display an on-screen keyboard. 3. Enter or modify the WAP name if necessary. 4. Tap the Security text field to display the Encryption screen. 100 • TSS-470E Product Manual — Doc. 9347A...
- Page 105 After any changes have been made, select OK to apply the new settings and restart the touch screen (if required). Select Cancel to cancel the changes. Select the back arrow button to return to the Wi-Fi Setup screen. Product Manual — Doc. 9347A TSS-470E • 101...
-
Page 106: Ethernet Setup
Tap the SSID, Security, and Password fields to edit their respective settings. After any changes have been made, select OK to apply the settings. Select Cancel to cancel the changes. Ethernet Setup Tap Ethernet Setup on the Device Settings screen to display the Ethernet Setup screen. 102 • TSS-470E Product Manual — Doc. 9347A... - Page 107 After any changes have been made, select OK to apply the new settings and restart the touch screen (if required). Select Cancel to cancel the changes. Select the back arrow button to return to the Ethernet Setup screen. Product Manual — Doc. 9347A TSS-470E • 103...
-
Page 108: Application Selection
The touch screen runs only one app, which is selected at setup. Only the apps approved and delivered by Crestron may run on the touch screen. NOTE: Additional subscriptions and/or licenses may be required. Refer to each provider’s website for details about the capabilities and requirements of its scheduling application and services. -
Page 109: Configure Microsoft Graph For Crestron Desk Scheduling
Configure Microsoft Graph for Crestron Desk Scheduling This topic describes how to configure Microsoft Graph support for the Crestron Desk Scheduling app when using the Office 365® scheduling calendar. Microsoft Graph is provided by the Azure® Active Directory® service to allow access to Microsoft Cloud service resources. - Page 110 3. Select App registrations from the Azure widget menu. 4. Select + New registration. 106 • TSS-470E Product Manual — Doc. 9347A...
- Page 111 Supported account types: Select the supported account type. Only the Accounts in this organizational directory only option is supported by the Crestron Desk Scheduling app at this time. NOTE: The Redirect URI (optional) settings are not configured for this application.
- Page 112 Create a Client Secret Once the app is registered, a client secret must be created to connect the Crestron Desk Scheduling App to the Azure AD app. 1. Select App registrations from the Azure widget menu. 2. Select the application created for the Crestron Desk Scheduling App. An application dialog box is displayed.
- Page 113 Expires: Select the duration before the client secret expires from the drop-down menu. 6. Select Add. The new client secret is added to the Certificates & secrets page for the Azure app. Product Manual — Doc. 9347A TSS-470E • 109...
- Page 114 1. Select App registrations from the Azure widget menu. 2. Select the application created for the Crestron Desk Scheduling App. An application dialog box is displayed.
- Page 115 3. Select API permissions from the navigation menu. The API permissions page for the Azure app is displayed. Product Manual — Doc. 9347A TSS-470E • 111...
- Page 116 6. Select Application permissions for the required permission type. NOTE: Delegated permissions require that the app acts on the behalf of a logged-in user. Since the app has its own key, permissions are granted to the app directly. 112 • TSS-470E Product Manual — Doc. 9347A...
- Page 117 7. Fill the appropriate check boxes to select the following permissions: Within the Calendars section, select Calendars.ReadWrite. Within the MailboxSettings section, select MailboxSettings.Read. Within the Users section, select Users.Read. Product Manual — Doc. 9347A TSS-470E • 113...
- Page 118 8. Select Add permissions. The three permissions are added under the Configured permissions section of the API permissions page for the Azure app. 114 • TSS-470E Product Manual — Doc. 9347A...
- Page 119 9. Select Grant admin consent for [Azure Account Name] for the three added permissions, where [Azure Account Name] is the name of the active Azure account, then select Yes when prompted within the dialog box that is displayed. Product Manual — Doc. 9347A TSS-470E • 115...
- Page 120 Use the following procedure to obtain the application and directory IDs that are required to connect the Crestron Desk Scheduling app to the Azure AD app. 1. Select App registrations from the Azure widget menu. 2. Select the application created for the Crestron Desk Scheduling app. An application dialog box is displayed. 116 • TSS-470E...
- Page 121 4. Copy the following fields from the Overview pane to an accessible location. Use the Copy to Clipboard button that appears when hovering over each field to ensure accuracy. Application (client) ID: The unique identification string for the Azure app. Directory (tenant) ID: The unique identification string for the Azure directory. Product Manual — Doc. 9347A TSS-470E • 117...
-
Page 122: Connect The Scheduling App To Microsoft Graph
Connect the Scheduling App to Microsoft Graph Once an app has been registered in Azure AD, the Crestron Desk Scheduling app can be connected to Microsoft Graph from the touch screen web configuration interface. To connect the Crestron Desk Scheduling App to Microsoft Graph: 1. -
Page 123: Perform A Factory Restore
1. Press the RESET button on the rear of the touch screen. The touch screen will begin to reset. 2. Once the Crestron logo is shown on the touch screen display, the reset process has completed. Press the RESET button again. -
Page 124: Operation
Scheduling app. Crestron Desk Scheduling User Interface The Crestron Desk Scheduling user interface allows a user to reserve and obtain schedule information for the current desk. The user interface comprises screens that display the status of the desk and that provide options for scheduling reservations, determining the desk availability, and performing other reservation-related functions. -
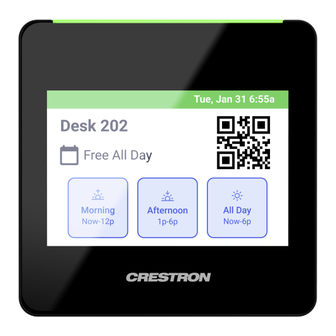
Page 125: Available Screen
"Scan to Reserve" message replaces the time period buttons, allowing the desk to be reserved for the following day via the scheduling calendar resource. A calendar icon that can be selected to view upcoming reservations for the day. Product Manual — Doc. 9347A TSS-470E • 121... -
Page 126: Upcoming Reservation Screen
Indicates that the desk will be reserved and shows the start time of the upcoming reservation (or end time if the reservation is in progress). A calendar icon that can be selected to view upcoming reservations for the day. 122 • TSS-470E Product Manual — Doc. 9347A... - Page 127 NOTE: If the user does not tap the check in button and decline for no show is turned off, the touch screen UI and light bar remain amber for the duration of the reservation. Product Manual — Doc. 9347A TSS-470E • 123...
- Page 128 The reservation will be shortened to the length of the decline for no show period for the first and second reported no shows. 124 • TSS-470E Product Manual — Doc. 9347A...
-
Page 129: Reserved Screen
If the current reservation is only scheduled for part of the day and no other upcoming reservations are scheduled, an Extend All Day button is provided that allows the reservation to be extended for the remainder of the work day. Product Manual — Doc. 9347A TSS-470E • 125... -
Page 130: Schedule Screen
Schedule Screen Tap the calendar icon within the Crestron Desk Scheduling user interface to display a Schedule screen for viewing the desk schedule for the current day. If a reservation is in progress, the name and duration of the reservation are listed under Current Reservation. -
Page 131: Scheduling Calendar Behavior
Scheduling Calendar Behavior The Crestron Desk Scheduling user interface receives its calendar data from a connected Office 365 scheduling calendar resource. Performing the following actions within the user interface will trigger the... -
Page 132: Check-In Behavior For Modified Active Reservations
12:00 AM start time depending on the specified decline for no show period. Since the desk would not typically be occupied until later in the morning, the Crestron Desk Scheduling user interface specifies the decline for no show period based on other factors. -
Page 133: Check-In Behavior For Multiple Day Reservations
Refer to the following example scenarios: If an all day reservation is scheduled for a future day in the scheduling calendar, the Crestron Desk Scheduling user interface uses the scheduled On Time for that day's work hours to determine the decline for no show period. -
Page 134: Resources
Resources The following resources are provided for the TSS-470E. NOTE: You may need to provide your Crestron.com web account credentials when prompted to access some of the following resources. Crestron Support and Training Crestron True Blue Support Crestron Resource Library Crestron Online Help (OLH) Crestron Training Institute (CTI) Portal... - Page 135 Crestron Electronics, Inc. Product Manual — Doc. 9347A 15 Volvo Drive, Rockleigh, NJ 07647 09/19/23 Tel: 888.CRESTRON Specifications subject to Fax: 201.767.7656 change without notice. www.crestron.com...
Need help?
Do you have a question about the TSS-470E and is the answer not in the manual?
Questions and answers