Table of Contents
Advertisement
Quick Links
Advertisement
Chapters
Table of Contents

Related Manuals for Zeiss AT 030


Summary of Contents for Zeiss AT 030
- Page 1 AT 030 Applanation tonometer Documentation set...
- Page 2 Copyright ©2020, Carl Zeiss Meditec AG, Jena Trademarks All trademarks mentioned in this document are the property of their respective owners.
- Page 3 Contents Instruction for use AT 030 Applanation tonometer [319300-9120-000-GA-GB-240320] Instructions for use and disinfection of tonometer measuring prisms [319300-9231-000-AddGA01-GB-240320] 319300-9120-000-Inhalt0-GB-240320...
- Page 5 Contents Instruction for use AT 030 Applanation tonometer [319300-9120-000-GA-GB-240320] 319300-9120-000-Inhalt1-GB...
- Page 7 AT 030 Applanation tonometer Instruction for use...
-
Page 9: Table Of Contents
Mounting the device to the SL 120, SL 130 and SL 220 slit lamps using the swivel- mounted tonometer holder behind the stereomicroscope..........18 Mounting the device on SL 120, SL 130, SL 220, and ZEISS VISULAS laser slit lamps using the fixed tonometer holder ..................20 Daily startup.................... - Page 10 Instruction for use AT 030 Measuring toric cornea surfaces..................24 Preparing for measurement....................24 Measurement with AT 030 ....................26 Conversion table for tonometer readings ................28 Cleaning and disinfection ................31 Safety when cleaning and disinfecting the device ............. 31 Cleaning ..........................
-
Page 11: Notes On The Instructions For Use
1.1 Product name 1 Notes on the instructions for use 1.1 Product name AT 030 applanation tonometer is referred to as "device" in these instructions for use. 1.2 Scope of application The present instructions for use apply to AT 030 applanation tonometer with the following labeling: •... -
Page 12: Conventions In A Course Of Action
1 Notes on the instructions for use Instruction for use 1.6 Applicable documents AT 030 Names of software dialogs, fields or menus, and software messages are marked by quotation marks: • "View" menu. • "Do you want to save the settings?"... -
Page 13: Safety Notes
Instruction for use 2 Safety notes AT 030 2.1 Intended user profile 2 Safety notes 2.1 Intended user profile The device may only be installed, operated, used and maintained by persons who have the necessary training, knowledge and experience to do so. Please also adhere to the national qualification guidelines applicable in your country. -
Page 14: Messages To Manufacturer And Authorities
Accessories and additional equipment If you want to connect accessories or additional equipment to the device: Contact your ZEISS representative [} 5]. 2.3.1 Messages to manufacturer and authorities If a serious incident occurs in connection with this medical device... -
Page 15: Maintenance Measures
Maintenance procedures (maintenance and repairs) which are not specified in these instructions for use may only be carried out by persons authorized by Carl Zeiss Meditec and solely according to the service instructions issued by Carl Zeiss Meditec. For planning and implementing these maintenance and care procedures please contact ZEISS Service or your local dealer. - Page 16 Empty page, for your notes...
-
Page 17: Description Of The Device
3.1 Package check list 3 Description of the device 3.1 Package check list The scope of delivery of the AT 030 applanation tonometer includes the following components: • AT 030 applanation tonometer • Box with measuring prisms and test weights •... -
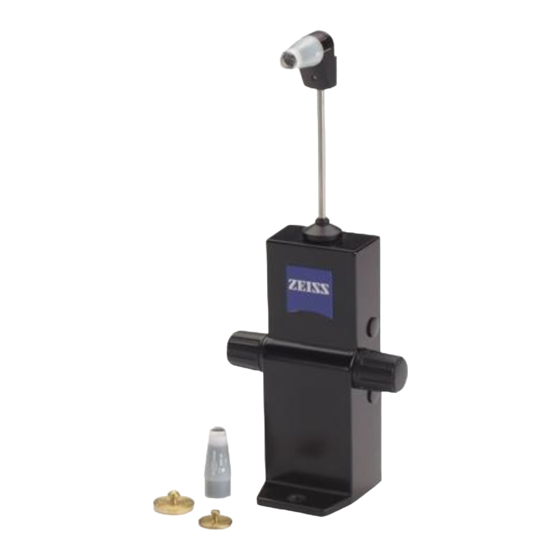
Page 18: Structure Of The Device
3 Description of the device Instruction for use 3.3 Structure of the device AT 030 3.3 Structure of the device Figure 1: Control elements of the AT 030 applanation tonometer and the swivel-mounted/fixed tonometer holder AT 030 applanation Rotary knob of graduated tonometer... -
Page 19: Functional Description
3.06 mm diameter, so that the applied force corresponds to the intraocular pressure. The AT 030 works on the principle of force variation due to the expansion of a spring. Therefore, it does not require any mainte- nance or readjustment. - Page 20 Empty page, for your notes...
-
Page 21: Installation
4.2 General information The device can be mounted on ZEISS slit lamps by using a special tonometer holder. Special tonometer holders have been specifically developed for the use of the AT 030 with ZEISS slit lamps and can be purchased separately. -
Page 22: Mounting The Device On Sl 800 Slit Lamp Using The Swivel-Mounted Tonometer Holder On The Stereomicroscope Or Fundus Varioview
4 Installation Instruction for use 4.3 Mounting the device on SL 800 slit lamp using the swivel-mounted tonometer AT 030 holder on the stereomicroscope or Fundus VarioView 4.3 Mounting the device on SL 800 slit lamp using the swivel-mounted tonometer holder on the... - Page 23 4.3 Mounting the device on SL 800 slit lamp using the swivel-mounted tonometer holder on the stereomicroscope or Fundus VarioView Figure 2: Mounting the AT 030 to the SL 800 slit lamp with swivel-mounted tonometer holder Swivel-mounted tonometer holder Guide pin...
-
Page 24: Mounting The Device To The Sl 120, Sl 130 And Sl 220 Slit Lamps Using The Swivel-Mounted Tonometer Holder Behind The Stereomicroscope
4 Installation Instruction for use 4.4 Mounting the device to the SL 120, SL 130 and SL 220 slit lamps using the AT 030 swivel-mounted tonometer holder behind the stereomicroscope 4.4 Mounting the device to the SL 120, SL 130 and... - Page 25 4.4 Mounting the device to the SL 120, SL 130 and SL 220 slit lamps using the swivel-mounted tonometer holder behind the stereomicroscope Figure 3: Mounting the AT 030 on ZEISS slit lamps with swivel-mounted tonometer holder behind the stereo- microscope e.g. SL 120 (left) and SL 220 (right)
-
Page 26: Mounting The Device On Sl 120, Sl 130, Sl 220, And Zeiss Visulas Laser Slit Lamps Using The Fixed Tonometer Holder
4 Installation Instruction for use 4.5 Mounting the device on SL 120, SL 130, SL 220, and ZEISS VISULAS laser slit AT 030 lamps using the fixed tonometer holder 4.5 Mounting the device on SL 120, SL 130, SL 220,... - Page 27 Instruction for use 4 Installation AT 030 4.5 Mounting the device on SL 120, SL 130, SL 220, and ZEISS VISULAS laser slit lamps using the fixed tonometer holder Figure 4: Mounting the AT 030 to ZEISS slit lamps using the fixed...
- Page 28 Empty page, for your notes...
-
Page 29: Daily Startup
Instruction for use 5 Daily startup AT 030 5.1 Preparation safety 5 Daily startup 5.1 Preparation safety Risk due to contaminated or damaged measuring prisms CAUTION! The patient may be injured by contaminated or damaged measuring prisms. Never use damaged measuring prisms! Only use clean, residue-free and undamaged measuring prisms. -
Page 30: Measuring Spherical Corneal Surfaces
5 Daily startup Instruction for use 5.2 Measuring spherical corneal surfaces AT 030 5.2 Measuring spherical corneal surfaces With a spherical cornea, the applanation surface is a circle. The optical system generates two fluorescein semicircles to be coinci- denced. The measuring prism has a graduated scale. The measuring prism holder has a white and a red index line. - Page 31 Instruction for use 5 Daily startup AT 030 5.4 Preparing for measurement NOTE! Always anesthetize both eyes to avoid eyelid blinking. NOTE! The application of too much fluorescein solution results in readings that are too high, whereas too little fluorescein solution results in narrow semicircles, thus producing readings that are too low.
-
Page 32: Measurement With At 030
5 Daily startup Instruction for use 5.5 Measurement with AT 030 AT 030 5.5 Measurement with AT 030 Figure 5: Controls of the AT 030 Measuring prism Extensible measuring arm with measuring prism holder Rotary knob of graduated Readout scale drum Action 1. - Page 33 Instruction for use 5 Daily startup AT 030 5.5 Measurement with AT 030 3. Pull the extensible measuring arm with measuring prism holder up to the upper end position and then rotate it by 90° towards the patient’s side. The upper end position is reached after overcoming a slight resistance.
-
Page 34: Conversion Table For Tonometer Readings
5 Daily startup Instruction for use 5.6 Conversion table for tonometer readings AT 030 5.6 Conversion table for tonometer readings Scale reading Pressure mmHg kPa* mbar 0.27 0.53 0.80 1.07 10.7 10.0 1.33 13.3 12.0 1.60 16.0 14.0 1.87 18.7 16.0... - Page 35 Instruction for use 5 Daily startup AT 030 5.6 Conversion table for tonometer readings Scale reading Pressure mmHg kPa* mbar 60.0 8.00 80.0 62.0 8.26 82.6 64.0 8.53 85.3 66.0 8.80 88.0 68.0 9.06 90.6 70.0 9.33 93.3 72.0 9.60 96.0...
- Page 36 Empty page, for your notes...
-
Page 37: Cleaning And Disinfection
When assembling, cleaning or transporting the AT 030 appla- nation tonometer, the measuring element must be set to 2.0. Damage due to improper cleaning and disinfection... - Page 38 Empty page, for your notes...
-
Page 39: Maintenance
If you wish Carl Zeiss Meditec to perform the metrological check, please contact ZEISS Service or your local dealer. NOTE! Please return only cleaned and disinfected device. -
Page 40: Adjusting The Swivel-Mounted Tonometer Holder With Square Mounting Interface (Version A)
Adjusting the swivel-mounted tonometer holder with round mounting interface (version b) [} 39]. It is not necessary to remove the tonometer holder with the AT 030 mounted from the slit lamp. NOTE! If, in case of the swivel-mounted tonometer holder mounted on the stereomicroscope or Fundus VarioView and in case of fixed tonometer holders, these checks do not yield satisfying results, contact ZEISS Service. - Page 41 Instruction for use 7 Maintenance AT 030 7.2 Adjusting the swivel-mounted tonometer holder with square mounting interface (version a) Figure 8: Adjusting options on the swivel-mounted tonometer holder, version a (square mounting interface) Clamping screw for image Height adjustment focus Adjusting screw for height...
- Page 42 7 Maintenance Instruction for use 7.2 Adjusting the swivel-mounted tonometer holder with square mounting AT 030 Setting the correct height in the field of view (height adjustment A) Set the magnification of the slit lamp microscope to a high magnification (e.g. 20x or 25x).
- Page 43 If, however, both eyepieces are to be used alternately, the position of the AT 030 on the base plate must now be changed: Release the knurled screw and remove the tonometer. Set the tonometer with the centering pin into the other alignment hole of the base plate.
- Page 44 7 Maintenance Instruction for use 7.2 Adjusting the swivel-mounted tonometer holder with square mounting AT 030 Figure 10: Structure on one side of measuring prism Set the magnification of the slit lamp microscope to a high magnification (e.g. 20x or 25x).
-
Page 45: Adjusting The Swivel-Mounted Tonometer Holder With Round Mounting Interface (Version B)
(version b) Preparation Action Mount the tonometer holder and AT 030 on the slit lamp. Put the AT 030 into the position for the right eyepiece. Set the eyepieces of the slit lamp to 0 D or your own correction value. - Page 46 7 Maintenance Instruction for use 7.3 Adjusting the swivel-mounted tonometer holder with round mounting AT 030 interface (version b) Figure 11: Clamping and adjusting screws on the swivel-mounted tonometer holder, version b (round mounting interface) Swivel arm Height adjustment Clamping screw for height...
- Page 47 Instruction for use 7 Maintenance AT 030 7.3 Adjusting the swivel-mounted tonometer holder with round mounting Setting the correct height in the field of view (height adjustment A) Set the magnification of the slit lamp microscope to a high magnification (e.g. 20x or 25x).
- Page 48 If, however, both eyepieces are to be used alternately, the position of the AT 030 on the base plate must now be changed: Release the knurled screw and remove the tonometer. Set the tonometer with the centering pin into the other alignment hole of the base plate.
- Page 49 Instruction for use 7 Maintenance AT 030 7.3 Adjusting the swivel-mounted tonometer holder with round mounting ð Push the swivel arm including tonometer forwards in the slot until the sharp focus of the structure visible on one side is in the middle of the motion range. When moving the tonometer lift it slightly to avoid it tilting under its own weight.
-
Page 50: Checking The Device
NOTE! If the measuring arm with the measuring prism does not move to the front end position, discontinue using the device. Consult ZEISS Service. Please also observe the infor- mation in the Metrological check [} 33]. 44 / 60 319300-9120-000-GA-GB-240320... - Page 51 Set the scale reading to 0. Take the 2 g and 5 g test weights out of the storage box. Put the AT 030 onto the open box with the scale facing downwards. Insert the measuring prism inversely up to the normal measuring position into the measuring prism holder.
- Page 52 Empty page, for your notes...
-
Page 53: Troubleshooting
Instruction for use 8 Troubleshooting AT 030 8 Troubleshooting Action 1. The axis of the measuring prism must coincide with the normal to the corneal surface. This is the case if the fluorescein semicircles are symmetrical to the separating line. - Page 54 8 Troubleshooting Instruction for use AT 030 Fault Eyepiece Remedy image Fluorescein ring too small: Let the patient blink The tear fluid has dried up during and close his/her a longer measurement. In this case eyes several times the pressure reading will be too and repeat the low.
- Page 55 Instruction for use 8 Troubleshooting AT 030 Fault Eyepiece Remedy image Only part of the upper semicircle Move the slit lamp and the entire lower semicircle are to the left using the visible: control lever. The measuring prism is not centered with the eye.
- Page 56 Empty page, for your notes...
-
Page 57: Technical Specifications
Device class in accordance with the MDD: I (with measuring function) The device is marked with 9.1.2 Classification of the device UMDNS No.: 16-809 The AT 030 applanation tonometer conforms to the ISO 8612:2009 standard. 9.2 Device data Value Measuring prism... -
Page 58: Dimensions And Weights
9 Technical specifications Instruction for use 9.3 Dimensions and weights AT 030 9.3 Dimensions and weights Value Dimensions (W x H x D) 105 mm x 40 mm x 25 mm Weight 245 g 9.4 Ambient requirements Value Ambient conditions for intended use Temperature +10 °C to +35 °C... -
Page 59: Optional Accessories
10 Optional accessories • Swivel-mounted tonometer holder • Fixed tonometer holder You can find the ZEISS contact partner for your country on the following website: www.zeiss.com/med Use only accessories and spare parts which are approved by ZEISS for this device. When using accessories and spare parts that are not approved by ZEISS, safe operation of the device cannot be guaranteed. - Page 60 Empty page, for your notes...
-
Page 61: Disposal Of The Device
For more information about the disposal of the device, please contact the ZEISS contact partner in your country. You can find the ZEISS contact partner for your country on the following website: www.zeiss.com/med If you resell the device or its components: Inform the buyer that the device is to be disposed of in accordance with the currently applicable regulations. - Page 62 Empty page, for your notes...
-
Page 63: Glossary
Instruction for use Glossary AT 030 Glossary D (diopter) is the unit of measurement of the refractive power of optical systems. Kilopascal: 1 kPA = 1000 Pa mbar Millibar: 1 mbar = 1 hPa = 100 Pa Medical Device Directive... - Page 64 Empty page, for your notes...
-
Page 65: Index
Instruction for use Index AT 030 Index Ambient conditions ........Disposal Electronics ..........55 Packaging material........ 55 Intended user profile ......... Operating personnel ........Product modification ......... User profile..........319300-9120-000-GA-GB-240320 59 / 60... - Page 66 Carl Zeiss Meditec AG Goeschwitzer Strasse 51-52 07745 Jena Germany Internet: www.zeiss.com/med E-Mail: info.meditec@zeiss.com Specifications subject to change 319300-9120-000-GA-GB-240320...
- Page 67 Contents Instructions for use and disinfection of tonometer measuring prisms [319300-9231-000-AddGA01-GB-240320] 319300-9120-000-Inhalt2-GB...
- Page 69 Instructions for use and disinfection of tonometer measuring prisms Addendum...
- Page 71 Operation, environment ....................Warranty and product liability................... Validated cleaning and disinfecting agents ............... List of disinfectants with good material compatibility with ZEISS measuring prisms..Service life ......................... 12 Cleaning and disinfection of reusable measuring prisms ......13 Manual cleaning steps ....................... 13 Disinfection steps ......................
- Page 72 Empty page, for your notes...
-
Page 73: Notes On The Instructions For Use
1.3 Questions and comments If you have questions or comments concerning these instruc- tions for use or the device itself, contact ZEISS Service. You can find the ZEISS contact partner for your country on the following website: www.zeiss.com/med 1.4 Conventions in this document Certain types of information are specially marked in this document for better recognition. -
Page 74: Conventions In A Course Of Action
1 Notes on the instructions for use Addendum 1.4 Conventions in this document Instructions for use and disinfection of tonometer measuring prisms The steps in menu and file paths are separated by slashes: • "File / Save as" • "My documents / Documents" Keys, buttons, knobs, levers and other operating controls are marked by square brackets: •... -
Page 75: Safety Notes
Addendum 2 Safety notes Instructions for use and disinfection of 2.1 Ambient conditions tonometer measuring prisms 2 Safety notes 2.1 Ambient conditions Please follow the instructions of use for the appropriate devices. 2.2 Important general advice Risk due to contaminated products CAUTION! Products listed in these instructions for use will not be shipped disinfected. -
Page 76: Validated Cleaning And Disinfecting Agents
2 Safety notes Addendum 2.5 Validated cleaning and disinfecting agents Instructions for use and disinfection of tonometer measuring prisms 2.5 Validated cleaning and disinfecting agents The following cleaning and disinfecting agents have been used in several validations. Cleaning agents • Palmolive 0.08 % Disinfectants Product Concen-... -
Page 77: List Of Disinfectants With Good Material Compatibility With Zeiss Measuring Prisms
ZEISS rejects all liability if any of the disinfectants mentioned in the list below is used without a proper validated cleaning and disin- fection process. - Page 78 2 Safety notes Addendum 2.6 List of disinfectants with good material compatibility with ZEISS measuring Instructions for use and disinfection of prisms tonometer measuring prisms Disinfectants Tested Alde- Contai- Comments concentration hyde ning free aldehyde NaOCl 0.0525 % (sodium hypo-...
- Page 79 Addendum 2 Safety notes Instructions for use and disinfection of 2.6 List of disinfectants with good material compatibility with ZEISS measuring tonometer measuring prisms Disinfectants Tested Alde- Contai- Comments concentration hyde ning free aldehyde Korsolex extra ® Mucocit ® NU-CIDEX ®...
-
Page 80: Service Life
The measuring prisms carry an expiry date ( YYYY-MM). They must not be used beyond this date. ZEISS recommends a maximum service life of two years before the expiration date. This service life applies under normal conditions of use, i.e. -
Page 81: Cleaning And Disinfection Of Reusable Measuring Prisms
For material compatibility reasons, only agents approved by ZEISS may be used. The current material compatibility list can be found on the ZEISS homepage and is included with the tonometer and the measuring prisms. Should the operator decide to employ other disinfectants or procedures of his own... -
Page 82: Disinfection Steps
3 Cleaning and disinfection of reusable measuring prisms Addendum 3.2 Disinfection steps Instructions for use and disinfection of tonometer measuring prisms Action 1. Remove the measuring prisms from the tonometer holder (a) and clean under running water (drinking water quality) (recom- mended time 60 seconds). -
Page 83: Rinsing And Storage
Addendum 3 Cleaning and disinfection of reusable measuring prisms Instructions for use and disinfection of 3.3 Rinsing and storage tonometer measuring prisms 3.3 Rinsing and storage Risk due to contaminated or damaged measuring prisms CAUTION! The patient may be injured by contaminated or damaged measuring prisms. - Page 84 3 Cleaning and disinfection of reusable measuring prisms Addendum 3.3 Rinsing and storage Instructions for use and disinfection of tonometer measuring prisms Figure 2: Steps for cleaning, disinfection and rinsing 16 / 18 319300-9231-000-AddGA01-GB-240320...
- Page 85 Empty page, for your notes...
- Page 86 Carl Zeiss Meditec AG Goeschwitzer Strasse 51-52 07745 Jena Germany Internet: www.zeiss.com/med E-Mail: info.meditec@zeiss.com Specifications subject to change 319300-9231-000-AddGA01-GB-240320...
- Page 87 Empty page, for your notes...
- Page 88 Carl Zeiss Meditec AG Goeschwitzer Strasse 51-52 07745 Jena Germany Internet: www.zeiss.com/med E-Mail: info.meditec@zeiss.com Specifications subject to change 319300-9120-000-DokS-GB-240320...
Need help?
Do you have a question about the AT 030 and is the answer not in the manual?
Questions and answers