Table of Contents
Advertisement
Advertisement
Table of Contents

Related Manuals for Zeiss CONTURA G2


Summary of Contents for Zeiss CONTURA G2
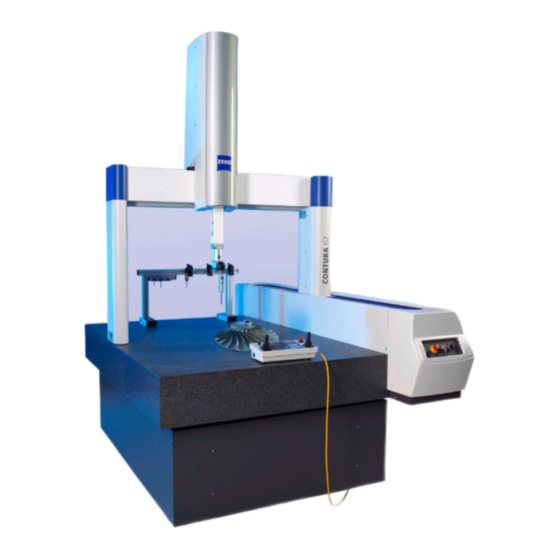
- Page 1 Technical Services Installation Instructions CONTURA G2 Measuring Center...
-
Page 2: Ambient Conditions
A measurement is required to determine the actual mag- 1.4 Ambient Conditions nitude of local floor vibrations. You can order such a vi- bration analysis from Carl Zeiss Oberkochen. Please call Bridge-type coordinate measuring machines are high- or e-mail your contact person for more details. - Page 3 To determine the floor load exerted by chure. Acceleration [mm/ss] 1000 Permissible foundation acceleration for Contura G2 w. trigger probe and standard damping Acceleration values above the curve require an additional foundation X axis horizontal Y axis horizontal...
- Page 4 Acceleration [mm/ss] 1000 Permissible foundation acceleration for Contura G2 measuring with standard damping Acceleration values above the curve require an additional foundation X-axis horizontal Y-axis horizontal Z-axis vertical Frequency [Hz] Page Installation Instructions...
- Page 5 2. Preparation for installation/Re- CMM and the data station, the line power supply must comply with the following specifications. quired connections/Transport/ Storage Line power supply: The following preparations must be made prior to the in- – Line voltage: stallation date: 1/N/PE 100/110/115/120/125/230/240 VAC –...
- Page 6 CZ. Packing materials such as e.g. foils or styrofoam chips ("popcorn") are recycled by Carl Zeiss and 2.8 Compressed Air Supply should be returned to CZ along with the trans-...
- Page 7 2870 2265 2515 16.4 4016 3358 X=1000, Y=2100, Z=600 3280 2265 2515 18.7 5997 5625 CONTURA G2 (opt. granite U-profile) Upper part, X=1000, Y=1200, Z=600 2870 2265 2515 16.4 3092 2795 Upper part, X=1000, Y=1600, Z=600 2845 2110 2515 15.1...
- Page 8 4. CMM Installation Dimensions and Arrangement of Steel Plates 4.1 Installation Dimensions for CONTURA G2 (all dimensions in mm, scale 1:30) Min. overhead clearance: 200 mm Height of secured CMM CONTURA G2 assembly without pallet and X/Y/Z Net weight Max. permissible...
- Page 9 4.2 Installation Dimensions for CONTURA G2 with opt. U-profile (all dimensions in mm, scale 1:30) Min. overhead clearance: 200 mm Height of secured CMM CONTURA G2 with optional U-profile assembly without pallet and X/Y/Z Net weight of Max. permissible without Z tower...
- Page 10 4.3 Installation of Floor Stripe or Chain The entrance to this area should be be clearly marked by a warning sign reading: The dangers posed by the CMM are impossible - or at "Admittance only for authorized personnel" least difficult - for untrained personnel to recognize. For this reason, a restricted-access zone must be set up and may be entered only by persons who have received around the machine to prevent damage or injury caused...
- Page 11 4.4 Arrangement of the Steel Plates for Contura G2 The relative unevenness of the bearing surfaces must not exceed max. 25mm (1“).. The deviation tolerance for the center-to-center plate distance is (A) ±10 mm (all dimensions in mm) CONTURA G2...
- Page 12 5. Dimensions of Granite Table and Fastening Hole Matrix 5.1 Measuring Table for Measuring Range of X=700, Y=700 58,4 Bridge running surface 1189 Bridge drive M12 (16x) Y grid position Meas. range 744,8 544,8 1041 1321 344,8 144,8 X grid position Page Installation Instructions...
- Page 13 5.2 Measuring Table for Measuring Range of X=700, Y=1000 58,4 Bridge running surface 1189 Bridge drive M12 (24x) Y grid position 1144,8 Meas. range 944,8 744,8 1346 1000 1626 544,8 344,8 144,8 X grid position Page Installation Instructions...
- Page 14 5.3 Measuring Table for Measuring Range of X=1000, Y=1200 58,4 Bridge running surface 1492 1000 Bridge drive M12 (42x) Y grid position 1344,8 Meas. range 1144,8 944,8 1545 744,8 1200 1825 544,8 344,8 144,8 1056 1256 X grid position Page Installation Instructions...
- Page 15 5.4 Measuring Table for Measuring Range of X=1000, Y=1600 58,4 Bridge running surface 1492 1000 Bridge drive M12 (54x) Y grid position 1744,8 Meas. range 1544,8 1344,8 1144,8 1945 944,8 2225 1600 744,8 544,8 344,8 144,8 1056 1256 X grid position Page Installation Instructions...
- Page 16 5.5 Measuring Table for Measuring Range of X=1000, Y=2100 58,4 Bridge running surface 1494 1000 Bridge drive M12 (66x) Y grid position Meas. range 2144,8 1944,8 1744,8 1544,8 1344,8 2464 1144,8 2743 2100 944,8 744,8 544,8 344,8 144,8 1056 1256 X grid position Page Installation Instructions...
- Page 17 5.6 Measuring Table with U-Profile for Measuring Range of X=1000, Y=1200 58,4 Bridge running surface 1492 1000 Bridge drive M12 (42x) Y grid position 1344,8 Meas. range 1144,8 944,8 1545 744,8 1825 1200 544,8 344,8 144,8 1056 1256 X grid position Page Installation Instructions...
- Page 18 5.7 Measuring Table with U-Profile for Measuring Range of X=1000, Y=1600 58,4 Bridge running surface 1492 1000 Bridge drive M12 (54x) Y grid position 1744,8 Meas. range 1544,8 1344,8 1144,8 1945 944,8 2225 1600 744,8 544,8 344,8 144,8 1056 1256 X grid position Page Installation Instructions...
- Page 19 5.8 Measuring Table with U-Profile for Measuring Range of X=1000, Y=2100 58,4 Bridge running surface 1494 1000 Bridge drive M12 (66x) Y grid position Meas. range 2144,8 1944,8 1744,8 1544,8 1344,8 2464 1144,8 2743 2100 944,8 744,8 544,8 344,8 144,8 1056 1256 X grid position...
- Page 20 6. Cutout Patterns for Customer Floor Plan 6.1 Cutout Patterns for Contura G2 Scale: 1:30 CONTURA G2 CONTURA G2 CONTURA G2 X=700, Y=700 X=1000, Y=1200 X=1000, Y=1600 CONTURA G2 X=700, Y=1000 CONTURA G2 X=1000, Y=2100 Controller Page Installation Instructions...
Need help?
Do you have a question about the CONTURA G2 and is the answer not in the manual?
Questions and answers