
Related Manuals for Pfeiffer Vacuum adixen DRYTEL 1025 Series


Summary of Contents for Pfeiffer Vacuum adixen DRYTEL 1025 Series
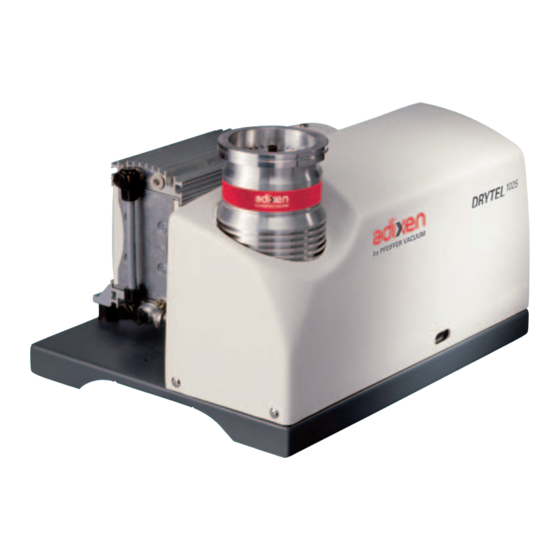
- Page 1 DRYTEL 1025 series Pumping Unit Operating instructions Operating instructions...
- Page 2 DRYTEL 1025 Series pumping unit Welcome You have just purchased a DRYTEL 1025 Series pumping unit. We would like to thank you and are proud to count you among our customers. This product has benefited from adixen’s many years of AMD4 - AMD4C experience in pumping unit design.
- Page 3 DRYTEL 1025 Series pumping unit Advantages • Clean pumping, • Flexibility, reliability and strength, • Compact size and low weight, • Easy maintenance, • Economical solution, • Protection by purges of neutral gas. This product is designed to generate vacuum by pumping on gases, but no liquids neither solids.
- Page 4 Contents MANUAL REFERENCE: 119976 : 05 - 12/2012 DITION Operating instructions Translated from original version DRYTEL 1025 Series Chapter A PRESENTATION A 10 - Drytel 1025 Series presentation A 20 - Drytel 1025 Standard interface description A 21- Drytel 1025C interface description A 30 - Drytel 1025 Series application A 40 - Technical characteristics Drytel 1025 Standard A 41 - Technical characteristics - Drytel 1025C...
- Page 5 Contents MANUAL REFERENCE: 119976 : 05 - 12/2012 DITION Operating instructions Translated from original version DRYTEL 1025 Series Chapter G APPENDIX G 100 - Declaration of conformity G 200 - Service Indicates a potentially hazardous situation which, if not avoided, could result in property damage.
-
Page 6: Main Characteristics
A 10 Drytel 1025 Series presentation Drytel 1025 Series pumping units AMD4 - AMD4C MDP 5011/5011CP AMH020/AMH020C AMD1 DRYTEL 1025 Different products Roughing pump AMD1 or AMD4 available Drytel 1025 High vacuum pump MDP 5011 or AMH020 Options Automatic gas balllast Standard Remote control DN16 exhaust and fitting... - Page 7 A 10 Drytel 1025 Series presentation Using and principle of Drytel 1025 Series pumping units are a combination of vacuum pumps: pumping units - a hybrid or simple turbomolecular secondary pump. - and a multi-stage diaphragm pump. They allow the reduction of pressure of the vessel from atmospheric pressure until low vacuum.
- Page 8 A 20 Drytel 1025 Standard interface description The Drytel 1025 pumping unit is a dry (oil-free) pumping system, Description capable of pumping from atmospheric pressure up to high vacuum pressures. Roughing pump Main board High vacuum pump Converter board Pumping Principle At the high vacuum pump exhaust, the gases are evacuated to the atmosphere by a roughing pump .
- Page 9 A 20 Drytel 1025 Standard interface description Machine/Man interface Male remote control connector (*) Ventilation holes Green indicator light Yellow inicator light Time meter Red indicator light Male mains connector Labels Main switch Voltage Fuse holder Intensity Fuse The operating status of the pumping unit is represented by the three indicator lights.
- Page 10 A 20 Drytel 1025 Standard interface description Automatic air ballast When these condensable gases are pumped, depending on the nature of the pumped gases, pressure and temperature conditions, operating principle they may condense in the dead volumes of the primary pump. Drytel Series When the pumping unit is at low pressure, the roughing pump is at its ultimate pressure.
- Page 11 A 21 Drytel 1025C interface description Description The Drytel 1025C pumping unit is a dry (oil-free) pumping system, capable of pumping from atmospheric pressure up to secondary vacuum pressures. Man/Product Interface Beforehand see section A 20 «Drytel 1025 Standard interface description».
- Page 12 A 21 Drytel 1025C interface description The exhaust of the Drytel 1025C must be connected to an exhaust system or scrubber (customer furnished). The purge of the Drytel 1025C may be connected to the neutral gas supply through a quick disconnect fitting (manual connection) or an DN 16 electromagnetic valve (normally closed) (automatic connection).
- Page 13 A 21 Drytel 1025C interface description The neutral gas connections and the different purges (Cdt.) Rep Description Function Furniture Exhaust purge. The exhaust purge dilutes pumped gases with a inert gas. It makes it possible to limit corrosion, condensation and accumulation of gases in the pipes and accessories connected at the exhaust of the pump.
- Page 14 A 30 Drytel 1025 Series application Gas and vapor The chemical and standard Drytel 1025 are designed for various gases and can be adapted to the application with accessories. pumped The gases pumped can be identify as follow: 1 - neutral or inert, air, nitrogen, CO , rare gases or permanent non reactive gases, 2 - gas containing condensable vapor, gases able to condense them...
-
Page 15: Accessories Description
A 30 Drytel 1025 Series application Accessories The use of specifi c accessories allows the pumping of different vapors and gases. description The purges decrease the reactivity of different gases and vapors. They reduce the concentration of the pumped gases. The gas ballast generates the thermodynamic conditions (tempera- ture and concentration) necessary to avoid condensation or deposits inside the pump. - Page 16 A 30 Drytel 1025 Series application Equipment choice depending on application Pumping units and recommended accessories Points to check Vapor / Gas Safety measures when pumping Neutral or Nothing. Nothing. inert gas Slightly Avoid condensa- Avoid over pressurization at ex- condensable tion.
- Page 17 A 30 Drytel 1025 Series application Pumping units and recommended accessories Points to check Vapor / Gas Safety measures when pumping Oxidizing gas Avoid moisture Dilute the gas in order to reduce its which can create concentration (important). liquid phases and Avoid over pressurization at exhaust destroy the pump and securit it.
-
Page 18: Technical Data
A 40 Technical characteristics - Drytel 1025 Standard Technical data Drytel 1025 Drytel 1025 with MDP 5011 with AMH020 AMD1 AMD4 AMD1 AMD4 CHARACTERISTICS UNIT Ultimate pressure (*) < 1·10 < 1·10 Pumping rate N Pumping rate He Pumping rate H Primary pump pumping rate (50 et 60 H 1.0 / 1.2 3.0 / 3.4... - Page 19 A 40 Technical characteristics - Drytel 1025 Standard Drytel 1025 Drytel 1025 with MDP 5011 with AMH020 AMD1 AMD4 AMD1 AMD4 CHARACTERISTICS UNIT Environmental conditions: Maximum relative humidity 80 % up to 31 °C Maximum relative humidity decreasing until 50 % at 40 °C Use of the product Indoor Ambient operating temperature...
- Page 20 A 40 Technical characteristics - Drytel 1025 Standard Dimensions (inch) Drytel 1025 with AMD1 adixen Vacuum Products - Operating instructions - Drytel 1025 Series...
- Page 21 A 40 Technical characteristics - Drytel 1025 Standard Dimensions (inch) Drytel 1025 with AMD4 adixen Vacuum Products - Operating instructions - Drytel 1025 Series...
-
Page 22: Centre Of Gravity
A 40 Technical characteristics - Drytel 1025 Standard Centre of gravity DRYTEL 1025 X mm (inch) Y mm (inch) Z mm (inch) Roughing pump High vacuum pump MPD 5011 182 (7.18) 162 (6.39) 108 (4.26) MDP 5011 with gas ballast 179 (7.07) 163 (6.41) 107 (4.22) - Page 23 A 41 Technical characteristics - Drytel 1025C Drytel 1025C equipped MDP 5011CP AMH020C Characteristics Unit Ultimate pressure (*) < 1·10 < 1·10 Pumping rate N Pumping rate He Pumping rate H Roughing pump pumping rate 3.4 (50H 3.8 (60 Hz) (50 et 60 H Pumped maximum flow hPa·l/s...
- Page 24 A 41 Technical characteristics - Drytel 1025C Drytel 1025C equipped MDP 5011CP AMH020C Characteristics Unit Environmental conditions: Maximum relative humidity 80 % up to 31 °C Maximum relative humidity decreasing until 50 % at 40 % Indoor Use of the product °C 5 à...
- Page 25 A 41 Technical characteristics - Drytel 1025C Dimensions (inch) adixen Vacuum Products - Operating instructions - Drytel 1025 Series...
-
Page 26: Remote Control
A 50 Drytel 1025 Standard Options Exhaust and fitting DN 16 Exhaust and fitting AMD1 AMD4 It is used to collect pumped gases to prevent them from being discharged into the atmosphere. In this case, the pump has not a silencer and must be connected to the smoke evacuation pipe. - Page 27 A 51 Drytel 1025C Options Remote control The remote control function is use for: Remote control of the On/Off functions - of the roughing pump, - of the high vacuum pump. • Copying the status of indicator lights. B 50 Connecting the remote control connector See section (option).
-
Page 28: Inlet Filter
A 60 Accessories A wide range of connecting accessories are available in the catalog. Inlet filter Prevents the introduction of foreign bodies into the high vacuum pump. AMH020/ AMH020C 5011/5011CP AMH020C DN 63 ISO-KF DN63 CF-F Inlet fi lter screen 063117 102565 102662... - Page 29 A 60 Accessories Gas ballast P/N 110949 AMD1 If the Drytel 1025 gas ballast is inadequate, you can use the gas ballast of the diaphgram pump This gas ballast is settled on the roughing pump and protects it from condensation during the pumping of condensable gases important quantities.
- Page 30 B 10 Safety instructions for pump Indicates a potentially hazardous situation which, if not avoided, could result in property damage. Indicates a potentially hazardous situation which, if not avoided, could result in moderate or minor injury. It may also be used to alert against unsafe practices.
- Page 31 B 10 Safety instructions for pump HANDLING Risk of tilting. Although the product meets EEC safety regulations (topple angle ± 10 °), it is advisable to guard against the risk of tilting during handling, installation, and use. Refer to chapter A of the user’s manual for location of the center of gravity.
- Page 32 B 10 Safety instructions for pump Electric shock hazard. Some components have capacitors charged to over 60VDC. When power is switched off, they keep their charge for a time. Residual voltages from the filter capacitors can cause electric shocks all the way back to the mains plug.
- Page 33 B 10 Safety instructions for pump Make sure that the parts or chambers connected to the inlet of our products withstand a negative pressure of 100 kPa in relation to the atmospheric pressure. The products are factory tested to ensure they will not leak in normal operating conditions.
- Page 34 B 10 Safety instructions for pump Labels stuck on the product This label indicates that some of the internal parts are energized and could cause electrical shocks in case of contact. It advises to disconnect the product before any intervention or to properly lock-out and tag-out the equipment breaker before any intervention.
-
Page 35: Packaging Contents
B 20 Unpacking, storage Precautions Make sure the equipment shows no sign of transport damage. If it has been damaged, take the necessary steps to record this with the carrier and inform the manufacturer. In all cases, we recommend keeping the packaging (reusable materials) for further transport of the equipment or for prolonged storage. - Page 36 B 30 Mechanical connection Drytel 1025 Series Preliminary Read the safety instructions carefully. See section B 10. recommendations Do not expose any part of the human body to vacuum. The product is supplied with the inlet and exhaust sealed. Remove these blanking plates when you are ready to connect the product on your vacuum system.
- Page 37 B 30 Mechanical connection Drytel 1025 Series Make sure that the parts or chambers connected to the inlet of our products withstand a negative pressure of 100 kPa in relation to the atmospheric pressure. The inlet pressure must be no higher than atmospheric pressure. Too high pressure can damage the product.
-
Page 38: Inlet Connection
B 30 Mechanical connection Drytel 1025 Series Drytel connection to the installation: Pumping line connection: it is strongly recommended to secure the inlet housing connection using 4 claw clamps to prevent any safety hazard to the user in standard operating conditions. When the pumping group is integrated into an equipment: use the frame holes provided for this purpose and follow the manufacturer’s advice (see section A40). - Page 39 B 30 Mechanical connection Drytel 1025 Series When pumping on corrosive gas traces, or aggressive gases (chemical model), the gas can cause injury or death. The exhaust of the pump must be connected to an exhaust stack or an evacuation duct. Ensure that all components in the exhaust pipeline have maximum pressure rating which is greater than the highest pressure that can be generated in your system.
-
Page 40: Nitrogen Characteristics
B 31 Inert gas purge connection (N Drytel 1025C The Drytel 1025C is equipped with purge to protect the motor .It is imperative to use this purge because it protects motor and bearing of the high vacuum pump against corrosion. Nitrogen For maximum performances, a filtered dry nitrogen supply with the following characteristics is required:... -
Page 41: Preliminary Recommendations
B 40 Electrical connection Drytel 1025 Series Preliminary Read the safety instructions carefully. See section B 10. recommendations Danger, risk of electric shock. Make sure that main switch is off during electrical connection. Disconnect any main power sources from the product prior to servicing. Ensure that the product is connected to an electrical installation: - in compliance with the local and national safety requirements, - equipped with electrical protection (fuses, circuit breaker, …) which has a... -
Page 42: Electrical Connection
B 40 Electrical connection Drytel 1025 Series Electrical characteristics AMD4/AMD4C AMD1 Voltage Frequency Power Intensity Power Intensity 50/60 Synchronism 50/60 50/60 Starting-up 50/60 Mains voltage check • Check the information on the label beside the mains connector complies with the power line on which the pumping unit is installed. - Page 43 B 40 Electrical connection Drytel 1025 Series We recommend that you fit a separate earth (ground) conductor to earth pump. Use an un-insulated braid or a separate insulated green/yellow conductor with a minimum 9AWG (3mm ) conductor. Use a M4 x 8 screw and a shakeproof washer fitted to the earth hole from the pump to secure the earth conductor to the product.
- Page 44 B 50 Connecting the remote control connector (option) Drytel 1025 Series Preliminary Read carefully the safety instructions. See section B 10. recommendations The internal part of the pumping unit containing the control electronics is equipped with dry contact outputs. When units containing control circuits are equipped with dry contact outputs, it is the responsability of the customer to use these outputs in compliance with extra low voltage installation and security standards.
- Page 45 B 50 Connecting the remote control connector (option) Drytel 1025 Series Wiring and If the pumping unit is used in remote control mode, wire the remote control connector (supplied by customer) according to the diagram installation of remote below, take off the mask (1) and connect it to the male remote control connector control connector (2).
- Page 46 B 50 Connecting the remote control connector (option) Drytel 1025 Series Remote control connector connection Mask (1) Wired plug connector (2) Drytel equipped with remote mode option In local mode, the pumping group can run only if the cover plug (delivered with the product) is fitted on the remote control connector.
- Page 47 B 50 Connecting the remote control connector (option) Drytel 1025 Series If the pumping unit equipped with the remote control option is Plug connector used in local mode, take off the mask (1) and connect the plug connection connector (3) to the male remote control connector. Mask (1) Plug connector (3) adixen Vacuum Products - Operating instructions - Drytel 1025 Series...
- Page 48 B 60 Connection of gas ballast (option) Drytel 1025 Series If the application allows it, the gas ballast can be use with ambient air. But attention, in this case, it puts in relation the circuit of pumping of the pump with the humidity and the oxygen of the ambient air.
- Page 49 C 10 Safety instructions for product use Peliminary Read carefully the safety instructions. See section B 10. recommendations Risk of injury by cutting. The inlet of the pump must not be disconnected as long as the rotor is moving and without having disconnecting the power line cable. Pump damage.
- Page 50 C 10 Safety instructions for product use Risk of cut. The access to the rotor of a turbomolecular pump with an unconnected inlet port is dangerous. In the meantime, if the turbomolecular pump is not switched on, it may be driven by another pump in operation. Always connect the pump inlet port before starting the product.
- Page 51 C 20 Using the pumping unit Drytel 1025 Series in local mode Preliminary Read the safety instructions. See sections C 10. B 10 recommendations Local mode In this type of operation, the pumping unit is completely autonomous in relation to the equipment in which it is installed. In case of Drytel Drytel equipped with remote mode option.
- Page 52 C 20 Using the pumping unit Drytel 1025 Series in local mode Using the automatic See section C 40. gas ballast (option Drytel 1025 Standard) Using purge on Drytel 1025C Purge adjustment • Lets the pumping unit operate for 1 hour to achieve its working temperature.
-
Page 53: Stopping The Unit
C 20 Using the pumping unit Drytel 1025 Series in local mode A technical incident occurs The pumping unit is fault See section D 30. Yellow Green Stopping the unit • Close the shut off valve. pumping • For evacuate completely the pumping gases, let working the pumping unit during 15 to 30 min. -
Page 54: Remote Control Mode
C 30 Using the pumping unit in remote control mode (option) Preliminary B 10 and Read carefully the safety instructions. See sections C 10. recommendations Remote control mode To enable the operation in remote control mode of the pumping unit, it is necessary to wire and connect the remote control connector to the male remote control connector, in accordance with instructions in the section B 50. - Page 55 C 40 Using the automatic gas ballast (option) Procedure Start up phase Start the pumping unit and let it work for 1 hour at ultimate pressure to get its temperature working. Open the automatic gas ballast to increase the pump temperature for 15 minutes.
- Page 56 C 41 Using purges of Drytel 1025C Procedure Start up phase Start the pumping unit and let it work for 1 hour at ultimate pressure to get its temperature working. Open the gas purge. Wait 15 minutes the thermic stabilization. Pump the corrosive gases.
-
Page 57: Maintenance Safety Instructions
D 10 Maintenance safety instructions The outside of the product can be cleaned with a lint free wiper. Avoid using cleaning products that deteriorate printed surfaces and self adhesive labels. All other cleaning operations must be done by our service centers. The overhaul must be performed by manufacturer’s trained personnel. - Page 58 D 10 Maintenance safety instructions Maintenance must be performed by a skilled maintenance operator trained in the relevant health and safety aspects (EMC, electrical hazards, chemical pollution, etc.). Isolate the product from all energy sources (mains electricity, compressed air, water, gas...) before starting work. Electric shock hazard.
- Page 59 D 30 Troubleshootings and remedies Drytel 1025 Series Identification of When a fault appears, the operator is informed by: • the indicator lights status in rear panel of pumping unit, anomalies see section C 20, • the information sent from remote, if the unit is equipped with remote control option, •...
- Page 60 D 30 Troubleshootings and remedies Drytel 1025 Series Symptom Origin / Cause Solution The high vacuum pump is Incorrect power sup- Contact the service centre. not operating. ply. The indicator lights do not come on. The pumping unit has Wait for the pumping heated up.
- Page 61 D 30 Troubleshootings and remedies Drytel 1025 Series Symptom Origin / Cause Solution The high vacuum pump is Lack of grease in the Operate a new running-in C 10 noisy. bearings or the procedure. Drytel is strored a Regrease the bearings. long time.
- Page 62 D 40 Drytel 1025 Series Maintenance frequencies Some maintenance operations require mechanical know-how and must be performed by qualified personnel. In the event of doubt, these operations may be carried out by a service centre. Roughing pump The frequency at which the primary pump depends on the context in which the pumping unit is used.
- Page 63 D 40 Drytel 1025 Series Maintenance frequencies Grease refilling scale In continuous rotation, at limit pressure --- --- --- In cycle 1 hour, at maximum inlet pressure ( MDP 5011/5011CP pump) Refilling period (hours) Stabilisation temperature (°C) Maintenance example MDP 5011/5011CP Stabilisation temperature measurement point Frequency...
- Page 64 E 20 Pumping unit dispatch procedure Before returning the product, fill in the safety form available in appendix of the user’s manual. Attach it to the product before shipping to the service-repair office closest to you. Study the safety instructions related to preventive maintenance D 10.
- Page 65 E 40 Pumping unit maintenance Drytel 1025 Series Preliminary Read the safety instructions. See sections B 10 C 10 D 10. recommendations Screws CHC M6-10 MDP 5011 Support Screws CHC M4-10 AMH020 Support Screws CHC M3-25 Pipe disassembly • Unfasten and remove the M4 -10 4 screws of cover attachment. •...
- Page 66 E 49 AMD4/AMD4C roughing pump replacement Read the safety instructions. See section D 10. Purge Exhaust Inlet Inlet Inlet Inlet Drytel 1025 Standard Drytel 1025C Roughing pump Disconnect any main power sources from product. disassembly - Disconnect the connections 1 . - Remove the main power cord 2 .
- Page 67 E 50 AMD1 roughing pump maintenance Read attentively the safety instructions outlined in section B 10. The tools and maintenance components required are outlined in F 10. section Never use vacuum grease (the grease can react with gases and explode on contact with oxygen), or a not soft lintfree fabric (with lint can disturb the working of the valves).
-
Page 68: Connector Disassembly
E 50 AMD1 roughing pump maintenance Connector disassembly While holding the banjo fitting use the 16 mm flat wrench, unfasten and release the upper connector using the 14 mm flat wrench. Perform the same procedure for the lower connector. Check valves Unscrew and remove the 6 C HC M 5 - 20 casing cover screws. - Page 69 E 50 AMD1 roughing pump maintenance Diaphragm Insert the new diaphragm between the attachment disk and the disk support. reassembly Take care to position the tight side of the diaphragm on the attachment disk side. Lift two opposite sides of the diaphragm so as to insert the attachment disk/diaphragm/support disk in the diaphragm wrench.
- Page 70 E 50 AMD1 roughing pump maintenance Position the new adjusting valve in the head covers. Assembly direction of Position the equipped head covers in their casing housing. the valves on the head covers Take care to observe their position (see photo). Position the casing cover on the casing, shaking it slightly to ensure that the head covers are positioned correctly.
- Page 71 E 51 AMD4 roughing pump maintenance Read attentively the safety instructions outlined in section B 10. The tools and maintenance components required are outlined in section F 10. Never use vacuum grease (the grease can react with gases and explode on contact with oxygen).
-
Page 72: Cleaning And Inspecting The Pump Heads
E 51 AMD4 roughing pump maintenance Cleaning and • To check the valves use a hex key to remove socket-head screws from the pump head and remove the housing cover with head inspecting the pump cover, valves and O-rings. heads Never remove parts by using a spiky or sharp-edged tool (e.g. -
Page 73: Assembling Pump Heads
E 51 AMD4 roughing pump maintenance Replacing the Position the new diaphragm between the diaphragm clamping disc with square head screw and the diaphragm support disc. diaphragm (cdt) Make sure that the square head screw of the diaphragm clamping disc is correctly seated in the guide hole of the diaphragm support disc. - Page 74 E 51 AMD4 roughing pump maintenance Assembling pump • Install head cover, valves, O’rings and housing cover. heads (Cdt) Make sure that the diaphragm stays positioned and centred so that it will become clamped uniformly between housing and head cover. •...
-
Page 75: Change Fuse
E 51 AMD4 roughing pump maintenance Change fuse The replacing of the device fuse has to be carried out by a certified electrician. Switch off the pump and disconnect it from mains before opening the terminal box. After disconnecting from mains wait two minutes to allow the capacitors to discharge. -
Page 76: Breakdown View
E 52 AMD4C roughing pump maintenance Read attentively the safety instructions outlined in sheet The tools and maintenance components required are outlined in a chapter F 10. Breakdown view cylinder pin/mark fillister head screw connecting rod o-ring housing valve washer valve head diaphragm support disc hose nozzle... - Page 77 E 52 AMD4C roughing pump maintenance Never use vacuum grease (the grease can react with gases and explode on contact with oxygen). Use a lint fabric (lint can disturb the working of the valves). Use petroleum ether or industrial solvent to remove deposits. Do not inhale.
- Page 78 E 52 AMD4C roughing pump maintenance Apply screw driver as shown and turn. Replacing the diaphragm Disassemble head covers to check the diaphragm. Unscrew eight socket head screws with a hex key size 5 and remove both head covers together with valve heads and connections.
-
Page 79: Replacing The Valves
E 52 AMD4C roughing pump maintenance Position new diaphragm between diaphragm clamping disc with square head screw and diaphragm support disc. Attention: Position diaphragm with pale side towards diaphragm clamping disc (to pump chamber). Make sure that the square head screw of the diaphragm clamping disc is correctly seated in the guide hole of the diaphragm support disc. - Page 80 E 52 AMD4C roughing pump maintenance Loosen the clamping brackets on the valve heads. Unscrew at each clamping bracket the two countersunk screws with a Torx screw driver TX20. Remove the clamping brackets. Remove valve heads conjointly with disc springs, connection tube if applicable, hose nozzles and connection fasteners or move the valve heads carefully aside.
- Page 81 E 52 AMD4C roughing pump maintenance Position valve heads, if applicable with hose nozzle, connection tube or connection fastener, and disc springs on the valve seats. Position disc springs with camber upwards. Pay attention to the correct orientation of the valve heads. Centre the valve head with respect to the valve seat.
- Page 82 E 52 AMD4C roughing pump maintenance Slide the head cover cowling in the grooves of the blinds and under the connection fasteners. Install the washers. Use a Torx screw driver TX20 to screw in the 4 screws fixating the head cover cowling. Tighten the fillister head screws of the connection fasteners with a Torx screw driver TX20.
-
Page 83: Replacing The Device Fuse
E 52 AMD4C roughing pump maintenance Replacing the device fuse The replacing of the device fuse has to be carried out by a certified electrician. Switch off the pump and disconnect it from mains before opening the terminal box. After disconnecting from mains wait two minutes to allow the capacitors to discharge. -
Page 84: Greasing Procedure
E 60 MDP 5011/5011CP pump lubrication The first greasing required for the correct operation of the secondary pump is performed in the factory. Subsequent regreasings should be carried out according to the procedure below, according to a frequency defined according to the processes used. - Page 85 E 60 MDP 5011/5011CP pump lubrication RELUBRICATION PROCESS Bearing near the “pumping cell” Bearing opposite the “pumping cell” Black adixen Vacuum Products - Operating instructions - Drytel 1025 Series...
- Page 86 E 60 MDP 5011/5011CP pump lubrication Refilling with grease Greasing the bearing • Introduce the syringe equipped with its needle into a hole of the ring (4) and remove the red jump. opposite the pumping cell • Distribute the dose of grease in 2 diametrically opposed points, until the syringe plunger comes to a stop against the black jumper.
- Page 87 E 70 Starting up the MDP 5011/5011CP pump after refilling the bearings with grease After refilling the bearings with grease, it is essential to observe the different phases of the start-up procedure. Running in cycle Replace the vacuum pump on the pumping group in following the instructionsi opposite order of dismantling ( E 40) with the various connections.
- Page 88 E 70 Starting up the MDP 5011/5011CP pump after refilling the bearings with grease Second phase After completing the first phase, seal the secondary pump intake and perform the following running-in cycles (the second phase is carried out in a vacuum): Put the roughing pump switch on 1 (start-up).
- Page 89 F 000 Spare parts - Instructions of use Replacement of parts Our products are designed to comply with current EC regulations and guarantee optimal operating conditions with and use of non genuine maximum safety conditions for the user. parts Any modification of the product made by the user is liable to lead to non-compliance with the regulations, or even to put into doubt the performance of the product and the user’s safety.
- Page 90 F 10 Spare parts for first level of maintenance User’s manuals Description AMD1 - ADM4 - AMD4C Primary pump 109443 AMH020/AMH020C High vacuum pump 108912 MDP 5011/MDP 5011C High vacuum pump 062199 Tool Description Seal extractor (specifi c tool) 063285 Diaphragm wrench for AMD4 (specifi...
- Page 91 F 10 Spare parts for first level of maintenance Seal washer Description AMD1 AMD4/AMD4C Seal washer 109528 106027 P/N in the stores Stainless steel seal BS 1/8” BS 1/4” AMD1 AMD4 Clamping torque 11 N·m 21 N·m Silencer Description AMD1 AMD4 Silencer 114494...
- Page 92 F 10 Spare parts for first level of maintenance AMD4C AMD4C Maintenance Kit P/N118938 Diaphragm Valve O’ring 28 x 1.5 Keep this kit in a dry place, away from heat and light (sunlight and ultraviolet light), in order to prevent any hardening of the elastomers (see AFNOR standards : «storage conditions for vulcanized elastomer based products»...
- Page 93 F 10 Spare parts for first level of maintenance Chemical high vacuum pump spare part Reducer MDP5011CP AMH020C Purges and connectors N° Description N° Description Flow reducer DN16 25 sccm 066950 DN16 elbow tube connector A464716 Flow reducer DN16 50 sscm 066752 DN 16 G1-8 blank off flange A461897...
- Page 94 G 100 Declaration of conformity adixen Vacuum Products - Operating instructions - Drytel 1025 Series...
- Page 95 Fill out the «Service Request» form and send it by fax or e-mail to your Pfeiffer Vacuumservice address. Include the confirmation on the service request from Pfeiffer Vacuum with your shipment. Fill out the declaration of contamination and include it in the shipment (mandatory!).
- Page 96 Vacuum Solutions Vacuum Solutions Pfeiffer Vacuum stands for innovative and custom vacuum Pfeiffer Vacuum stands for innovative and custom vacuum solutions worldwide, technological perfection, competent advice solutions worldwide, technological perfection, competent advice from a single Source from a single Source and reliable service.
Need help?
Do you have a question about the adixen DRYTEL 1025 Series and is the answer not in the manual?
Questions and answers